Chapter 8 Restorative Dentistry
GENERAL COMMENTS
CLASSIFICATION OF LESIONS
Classification by Location of Lesion
Caries Classification
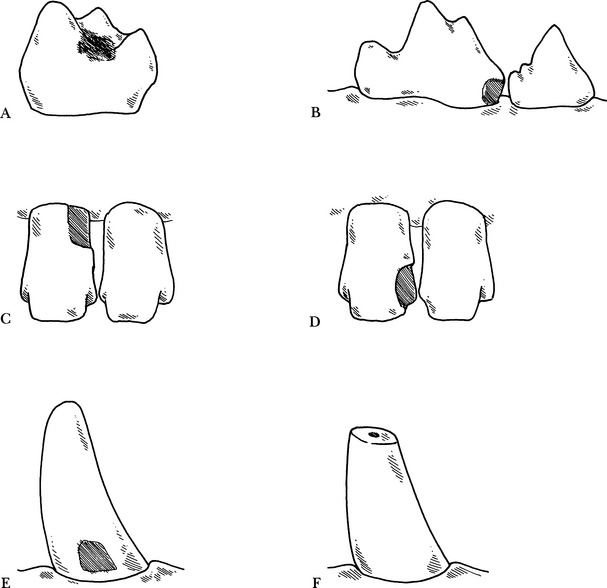
Classification by Extent of Fracture
Table 8-1 FRACTURE CLASSIFICATION (BASRANI2)
| Class A1 | Crown fracture, enamel only |
| Class A2a | Crown fracture, enamel and dentin |
| Class A2b | Crown fracture into enamel, dentin, and exposing the pulp tissue |
| Class B | Crown fracture involving the root only |
| Class C | Crown and root fracture involving crown and root |
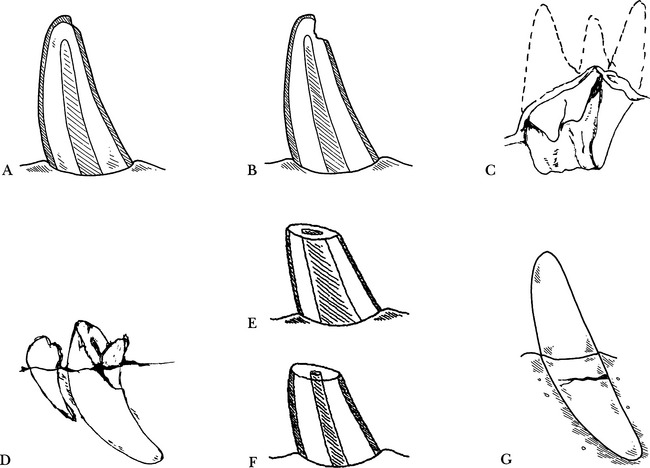
Table 8-2 FRACTURE SEVERITY INDEX
| Class 1 | FX1 | Fracture into enamel only |
| Class 2a | FX2a | Fracture into enamel and dentin only; no pulp exposure or root involvement |
| Class 2b | FX2b | Fracture into enamel and dentin with root involvement; no pulp exposure |
| Class 3a | FX3a | Fracture into enamel, dentin, and with pulp exposure; no involvement of root |
| Class 3b | FX3b | Fracture into enamel, dentin, and with pulp exposure and root involvement |
| Class 4 | FX4 | Fracture of the root only; crown intact |
Class 1
Treatment
Class 2a
Class 2b
Treatment
Dog
Class 3b
Treatment
Young animal (younger than 1½ years)
Older animal (older than 1½ years)
Class 4
GENERAL RESTORATIVE TECHNIQUES
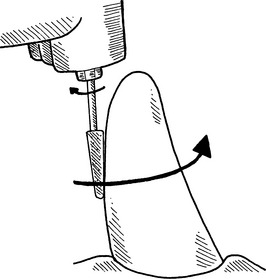
Cutting Techniques
Cavity Preparation Techniques
RESTORATIVE MATERIALS
General Comments
Composite Resins
General Comments
Technique
Step 1—Preparation of the Surface
Substep 1—Prepare the filling site, considering the following:
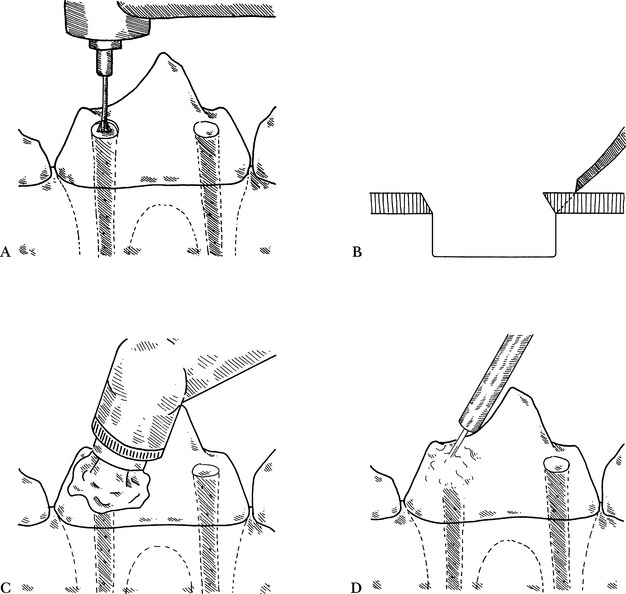
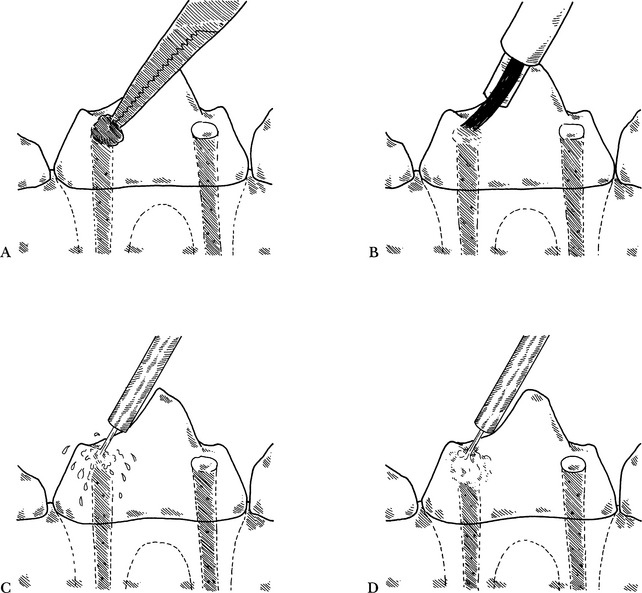
Substep 2—Clean the surface using a prophy cup and flour pumice (not prophy paste, which may contain fluoride and glycerin) (Fig. 8-4, C).
Substep 3—Wash the surface with water and air dry (Fig. 8-4, D).
Substep 4—Acid-etch the enamel with 38% to 50% phosphoric acid solution or gel for 15 to 20 seconds, according to manufacturer’s instructions. Either a sponge (Fig. 8-5, A) or a brush (Fig. 8-5, B) may be used. Gel etchant can be placed with a small blunt needle and does not need to be applied with a brush or sponge.
Substep 5—Wash the surface with water for 10 to 20 seconds (Fig. 8-5, C).
Substep 6—Air dry the surface (5 seconds) (Fig. 8-5, D).
Step 2—Application of the Bonding Agent: Chemical Cure (Light-Cure Gun Not Available)
| Chemical-Cured Bonding Agents | ||
| Product | Manufacturer | |
| Bonding Agent Self Cure | Dentsply Caulk | |
| Etch-Prep | Henry Schein | |
| Clearfil New Bond | Kuraray America | |
| Encore Bond | Centrix | |
| Dentin Bonding Agents | ||
| Product | Manufacturer | |
| All Bond 2 | Bisco | |
| Clearfil Line Bond 2V | Kuraray America | |
| DenTASTIC | Pulpdent | |
| Gluma Solid Bond | Heraeus Kulzer | |
| OptiBond | Kerr | |
| OptiBond FL | Kerr | |
| Scotchbond Multi Purpose | 3M ESPE | |
| Tenure | Den-Mat | |
| Syntac | Ivoclar Vivadent | |
| One Up Bond F | Morita | |
| ProBond | Dentsply Caulk | |
| PermaQuick | Ultradent | |
| Wet Bond | Mirage Dental | |
| Systems/Chameleon Dental Products | ||
| Dual-Cure Bonding Agents | ||
| Product | Manufacturer | |
| Scotchbond Multipurpose Plus | 3M ESPE | |
| DenTASTIC Uno Duo | Pulpdent | |
| Clearfil Photo Bond | Kuraray America | |
| OptiBond Solo Plus Dual Cure | Kerr | |
| Prime & Bond NT | Dentsply Caulk | |
| Multibond | Centrix | |
| Bond-It | Pentron Clinical | |
| Technologies | ||
| Single-Step Bonding Agents | ||
| Product | Manufacturer | |
| DenTASTIC Uno | Pulpdent | |
| Excite Advanced Adhesive Technology | Ivoclar Vivadent | |
| OptiBond Solo Plus | Kerr | |
| One-Step | Bisco | |
| One-Step Plus | Bisco | |
| Single Bond | 3M ESPE | |
| Syntac Single Component | Ivoclar Vivadent | |
| Gluma Comfort Bond | Heraeus Kulzer | |
| Clearfil SE Bond | Kuraray America | |
| Tenure, UniBond | Den-Mat | |
| Xeno | Dentsply Caulk | |
| PQ1 | Ultradent | |
| Prime One | Mirage Dental | |
| Systems/Chameleon | ||
| Dental Products | ||
| Bond-1 | Pentron, Clinical | |
| Technologies | ||
Substep 1—Drop(s) of bonding agent solution A are placed in a dappen dish (Fig. 8-6, A).
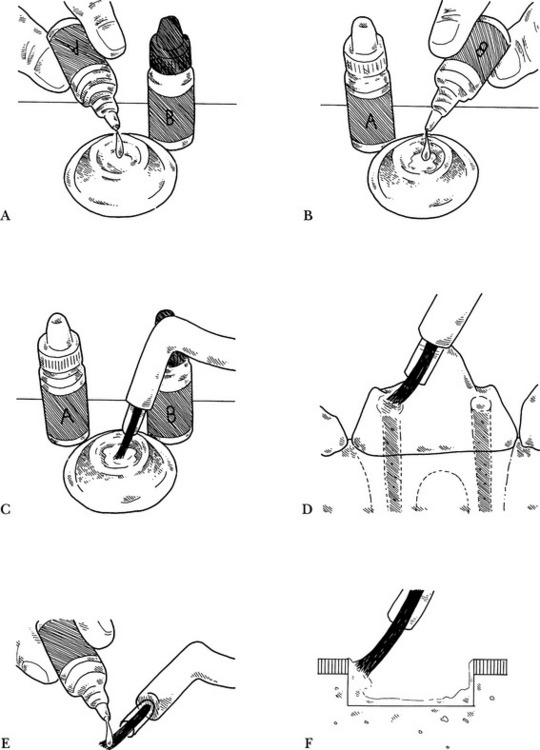
Substep 2—Bonding agent solution B is added to the same dappen dish (Fig. 8-6, B). Exact proportions of the two solutions are determined by the manufacturer’s recommendations. The solutions are mixed with a brush (Fig. 8-6, C).
Substep 3—A thin coat of bonding agent is applied to the prepared surface (Fig. 8-6, D).
Substep 5—The unfilled resin is placed on a brush (Fig. 8-6, E) and is brushed onto the tooth (Fig. 8-6, F).
Step 3—Application of the Restorative Agent: Chemical Cure (Light-Cure Gun Not Available)
Table 8-4 CHEMICAL-CURED COMPOSITE RESINS
| Conventional Fillers | |
| Product | Manufacturer |
| Concise | 3M ESPE |
| Composite/radiopaque | Henry Schein |
| Hybrid Fillers | |
| Product | Manufacturer |
| P10 | 3M ESPE |
| Marathon (hybrid) | Den-Mat |
| CR Hybrid | Centrix |
| Bisfil II | Bisco |
| Core Materials | |
| Product | Manufacturer |
| Clearfil Core | Kuraray America |
| Core Paste | Den-Mat |
| Encore | Centrix |
| Core Material | Henry Schein |
| CompCore | Premier |
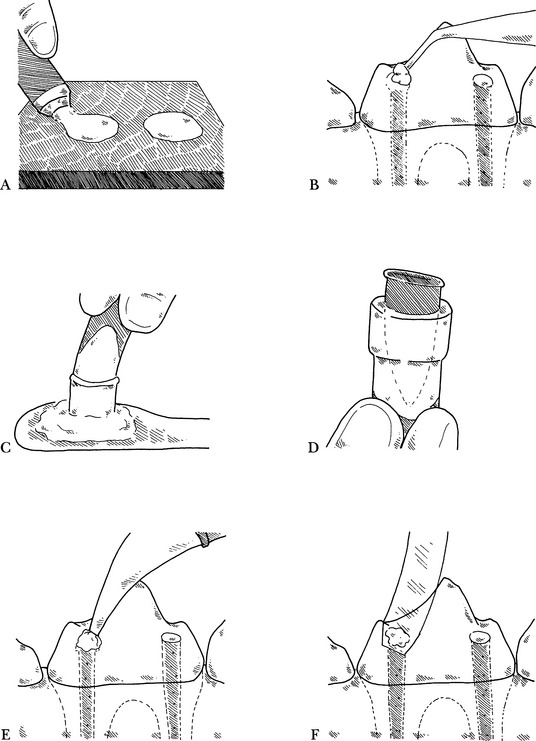
Substep 1—Equal portions of the filled resin are placed on a mixing slab (Fig. 8-7, A).
Substep 2—The restorative material is mixed in a figure-of-eight motion using a plastic spatula.
Substep 3—The mixed resin is transferred to the site with a plastic filling instrument (Fig. 8-7, B).
Substep 4 (Optional)—A Mylar strip is placed over the site to conform the material better to the tooth shape and to compact the material, lessening the chance of leaving an internal void (Fig. 8-7, F).
Step 2—Application of the Bonding Agent: Light Cure (Light-Cure Gun Available)
Substep 1—The dentin primer is applied with a brush to the prepared surface.
Substep 4—The bonding resin is light cured for 10 to 20 seconds.
Step 3—Application of the Restorative Agent (Light-Cure Gun Available)
General comments
Table 8-5 LIGHT-CURE RESTORATIVE MATERIALS
| Light-Cure Microfil Composites | |
| Product | Manufacturer |
| Durafill VS | Heraeus Kulzer |
| Amelogen Microfil | Ultradent |
| Renamel Microfil | Cosmedent |
| Esthet-X Micro Matrix Restorative | Dentsply Caulk |
| HelioProgress | Ivoclar Vivadent |
| Filtek A110 | 3M ESPE |
| Micronew | Bisco |
| Virtuoso Sculptable | Den-Mat |
| Light-Cure Hybrid Composites | |
| Product | Manufacturer |
| Charisma | Heraeus Kulzer |
| Tetric | Ivoclar Vivadent |
| Herculite XR | Kerr |
| Herculite XRV | Kerr |
| Prodigy | Kerr |
| Amelogen Universal | Ultradent |
| Z100 | 3M ESPE |
| Filtek Z250 | 3M ESPE |
| Prisma APH | Dentsply Caulk |
| Prisma TPH | Dentsply Caulk |
| Clearfil ST Opaquer | Kuraray America |
| Clearfil AP-X | Kuraray America |
| Renew | Bisco |
| Aelite LS | Bisco |
| Versalite | Centrix |
| True Vitality | Den-Mat |
| Vit-1-escence Syringes | Ultradent |
| Simile | Pentron Clinical Technologies |
| Flowable Composites | |
| Product | Manufacturer |
| Aeliteflo | Bisco |
| Tetric Flow | Ivoclar Vivadent |
| Starflow | Danville Materials |
| Esthet-X Flow | Dentsply Caulk |
| Flow-It | Pentron Clinical Technologies |
| Filtek Flow | 3M ESPE |
| Flow Line | Hereaus Kulzer |
| Heliomolar Flow | Ivoclar Vivadent |
| Point 4 Flowable | Kerr |
| Revolution Formula 2 | Kerr |
| PermaFlo | Ultradent |
| PermaFlo DC | Ultradent |
| Flows-Rite | Pulpdent |
| Versaflo | Centrix |
| Virtuoso Flowable | Den-Mat |
| Compactable Composites | |
| Product | Manufacturer |
| Pyramid | Bisco |
| Filtek P-60 | 3M ESPE |
| SureFil | Denstply Caulk |
| Alert | Pentron Clinical |
| Technologies | |
| Prodigy Condensable | Kerr |
| Solitare 2 | Heraeus Kulzer |
| Heliomolar HB | Ivoclar Vivadent |
| Virtuoso Packable | Den-Mat |
| Compomers | |
| Product | Manufacturer |
| F2000 | 3M ESPE |
| Dyract AP | Dentsply Caulk |
| Dyract Flow | Dentsply Caulk |
| Compoglass F | Ivoclar Vivadent |
| Light-Cure or Dual-Cure Composite Core Materials | |
| Product | Manufacturer |
| Clearfil Photo Core | Kuraray America |
| Core Restore 2 | Kerr |
| Encore Supercure | Centrix |
| FluoroCore | Dentsply Caulk |
| HardCore | Pulpdent |
| ParaPost, ParaCore | Coltene/Whaledent |
| HardCore | Pulpdent |
| Bisfil Core | Bisco |
| Bis-Core (dual cure) | Bisco |
Light-cure technique
Substep 1—The filled resin is dispensed from the syringe onto a plastic working instrument (Fig. 8-8, A). Some products come with small ampules of filled resin and an injection syringe. This material can be deposited directly into the cavity preparation.
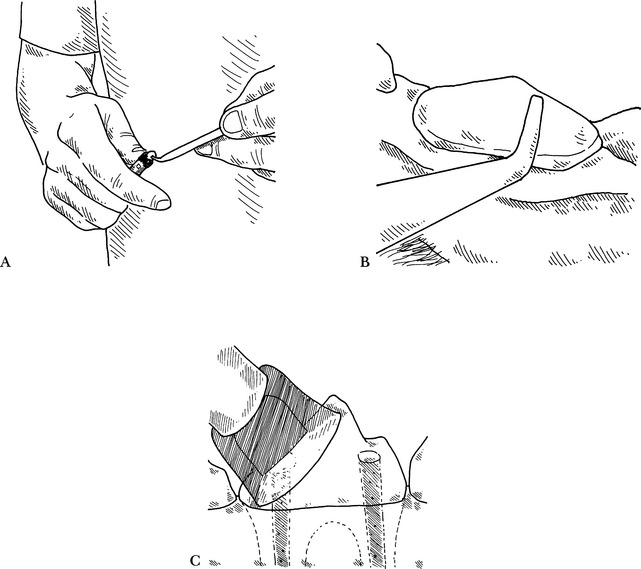
Substep 2—The filled resin is applied to the prepared surface (Fig. 8-8, B).
Substep 3—The restorative material is shaped with a plastic working instrument.
Substep 5—The filled resin is hardened with a light-cure gun (Fig. 8-8, C). Hold the tip of the light source within 3 to 4 mm of the surface and cure the restorative material for 30 to 70 seconds, according to the manufacturer’s instructions. The time necessary will vary depending on the darkness of the shade, the thickness of the restoration, the product used, and the strength of the cure light. The thickness of restorative material should be no more than 2 mm at a time without curing to minimize polymerization shrinkage. Large restorations may need to be cured from several directions and have smaller increments placed in sequential layers and cured incrementally to minimize polymerization shrinkage.
Dual-cure technique
Substep 1—Equal portions of the filled resin are placed on a slab.
Substep 2—The restorative material is spatulated to a homogeneous consistency.
Substep 4—The restorative material is shaped with a plastic working instrument.
Substep 5 (Optional)—A Mylar strip is pulled tightly over the filling material.
Complications and cautions
Step 4—Shaping the Hardened Restoration
Step 5—Smoothing the Restoration
Abrasive discs
Description
Nonadhesive strips
Description
Advantages
Complications
Glass Ionomers
General Comments
Table 8-6 GLASS IONOMER RESTORATIVE MATERIALS
| Type I: Luting or Cementing | |
| Product | Manufacturer |
| CX-Plus GlasIonomer Cement | Shofu |
| Fuji 1 | GC America |
| FujiCEM | GC America |
| Ketac-Cem | 3M ESPE |
| Vivaglass Cem | Ivoclar Vivadent |
| GlassLute | Pulpdent |
| Type II: Core | |
| Product | Manufacturer |
| Ketac Silver Applicap | 3M ESPE |
| Ketac-Silver Maxicap | 3M ESPE |
| Miracle Mix | GC America |
| Fuji II LC Core Material | GC America |
| EMKA Silver | Henry Schein |
| CoreShade | Shofu |
| Vitremer Core Buildup | 3M ESPE |
| GlassCore | Pulpdent |
| Type II: Lining | |
| Product | Manufacturer |
| FujiPlus | GC America |
| Fuji Lining LC | GC America |
| Ketac-Bond | 3M ESPE |
| Ketac-Bond, Applicap | 3M ESPE |
| Vitrebond | 3M ESPE |
| RelyX | 3M ESPE |
| GlassLine | Pulpdent |
| Type II: Restorative | |
| Product | Manufacturer |
| Fuji II | GC America |
| Fuji II LC | GC America |
| Fuji IX GP | GC America |
| Ketac-Fil Applicap | 3M ESPE |
| Ketac-Molar Applicap | 3M ESPE |
| Photac-Fil Quick Applicap | 3M ESPE |
| Geristore | Den-Mat |
| GlassFill | Pulpdent |


