Fig. 1.
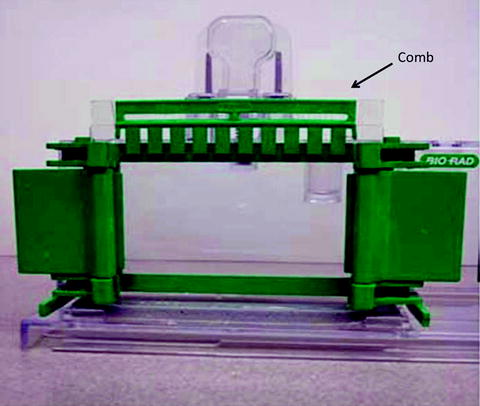
The setup of the polyacrylamide gel caster.
2.
The percentage of the resolving gel needed is dependent on the size of the proteins of interest. The following table provides some guidance to the most suitable percentage gel for your needs.
Acrylamide percentage (%) | Size of proteins (kDa) |
|---|---|
15 | 15–45 |
12 | 15–65 |
10 | 20–75 |
8 | 30–120 |
3.
Typically, 10 ml of the resolving gel mixture is needed to cast at least one gel. The recipes for the different percentage cell mixture is as follows:
30% Acrylamide mix (ml) | 1.5 M Tris (pH 8.8) (ml) | 10% SDS (μl) | H2O (ml) | 10% APS (μl) | TEMED (μl) | |
8% | 2.7 | 2.5 | 100 | 4.6 | 100 | 10 |
10% | 3.3 | 2.5 | 100 | 4.0 | 100 | 10 |
12% | 4.0 | 2.5 | 100 | 3.3 | 100 | 10 |
15% | 5.0 | 2.5 | 100 | 2.3 | 100 | 10 |
4.
Pour the resolving gel mixture into the space between the two glass plates less than 1.5 cm below the top of the longer glass plate. Then layer 100% ethanol onto the gel mixture interface to minimize its contact to air and facilitate the polymerization.
5.
After the resolving gel is set, the ethanol is pour out and the interface is rinse once with water. Drain the excess water before pouring the stacking gel mixture on top of the resolving gel. The recipe of the stacking gel mixture (4 ml) is as follows:
30% Acrylamide mix | 1.0 M Tris (pH 6.8) | 10% SDS | H2O | 10% APS | TEMED | |
Stacking gel | 0.67 ml | 0.55 ml | 50 μl | 2.7 ml | 30 μl | 3 μl |
6.
Immediately after the stacking gel mixture is pour on top of the resolving gel, the sample comb is inserted into the stacking gel mixture to form sample wells as shown in Fig. 2.


Fig. 2.
Casting of a polyacrylamide gel with the comb defining the sample lanes.
7.
The stacking gel is allowed to polymerize for 15 min.
8.
Meanwhile, samples of equal total amount of the proteins are normalized to the same concentration by adding Lysis Buffer. Then, each sample is added with an appropriate amount of 4× Sample Buffer before heating it to 95°C. This will enhance protein denaturation and SDS to surround all proteins. Afterward, the samples are ready for loading onto the gel.
9.
Once the stacking gel is set, the comb is removed giving rise to wells where the samples are to be loaded. One of the well is reserve for prestained markers to enable the estimation of protein sizes.
10.
Once the samples and prestained markers are loaded, protein resolution begins as soon as the Protean system is connected to the power supply and a voltage of 80–100 V is applied.
11.
Not only the Sample Buffer provides the denaturing environment for the proteins, but the bromophenol blue also provides the dye front to indicate how far along the resolved proteins have travelled to. So, when the bromophenol blue has reached the end of the polyacrylamide gel, the voltage is stopped.
12.
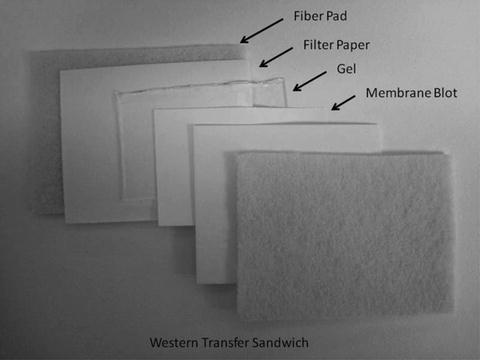
The gel is then removed from the Protean II system and placed onto a piece of blotting paper prewet with Transfer Buffer. A piece of prewet nitrocellulose or PDVF membrane is placed on top of the gel followed by another piece of prewet blotting paper. This sandwich is further flanked by two pieces of fiber pads before placing it into the transfer cassette of the Bio-Rad Transfer System. Complete anatomy of the Western Transfer sandwich is shown in Fig. 3.


Fig. 3.
The anatomy of a Western Transfer sandwich.
13.
The transfer cassette is inserted into the electrode assembly before placing it into the transfer tank. Attach the electrodes and set the power supply to 50 mA at constant current to transfer over night. Alternatively the power supply can be set to 100 V at constant voltage to transfer for 1 h. Please consult the Instruction Manual when other systems are used.
Part 2
1.
Upon completion of the transfer, the membrane is removed from the assembly and is placed into the Blocking Buffer for at least 1 h.
2.
Dilute the primary antibody in 3% nonfat milk solution in TBST and incubate at room temperature for at least 2 h. Nevertheless, the optimum duration and dilution factor is dependent on the potency and efficacy of the antibody. If primary antibody is to be incubated overnight, then it should be at 4°C to prevent bacteria, fungi, and mold contamination.
3.
Then, the membrane is washed for 5 min in TBST consecutively for at least three times.
4.
After the washes, the membrane is to be incubated with the appropriate secondary antibody (one that recognizes the specific species of the primary antibody). The optimal dilution of the secondary antibody is also dependent on the source of the antibody. Typically, 1-h incubation at room temperature would suffice.
5.
Again, the membrane is washed for 5 min in TBST consecutively for at least three times.
6.
After the washes, the membrane is then subjected to a chemiluminiscent system enabling the HRP conjugated onto the secondary antibody to react with its substrate to generate chemiluminiscence. The actual procedure may differ based on the commercial source of the system.
7.
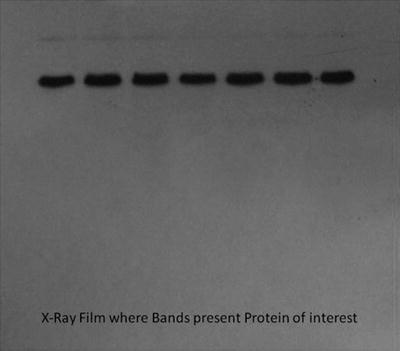
The chemiluminiscence is detected by exposure to X-ray film in the dark room. The protein of interest is indicated as bands on the developed film as follows with the intensity reflecting its quantity in the sample as shown in Fig. 4.


Fig. 4.
The bands on the X-ray film indicating specific protein of interest.
3.3 Variations
What is outlined above is called the SDS-PAGE where all the proteins are denatured and surrounded by SDS. Hence, the resolution of the proteins is based solely on the size of the proteins. Nevertheless, a variation of this is the native PAGE where SDS is removed from the PAGE, the Running Buffer as well as the Sample Buffer. In cases where nonreducing native PAGE is preferred, the 2-mercaptoethanol is also removed from the Sample Buffer. Under such circumstances, proteins are resolved based on their shape and charges. The advantage of native PAGE is in the study of protein complexes where each complex resolves as individual entities. Consequently, we can determine whether the protein of interest exists on its own or as part of a complex under physiological conditions.
4 Electrophoretic Mobility Shift Assay
EMSA is an assay developed to examine the association between DNA or RNA fragments and specific proteins. In many studies, this method is used mainly to study key bases on the DNA or RNA fragments that alter their binding affinity to protein(s).
4.1 Material and Instruments
4.1.1 Materials
1.
Binding Buffer (5 mM HEPES pH 8.0, 85 mM KCl, 0.5% NP-40, and protease inhibitor cocktail)
2.
Random prime labeling kit (Invitrogen) for labeling the DNA or RNA fragments
3.
Purified protein known to associate with this DNA or RNA fragment
4.
Purified protein(s) of interest
5.
[α-P32]dCTP
4.1.2 Instruments
1.
Water bath
2.


Geiger counter
< div class='tao-gold-member'>
Only gold members can continue reading. Log In or Register to continue
Stay updated, free articles. Join our Telegram channel

Full access? Get Clinical Tree


