Fig. 1
Mouse board for cremaster muscle intravital microscopy. The board should be maintained in a constant temperature (36.5–37.5 °C) with a heating system. There are two areas in the tray: the warmed plate and the cremaster muscle pedestal. Mouse should be placed in the warmed area, while the cremaster should be externalized and fixed in the cremaster muscle pedestal. The warmed bicarbonate-buffered salt solution should be perfused directly to the cremaster, keeping the muscle wet during the whole study
4.
Common materials and buffers: all the materials and solutions are prepared under sterile conditions.
(a)
Mouse anesthesia is a mixture of xylazine hydrochloride at the dose 10 mg/kg and ketamine hydrochloride 200 mg/kg.
(b)
Sterile water.
(c)
Sterile physiological saline solution: 0.9 % NaCl.
(d)
Sterile bicarbonate-buffered salt solution (BBS): 131.9 mM NaCl, 4.7 mM KCl, 1.2 mM MgSO4, 20 mM NaHCO3, 2.0 mM CaCl2, pH 7.4. The buffer is bubbled with a 95 % N2/5 % CO2 gas mixture to reduce the oxygen tension to the physiological level (40–50 mmHg).
5.
Surgical materials:
(a)
A pair of sharp-tip tweezers and a small surgical scissors.
(b)
Triangular suture needle.
6.
Sterile gauze pads.
7.
1 ml syringe with 25-gauge needles.
8.
Thermocautery.
9.
Water-resistant surgical tape.
10.
Male mice.
11.
Electric razor.
12.
Optical Doppler velocimeter (Microcirculation Research Institute, Texas A&M University, College Station, Texas).
13.
Video caliper to measure vessel diameter (e.g., Microcirculation Research Institute, Texas A&M University, College Station, Texas).
3 Methods
3.1 Surgical Procedure to Access Mouse Cremaster Muscle (Fig. 2)
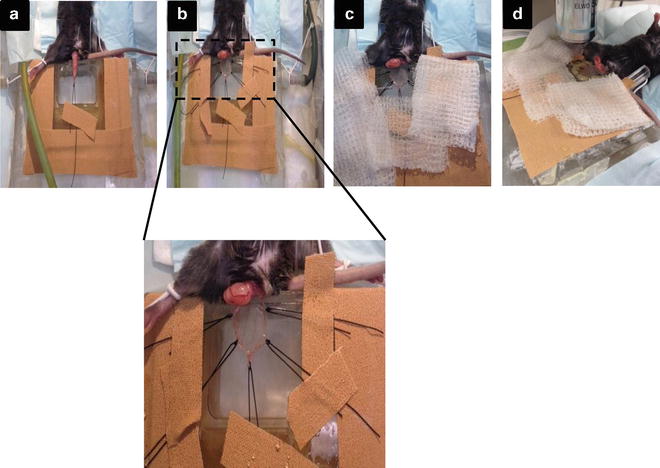
Fig. 2
Main steps during the cremaster muscle surgery. (a) Externalization of the testicle and fixation of the apex to the board. (b) Exposure of the cremaster muscle and fixation with five stitches to the board, to create a surface as flat as possible (suture at least with 3–5 stitches). (c) The preparation must be kept moistened constantly with sterile bicarbonate-buffered salt solution. (d) Visualization under the microscope using the 40× objective
1.
Anesthetize a male mouse by intraperitoneal injection of a mixture of xylazine hydrochloride (10 mg/kg) and ketamine hydrochloride (200 mg/kg).
2.
Shave the testicle area, legs, and lower abdomen, using an electric razor.
4.
Place the animal in a supine position on the surgery tray taking into account that surgical tape pad should be located close to the cremaster muscle pedestal (area of the plate specially designed for the visualization of the cremaster muscle).
5.
Extend each leg of the animal, separating them as much as possible to have enough space to facilitate the manipulation of the testis and exteriorize the cremaster muscle (see Note 5 ). Fix them to the plate using water-resistant surgical tape.
7.
Hold with tweezers the skin testicle apex and use small scissors to make a tangential incision of 1 cm until visualizing the round white tissue that corresponds to epididymis (see Note 7 ).
8.
9.
Take the end of the scrotal sac with suture and pull it up to exteriorize the testicle completely.
11.
Recognize the prolongation of the femoral artery and iliac vein in the cremaster muscle (see Note 10 ).
12.
Pin the apex of the cremaster muscle using a suture.
13.
Tension the suture that has been inserted in the apex until the testicle is externalized and longitudinally extended onto an optical clear viewing pedestal.
14.
Make a small incision with a thermocautery without touching the main vessels.
15.
Extend the initial incision using the thermocautery longitudinally along the line drawn by the prolongation of the femoral artery and the iliac vein, until reaching the base of the testicle.
16.
Open the cremaster sac carefully with tweezers until the testicle and epididymis are visualized.


