Fig. 1
PET/CT scanner and different equipment needed for anesthesia, injection of CT contrast agent, and temperature control
3.
Animal bed (the bed support should integrate a mask for the anesthesia and a heating system to keep a constant temperature of the animal during the study, ~38 °C).
5.
Reconstruction software. The system should include reconstruction software to recover the CT image from the projections and the PET tracer distribution from the measured data. For PET, different reconstruction methods can be typically chosen: 2D, 3D, analytical (FBP), and iterative (MLEM, OSEM).
8.
Activimeter for PET tracer dose calibration.
9.
Blood glucose meter.
11.
Materials for radiotracer uptake validation (see Note 10 ):
(a)
Surgical instruments to extract the anatomical organ or structure of interest.
(b)
Material for autoradiography: phosphor imaging system equipped with software for data acquisition and image analysis and a phosphor imaging screen or autoradiography films and tools for developing and analysis.
(c)
Automatic gamma counter for tissue gamma counting.
12.
Materials for histology/immunohistology validation: phosphate-buffered saline (PBS, pH 7.4), 10 % buffered formalin, dissection tools, Tissue-Tek O.C.T. compound (Sakura), paraffin, hematoxylin, eosin, antibodies (e.g., F4/80 for mouse macrophages), reagents for developing and visualization of immunostaining, microtome (to section tissue specimens embedded in paraffin), cryostat (to section tissue specimens embedded in O.C.T.), and microscope equipped with camera and imaging dedicated software.
3 Methods
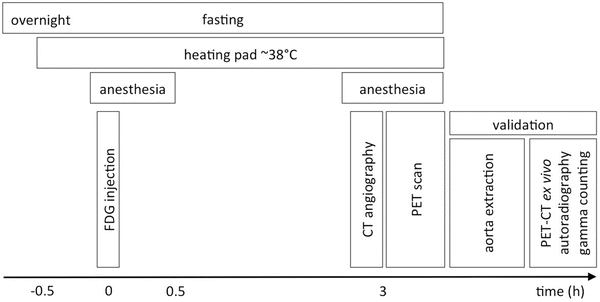
A schematic of the animal preparation, imaging procedure, and validation protocol is summarized in Fig. 2.


Fig. 2
Protocol for FDG-PET/CT imaging in atherosclerotic mice
3.1 Animal Preparation
1.
Have mice fasting overnight prior to the FDG-PET/CT scan.
2.
Keep the mice warm from 30 min before the injection until the end of the uptake period in order to reduce uptake by fat. Different strategies such as heating pads, IR lamps, or hot air are available.
3.
Weigh the animal.
4.
Check the fasting serum glucose levels prior to FDG administration using a blood glucose meter to ensure that glucose within the body does not compete with FDG. Values between 80 and 120 mg/dl are typically obtained.
5.
Anesthetize the animal prior to injection and keep the anesthesia for at least 30 min after injection to reduce the muscular uptake (e.g., isoflurane, sevoflurane).
6.
Prepare the FDG dose in an insulin syringe and measure the activity in the activimeter. Subtract the background activity from the obtained value. Write down the background-corrected activity in the syringe and the time at which the measurement is done (see Note 11 ).
7.
8.
Put the animal back in the cage in a shielded area to protect the personnel from radiation.
9.
Anesthetize the animal again for 20 min before the end of the uptake time and place it in the scanning bed enabling the anesthesia and heating mechanism.
10.
Place a drop of ocular lubricant (e.g., Puralube or Lacryvisc gel) on each eye of the mouse during the anesthesia to prevent corneal ulceration.
3.2 PET/CT Acquisition
1.
Use the CT detector to obtain a localizer, which consists in a projection image of the entire animal that is used to delimit the region to be scanned with both CT and PET scans.
2.
Perform a CT scan using contrast agent before the PET scan in order to avoid any further movement of the animal once the contrast agent is administered. The field of view of the CT scan should at least cover the one that is imaged with the PET scan to allow for scatter and attenuation correction and to use as an anatomical reference. The CT scan configuration parameters will depend on vendor to vendor, but some reference could be 55 kVp, exposure time 500 ms, projections 180, and isotropic voxel size 0.1 mm. Try to keep a low level of dose (<100 mGy CTDI) by using a larger voxel size instead of an increased dose to avoid producing side effect on the animal.
3.
Perform the PET scan. The axial extend of the field of view for the PET scan should at least cover from the iliac bifurcation to the neck of the mouse to cover the entire aorta. This requires one or two bed positions depending on the axial extent of the PET scanner. An acquisition time of 10–30 min can be used depending on the scanner sensitivity and the injected dose.
4.
Once finished with the image acquisition, return the animal to the cage, resume the food supply, and leave it in a shielded area until most of the activity has decayed (typically 10 half-lives, ~18 h after injection).
3.3 Image Analysis
1.
Open PET and CT images on the analysis software.
2.
Adjust the contrast level on both images.
3.


Make sure that the units in which the PET image is shown are standardized uptake values (SUV), which is the ratio of tissue radioactivity concentration at time point and the injected activity extrapolated to the same time divided by the body weight (see Note 15 ).
Stay updated, free articles. Join our Telegram channel

Full access? Get Clinical Tree


