Gait Analysis
Basic Information 
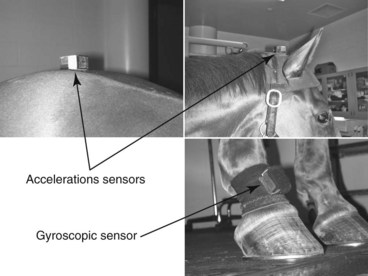
Preparation: Important Checkpoints (Figure 1)
• Attach the head sensor to the head bumper.
• Attach the pelvis sensor to a strip of 3M Dual Lock tape on the dorsal midline and tape in place.
• Place the gyroscopic sensor in the right forelimb pastern pouch on the dorsal aspect of the limb.
• Place sensor labels face up (head and pelvis sensors) or out (right forelimb sensor).
• Face the light-emitting diodes of sensors forward (head and pelvis sensors) or up (right forelimb sensor). Collect at least 25 strides.
Procedure
FORELIMB LAMENESS (Figure 2)
• Pain in first half of stance:


 By convention, HEADDIFFMIN is positive when the head falls less during right forelimb stance and negative when the head falls less during left forelimb stance.

 By convention, HEADDIFMAX is positive when the head rises more after left forelimb push-off and negative when the head rises more after right forelimb push-off.


• Pain in second half of stance:


 By convention, HEADDIFFMAX is negative when the head rises more after push-off of the right forelimb and negative when the head rises more after push-off of the left forelimb.


• Forelimb lameness is displayed as a ray diagram (see Figure 2). The x-axis is HEADDIFFMAX and the y-axis is HEADDIFFMIN.
< div class='tao-gold-member'>

Only gold members can continue reading. Log In or Register to continue
Stay updated, free articles. Join our Telegram channel

Full access? Get Clinical Tree


