Chapter 7 Endodontics
GENERAL COMMENTS
Standard of Care
Justifications for Endodontic Therapy
Signs of Endodontic Pain13
Additional Signs a Tooth Has Abscessed
Advantages of Endodontic Treatment
Differential Diagnoses
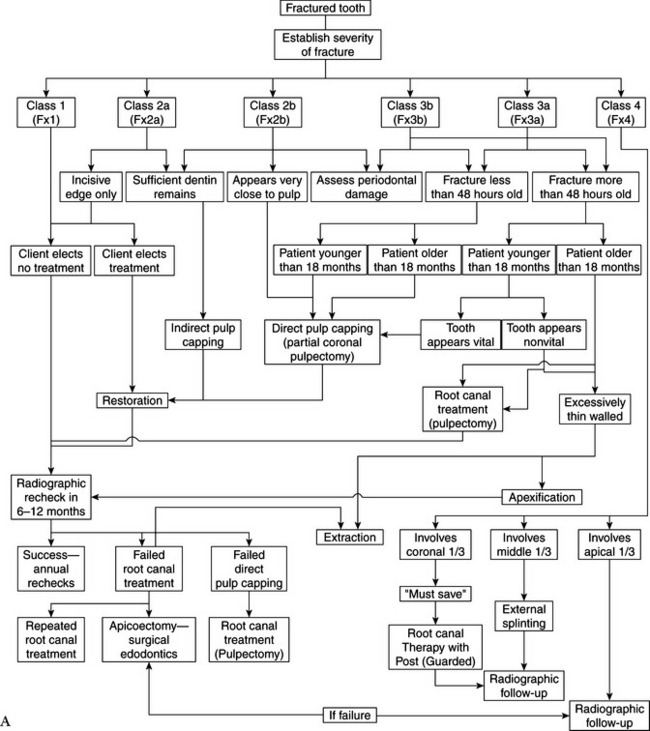
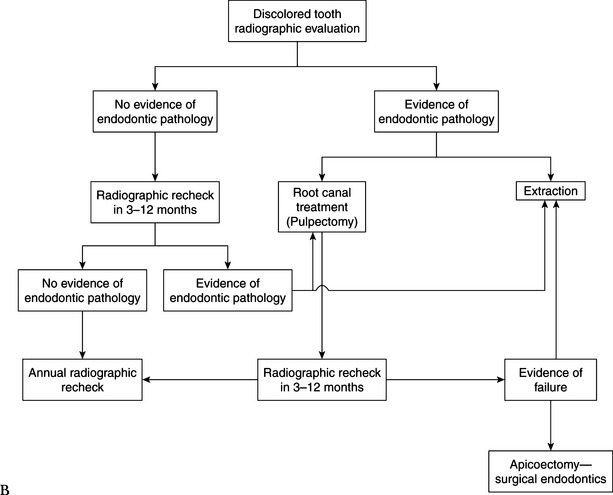
Algorithm Outline for Endodontic Pathology
Nonfractured Tooth
Fractured Tooth
INDIRECT PULP CAPPING
General Comments
Materials
Technique
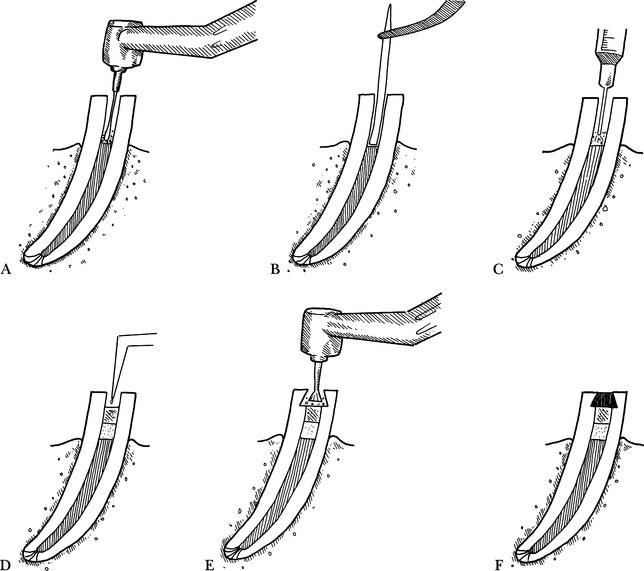
Step 1—The mechanically prepared cavity preparation or restoration site is irrigated with sterile saline to remove dentinal debris and is air dried (Fig. 7-1, A).
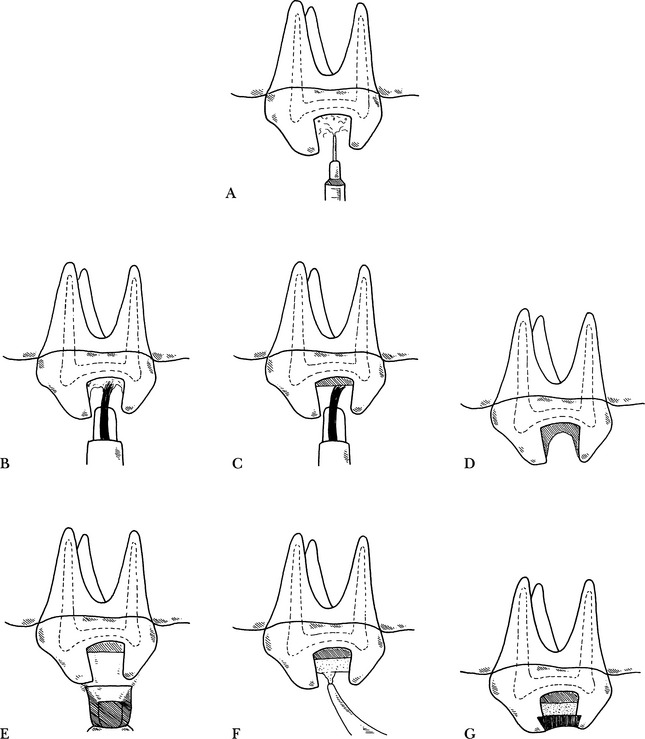
Substep 1—A dentin tooth conditioner is applied to the dentinal surface with a Getz brush for the manufacturer’s recommended time, rinsed with water, and air dried (Fig. 7-1, B).
Step 2—The cavity liner is applied to the fundus of the cavity or restorative preparation in a thin layer, using a Getz brush or plastic working instrument (Fig. 7-1, C), and is allowed to dry. Bonding of the final restoration will be inhibited if the liner coats the walls of the cavity preparation (Fig. 7-1, D). If the walls are coated inadvertently, they should be prepared again.
Substep 1—When using a light-cured glass ionomer liner, the material is cured with a visible light gun for the prescribed length of time (Fig. 7-1, E).
Step 3—In deep restorations, another layer of a glass ionomer can be placed to reduce the thickness of the final restoration (Fig. 7-1, F). This reduces the polymerization shrinkage that occurs as the restoration material cures.
Step 4—The restorative procedure is continued (Fig. 7-1, G), as described in Chapter 8.
INDIRECT PULP CAPPING: CROWN THERAPY
General Comments
Contraindications
VITAL PULPOTOMY AND DIRECT PULP CAPPING
General Comment
Indications
Vital Pulpotomy
Direct Pulp Cap
Contraindications
Materials
Technique
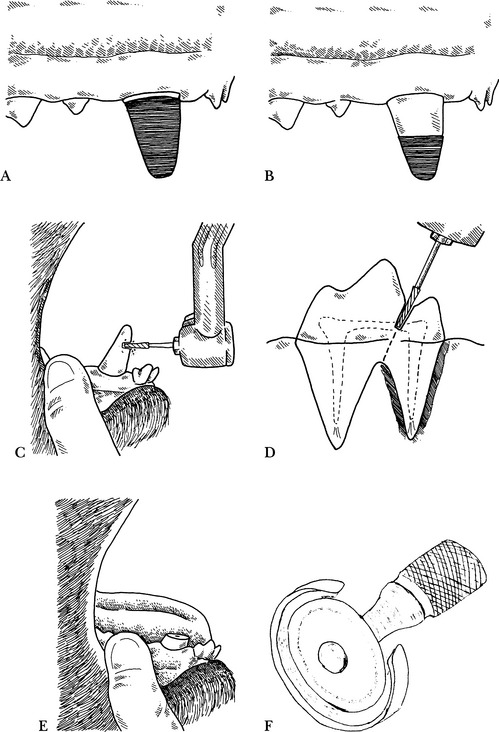
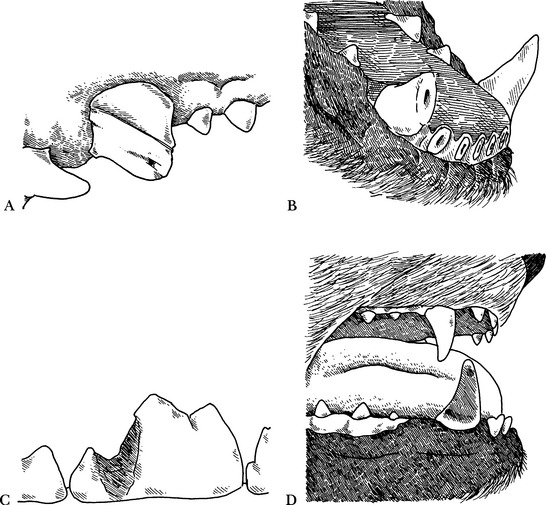
Step 2—A #701L cross-cut, tapered-fissure bur in a high-speed or low-speed handpiece with sterile physiological saline or sterile water cooling is used to amputate a tooth crown (Fig. 7-2, C) or hemisect a multirooted tooth (Fig. 7-2, D). (When disarming animals, the canine teeth are shortened to the level of the adjacent incisors) (Fig. 7-2, E). A 3/4-inch diameter double-sided diamond disc, with a disc guard to protect the adjacent soft tissue, is another option (Fig. 7-2, F).
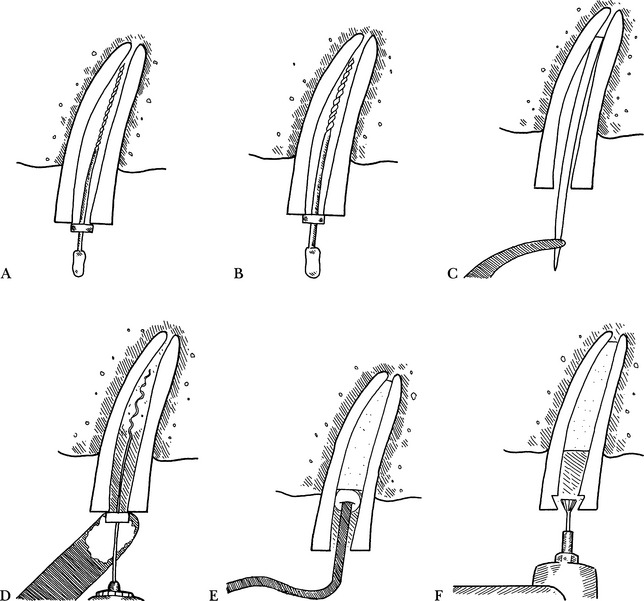
Step 3—A bur approximately equal in size to the diameter of the pulp chamber (round, pear, or tapered-fissure) is used in a high-speed handpiece to remove the coronal portion of the pulp from the amputated tooth, removing 5 mm of the pulp from the remaining endodontic system (Fig. 7-3, A).
Step 4—Hemostasis may be achieved using sterile saline lavage and the blunt end of multiple sterile, dry, paper points. Leaving a paper point in place for 2 to 3 minutes is often sufficient to control hemorrhage. In cases with persistent hemorrhage, lavage with a local anesthetic solution containing epinephrine17 or 20% ferric sulfate (Viscostat, Pulpdent) can be used. Caution should be used if employing a halothane (Fluothane) anesthetic agent. If hemorrhage continues, the coronal portion of the canal should be inspected to be sure all pulp tissue coronal to the area cleaned out in step 3 has been removed. Any filaments of inflamed pulp left may cause continued bleeding.14,17,18 Excessive hemorrhage at an exposure site or during the procedure indicates severe inflammation, and treatment adjustment should be considered, either changing the therapy to pulpectomy or to extraction.14 A coating of calcium hydroxide powder on the paper point may also help control hemorrhage (Fig. 7-3, B).
Step 5—When bleeding is controlled, calcium hydroxide paste is applied over the exposed pulp for a depth of 1 to 2 mm using the applicator syringe provided (Fig. 7-3, C). The paste is tamped against the pulp stump with the blunt end of a sterile paper point. If using a calcium hydroxide powder, a sterile retrograde amalgam carrier can be used to gently place a layer of powder against the pulp. More recently mineral trioxide aggregate (MTA) (ProRoot, Dentsply Tulsa Dental, Tulsa, Okla.) has been advocated because of its retention and resistance to leakage. MTA is a compound somewhat similar to Portland cement. It is mixed with water or physiologic saline and applied directly to the pulp with an amalgam plugger or other suitable instrument. It has been used successfully and is recommended by the manufacturer for use in vital pulpotomies, direct pulp caps, and retrograde root canal therapy.
Step 6—An intermediate filling material, such as glass ionomer, is placed over the calcium hydroxide paste (or MTA) with an injection syringe or jiffy tube and is allowed to cure (Fig. 7-3, D).
Step 7—The pulpal access (cavity) opening is prepared (Fig. 7-3, E) for the desired filling material, and the restoration is completed (Fig. 7-3, F).
Complications
DIRECT PULP CAPPING WITH DENTAL ADHESIVES
General Comments
Technique
Step 7—A 37% phosphoric acid gel (contained in the composite resin kit) is applied for 20 seconds.
Step 9—The area is blotted dry.
Step 11—A light-cured unfilled resin is applied and activated.
Step 12—The filled resin is applied.
Complications
APEXIFICATION, APEXOGENESIS, HARD TISSUE FORMATION
General Comments
Indications
Contraindications
Technique
Step 1—A radiograph is taken to examine development of root length and apical closure.
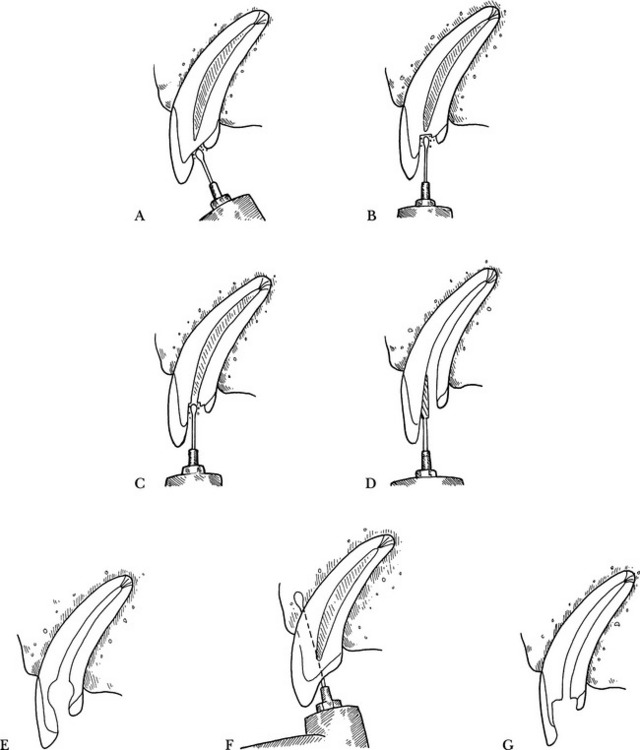
Step 3—A small file is placed in the canal to the approximate apical limit, and the tooth is radiographed again to determine a working length of the files, optimally to within 2 mm short of the apex, thus preventing injury to the periapical or apical tissues (Fig. 7-4, A).
Step 4—The root canal is filed and shaped in a standard manner (described in the section Cleaning and Shaping the Canal), using only sterile water or saline for irrigation (Fig. 7-4, B).
Step 5—The canal is dried, using the blunt end of sterile paper points (to avoid perforation into the apex) (Fig. 7-4, C).
Step 6—The canal is filled with calcium hydroxide paste, using a spiral filler with a stop at the working length (Fig. 7-4, D) or a sterile needle with an endodontic syringe.
Step 7—The calcium hydroxide paste is forced to the apex by placing a cotton pellet over the paste and using a blunt plugger to condense it apically (Fig. 7-4, E). The cotton pellet is removed with an endodontic file or broach.
Step 8—The calcium hydroxide paste is removed 3 mm from the access area, and a fast-setting base is placed over the paste (Fig. 7-4, F).
Step 9—A restoration is placed according to standard techniques.
Postoperative Care
NONSURGICAL ROOT CANAL THERAPY: STANDARD, NORMOGRADE, and PULPECTOMY
General Comments
Contraindications
Objective
Coronal Access to the Pulp Chamber and Root Canal
Objectives
Materials
Technique
Step 3—The oral cavity is disinfected with 0.2% chlorhexidine solution.
Step 4—Using the desired cutting bur, a hole is drilled through the enamel layer with the bur positioned perpendicular to the tooth surface, so as to minimize “wandering” of the bur tip. This step is eliminated if an open fracture site allows straight-line access to the apex (Fig. 7-6, A).
Step 5—Once the enamel has been perforated, the bur is repositioned and aligned parallel with the root canal, and the access site continues to be developed (Fig. 7-6, B).
Step 6—The access site is deepened until the pulp chamber is entered. When using a high-speed handpiece, a reduced resistance and a higher pitched drilling noise are noted when the pulp chamber is penetrated (Fig. 7-6, C).
Step 7—The access can be enlarged, using a #701L bur or Gates Glidden reamer, and shaped to expose the entire width of the pulp chamber, removing ledges so as to appropriately accommodate the endodontic files that will be introduced to debride the root canal (Fig. 7-6, D).
Cleaning and Shaping the Canal
Materials
Technique
Step 1—Length determination. A small-diameter endodontic file (usually size 10, but 06 and 08 sizes are available) with preplaced endodontic stop is inserted into the root canal 2 mm short of the estimated canal length, as determined from a preoperative radiograph (Fig. 7-7, A).
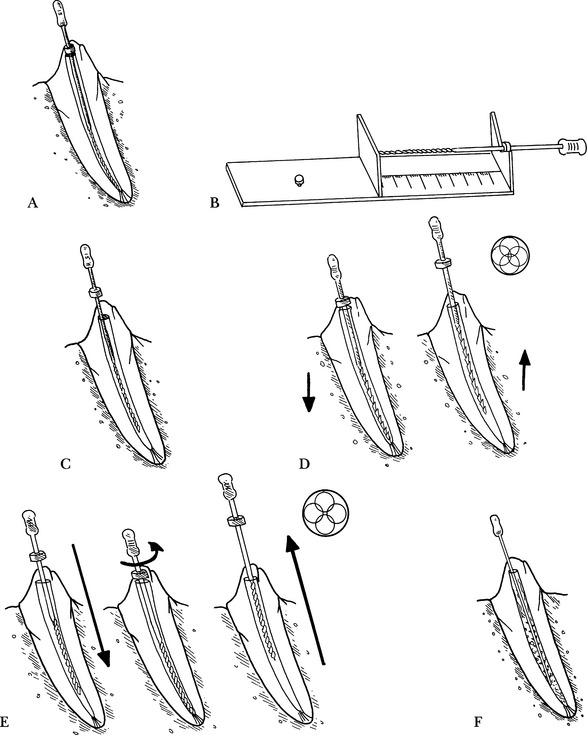
Step 2—Radiograph. A radiograph is taken to verify the file depth (how far the file has penetrated) and the working length (how far the file should penetrate). This apical stop indicates that the pulp canal does not extend beyond the file. The ideal working length is 1 mm short of the apex. The canal usually needs to be instrumented further, and the file may be inserted farther and additional radiographs taken until the working length is achieved. Once the working length is achieved, the endodontic stop is moved down the shaft of the file until it contacts the crown, with the file fully inserted. The length is noted (Fig. 7-7, B) and recorded. To provide consistency as to the measurement, the stop should be perpendicular to the file.
Stay updated, free articles. Join our Telegram channel

Full access? Get Clinical Tree


