Chapter 3 Emergency and Critical Care Techniques and Nutrition
This chapter describes commonly used techniques in emergency and critical care medicine. See appropriate chapters for information about diseases that require critical care.
INTRAVENOUS CATHETERIZATION BY CUTDOWN
Technique
1. When the patient is semicomatose or moribund, local anesthesia is not required. Otherwise, infiltrate small amounts of local anesthetic into the aseptically prepared skin site.
2. In general, the lateral saphenous (canine) or medial saphenous (feline) are easier to approach than the cephalic veins. Jugular cutdown can also be performed with the same technique, but the vein is deeper and may be more troublesome for inexperienced surgeons to find.
3. After aseptic skin preparation and use of aseptic technique, identify the vessel. In many situations the vessel may not be visible even when occluded, so the anatomy of the vessel is important to understand.
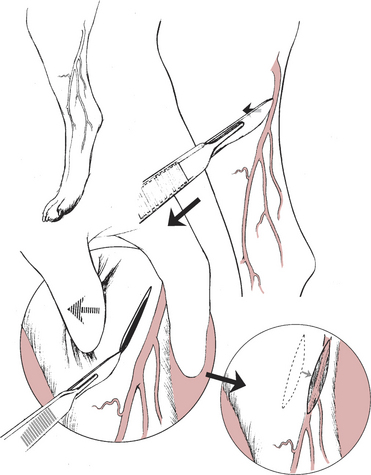
4. Place the scalpel blade gently on the skin over the vessel and, without cutting the skin but maintaining skin contact with the blade, pull the skin laterally to the vessel (Fig. 3-1).
7. The bluish hue of the vessel should be obvious if the incision was made in a correct location. Move the skin to attempt to identify the vessel if it is not immediately obvious. To differentiate the vessel from underlying muscle bellies, the vessel should blanch with minimal digital pressure; muscle bellies will not.
8. Hold the iris scissors with the thumb and index finger in the finger rings with the tips of the scissors pointing across the palm of your hand, not extending out from the fingers. This allows the shaft of the scissors to be perpendicular to the patient and the vessel.
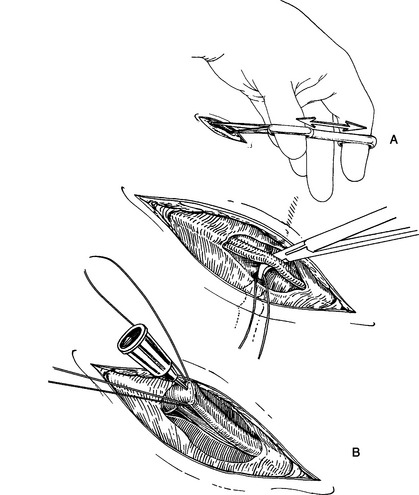
9. Place the tips of the scissors as close to the vessel wall as possible, apply gentle pressure to the tissue, and extend the blades maximally, bluntly dissecting the fascia from the vessel wall (Fig. 3-2A).
10. Repeat this procedure on both sides of the vessel wall until the vessel is freed from its fascial attachments and the mosquito hemostat can be placed under the vessel. Take care not to place the tips of the blades on the vessel itself. In addition, if small side branches of the vessel are present, choose a more proximal or distal location.
11. Pull a loop of suture ventrally underneath the vessel to exteriorize and serve as a manipulator to allow positioning of the vessel for catheterization.
12. Examine the vessel for remnants of fascia. It is easy to catheterize one of these fascial planes by mistake and think that you are in the vessel lumen. Strip the vessel of any remaining fascia by gently using one arm of the Adson thumb forceps.
13. Catheterize the vessel using the suture as a handle to manipulate the vessel into an appropriate position (Fig. 3-2B).
14. It is easy to puncture both sides of the vessel wall, so prior to advancing the catheter, verify that the metal of the stylet cannot be seen underneath or beside the vessel wall by gently moving the catheter.
16. Remove the loop of suture, connect IV fluids to the catheter, suture or staple the skin with the catheter exiting from the suture line, and secure the catheter to the skin with the normal taping method.
INTRAOSSEOUS ACCESS FOR FLUID ADMINISTRATION
Technique
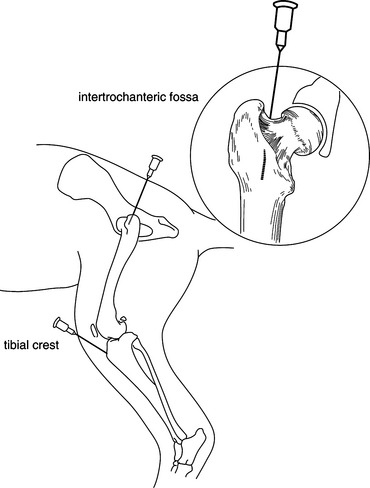
1. Aseptically prepare the skin over the appropriate site. In general, the intertrochanteric fossa or the tibial crest is the easiest site to gain access (Fig. 3-3).
2. Infuse a small quantity of local anesthetic into the periosteum and the skin surrounding the site. Be cautious that the volume administered is not in the toxic range for the size of the animal. Lidocaine can be diluted to 1% to prevent toxicity if necessary.
3. Using aseptic technique, identify the site of needle insertion into the appropriate long bone (femur or tibia) and palpate firmly to identify the appropriate direction and angle of needle advancement. Direct the needle as straight as possible down the marrow cavity of the shaft of the long bone.
4. Advance the needle using gentle but steady forward pressure as you slowly twirl the shaft of the needle back and forth.
5. Once the needle is firmly seated into the bone, remove the stylet and attempt to aspirate through the needle. Ability to aspirate bloody fluid (bone marrow) generally indicates successful placement. If awake, animals will often object to aspiration as they would for bone marrow aspiration.
6. Gently flush the needle with isotonic fluid and gently palpate around the long bone for accumulation of fluid. If fluid accumulates outside the bone, then the needle has penetrated the cortex and must be repositioned into the marrow cavity.
7. If successfully placed, attach the IV line to the needle (a luer lock tip assists in prevention of accidental disconnection). Carefully bandage the limb and exposed needle to minimize movement.
ARTERIAL SAMPLING FOR BLOOD GAS ANALYSIS
Technique
1. If no commercially available dry heparin blood gas syringes are available, heparinize a regular syringe by withdrawing liquid heparin into the syringe so that the insides of the syringe barrel are in contact with the heparin. Depress the syringe plunger to extrude the liquid heparin out of the needle. A small quantity of liquid heparin should remain in the syringe hub. Place a new needle onto the syringe prior to puncturing the skin.
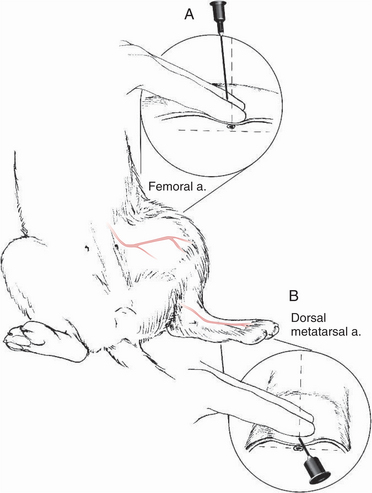
2. The two most commonly utilized sites for arterial sampling are the femoral artery medial to the femur in the inguinal region (Fig. 3-4A) and the dorsal metatarsal artery medial to midline and distal to the tarsus joint (Fig. 3-4B).
3. Hold the tips of the index and middle fingers of the nondominant hand perpendicular to the artery but parallel to the long axis of the patient and gently palpate the region until the pulsation of the artery can be felt underneath both finger tips. Excessive pressure will often occlude the artery and prevent successful palpation of the pulsation.
5. Hold the sampling syringe with the dominant hand. Place the needle between the fingers over the artery and advance slowly at an acute angle (45 degrees or greater for the dorsal metatarsal artery, slightly less than 90 degrees for the femoral artery).
6. Observe the hub of the needle carefully for a blood flashback to “jump” into the hub. Frequently, pulsations can be observed if the patient’s blood pressure is high enough. Self-filling blood gas syringes should fill rapidly if the pressure is normal. Withdraw the sample volume if a conventional syringe is being utilized. Slow flashbacks, lack of observable pulsations, color of the blood sample, slow filling of self-filling syringes, and the blood gas results may all indicate that the sample is venous or mixed rather than a pure arterial sample.
7. Place gentle but firm pressure over the sampling site for 3 to 5 minutes, then observe for an additional 30 to 60 seconds to ensure that the puncture site has sealed to prevent hematoma formation.
NASAL CATHETER PLACEMENT
Technique
1. Install several drops of local anesthetic into the nostril with the patient’s head tipped up slightly; allow several minutes to reach peak effect.
2. Premeasure the catheter to (a) the last rib for nasogastric tube, (b) the base of the heart for nasoesophageal tube, or (c) the junction of the zygomatic arch and the cranial edge of the ramus of the mandible for nasal oxygen.
3. Restrain the patient with the head tipped slightly up and place the tip of the catheter gently into the nostril.
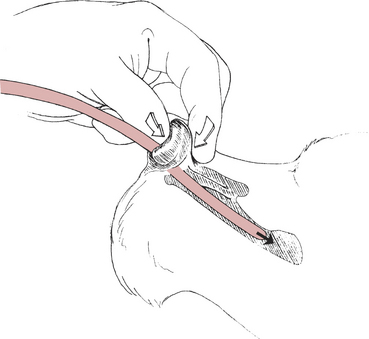
4. Use the thumb of the nondominant hand to push gently up on the nasal philtrum. With the index finger of the same hand, gently squeeze against the thumb from the top of the nasal planum (Fig. 3-5).
5. Advance the catheter quickly and gently, forcing the tube in a ventral and medial direction into the ventral meatus. The patient will often retract away from you, so release your advancing fingers immediately after you have advanced the tube. This is a similar motion to holding and throwing a dart.
6. Advance the catheter with repetitive motions until the premeasured catheter length has been inserted. If placing a nasal oxygen cannula, advance the tube past the nasopharynx if possible to confirm placement into the ventral meatus, then pull back to the premeasured length. Tubes that will not advance past the nasopharynx may be in the dorsal meatus and should be repositioned.
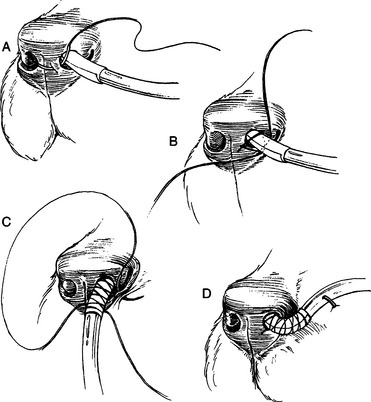
8. Place a simple interrupted suture at the ventromedial corner of the nostril. Place a finger trap suture pattern over the tape on the tube to secure the tube to the nostril (Fig. 3-6A–D). Tie multiple knots to complete the finger trap.
9. Place a second simple interrupted suture to the ventrolateral corner of the nostril at the mucocutaneous junction using the remaining ends of the suture to further secure the tube from accidental removal (Fig. 3-6C).
10. Use skin staples to attach the end of the tube to the patient’s face, generally either on the side of the face or up the center of the face between the eyes and to the top of the head (Fig. 3-6D).
EMERGENCY TEMPORARY TRACHEOSTOMY
Technique
1. Position the patient in dorsal recumbency with the head extended slightly off and over the edge of the table or with the neck over a rolled towel or sandbag.
2. Make one attempt to insert a large over-the-needle peripheral IV catheter into the trachea at the base of the neck close to the thoracic inlet to provide oxygen to the patient while final preparations are made.
6. Bluntly force the closed tips of Mayo scissors into the first tissue plane, open and insert one tip into the tissue plane created, then incise the tissue plane to each end of the incision. Attempt to use the sharp edges of the scissors to cut by advancing with the blades open rather than “scissoring” through the tissue.
8. Identify the neurovascular bundle on each side and bluntly insert a hemostat through the fascia dorsal to the trachea, allowing it to be elevated into the surgical incision.
10. Depending on the experience and skill of the surgeon, two approaches to incising the trachea are possible:
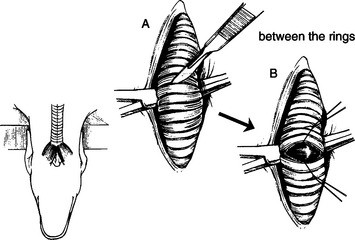
a. If the surgeon feels comfortable and excellent surgical precision is possible, incise the trachea transversely “between” two rings in the mid cervical trachea (Fig. 3-7). Extend the incision over the ventral two thirds of the circumference of the trachea. Do not incise into the dorsal tracheal membrane.
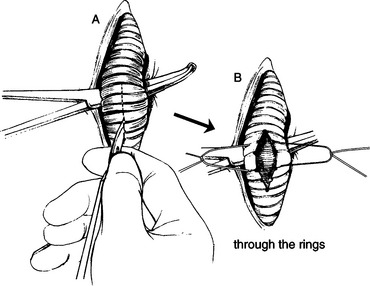
b. Alternatively, if the surgeon is less comfortable and a lesser degree of surgical precision is likely, incise longitudinally “through” several rings (Fig. 3-8). Holding the scalpel upside down and gripping the blade carefully to allow only 10 to 15 mm of blade to be exposed, incise approximately four tracheal rings beginning with ring 3 and continuing through ring 6 distal to the larynx.
12. Place stay sutures (3-0 or 4-0 silk) in the edges of the tracheal incision. If a transverse incision was made, place stay sutures in the ventral-most aspect of the trachea and around the first proximal and first distal ring. If a longitudinal incision was made, place stay sutures around two adjacent rings, approximately 3 to 5 mm from the tracheal incision and encompassing 2 tracheal rings on both sides of the incision. Leave the suture ends long.
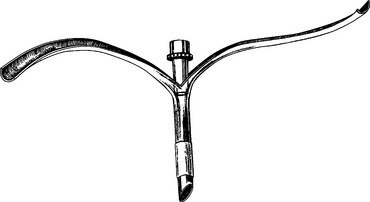
13. Insert the tracheostomy tube into the trachea. Several types of specialized tracheostomy tubes are commercially available. Each has advantages and disadvantages. A simple tracheostomy tube can also be easily constructed from an endotracheal tube (Fig. 3-9).
14. The most critical aspect of tube placement is the size and fit of the tube. If the tube exerts circumferential pressure on the tracheal mucosal, then significant pressure necrosis, scarring, or fibrotic web formation are more likely to occur as a complications. Choose a tube that fits loosely in the trachea with no major points of mucosal pressure. Do not inflate the cuff unless positive pressure ventilation is required.
15. Suture the skin edges to allow easy access to the tracheal incision when the tube needs to be changed.
ABDOMINOCENTESIS
Technique
1. If possible, allow the patient to stand or be positioned in sternal recumbency to allow access to the most dependent site on the abdomen. Alternatively, place the patient in left lateral or dorsal recumbency.
Stay updated, free articles. Join our Telegram channel

Full access? Get Clinical Tree


