Chapter 4 Dental Prophylaxis and Periodontal Disease Stages
GENERAL COMMENTS
• The deleterious effects of untreated dental disease on the rest of the body have long been recognized.
• The oral examination and prophylaxis are basic to good dentistry. A thorough dental prophylactic treatment is a critical step in preventing and treating periodontal disease.
• To perform high-quality professional periodic periodontal care, it is imperative that a general anesthetic be administered when dogs and cats have their teeth cleaned. When general anesthesia is not administered, caudal teeth cannot be cleaned adequately, the lingual side of all the teeth are inaccessible, and the all-important subgingival tissues, both buccal and lingual, are at risk for incomplete care and tissue damage. This applies to both dogs and cats. Additionally, only the most docile animals will submit to sharp instruments being introduced subgingivally and the patient, as well as the person handling these instruments, is at risk for injury. If sharp instruments or mechanical instruments are not employed subgingivally in routine prophylactic dentistry, an incomplete service and a poor value is being delivered to the consumer and patient.
ORAL EXAMINATION
General Comment
• Perform the examination in a routine that is followed every time.1 A thorough examination is facilitated by a bright light source and even with magnification, if necessary. Often only a cursory examination is possible in the awake patient. Once the patient is anesthetized, a more complete oral examination is possible.
Technique
Step 1—The head, muzzle, and nostrils are observed and examined. Check for asymmetry and lymph node enlargement. In the awake patient, note any pain on palpation.
Step 2—The lips are lifted; starting rostrally, and buccal and labial surfaces of the teeth and gingiva are examined.
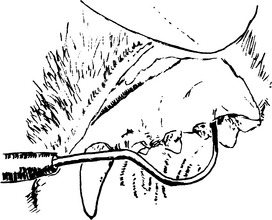
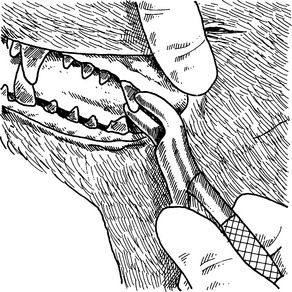
Step 3—Working caudally, the mandibular and maxillary teeth, cheek tissues, and salivary gland ducts are evaluated. If crown wear or fractures are noted, a dental explorer can be used to determine if the pulp horn is open. Other dental abnormalities such as resorptive lesions and caries can be confirmed with use of the dental explorer (Fig. 4-1). More specific periodontal probing is performed while the patient is under general anesthesia, either before or after the teeth have been cleaned, in the patient brought in for dental treatment.
Step 5—Once the external examination of the lips and the buccal surface of the teeth and gingiva is completed and the clinician has gained familiarity with the patient, the mouth is opened.
Step 6—The lingual and palatal gingival tissues are examined. The lingual, palatal, interproximal, and occlusal surfaces of the teeth are evaluated. The examiner’s thumb can be placed in the diastema behind the maxillary canine tooth so that the thumb pushes on the hard palate as an aid in keeping the mouth open. In the awake patient, visualization is limited.
Step 7—The tongue and floor of the mouth are examined. This area may be visualized more easily by pushing up on the skin beneath the tongue on the ventral portion of the mandible posterior to the symphysis.
Step 9—The pharyngeal area and tonsils are examined. In tolerant animals, a finger can be placed over the base of the tongue for better visualization of the oral pharynx.
Complications
• A mouth gag should be used only for a short time to prevent undue tension on the temporomandibular joint.
PERIODONTAL DISEASE
Causes of Periodontal Disease
• The tissue degradation process appears to be driven by subgingivally advancing plaque, acute inflammation, and prostaglandin-induced bone resorption.2 Plaque bacteria are area specific, with some attaching to the root surface, some to the epithelial lining of the sulcus or pocket, while others become loosely adherent to the sulcus wall in the gingival crevice. The loosely adherent plaque has been found to have more pathogenic potential and contains the endotoxins produced from gram-negative bacteria.3 Other bacteria actually penetrate into the gingival tissues.
• The host response, bacterial actions, and bacterial endotoxins all participate to help damage and, in the worst case scenario, destroy the periodontium.
Stages of Periodontal Disease
Comments
• Periodontal disease is divided into grades or stages for the purpose of treatment planning and evaluation of patient progress. In reality, a given stage of periodontal disease is fairly subjective; what matters is the overall evaluation of a combination of factors that includes plaque, calculus, gingival inflammation, gingival recession, and bone loss. The number of classification systems for grading periodontal disease are in excess of 18 in human dentistry. One treatment schedule was based on the predominant cell types in the connective tissue of the marginal gingiva.5 Periodontal pocket measurement was used in another.6 Harvey and Emily7 proposed a six-stage system. A five-stage system (0 to 4) described by Wiggs and Lobprise8 includes normal, gingivitis, and then three stages of periodontal disease based on percentage of bone loss.
• This text uses a system with a clinical approach. Healthy is defined as the absence of disease and therefore is not assigned a grade. Likewise, once a tooth is extracted, although disease may be present, the intact periodontium is missing and, therefore, the missing tooth is not graded. There may be more than one stage present in a patient’s mouth at one time or present even within a tooth with multiple roots, in which one root has advanced periodontal disease and the other(s) are normal. Although the site of the extracted tooth, itself, is not graded, the overall patient periodontal status may be upgraded once the disease process is inactivated. Periodontal disease typically waxes and wanes cyclically as it periodically becomes exacerbated and a currently inactive condition becomes active again.
A Healthy Periodontium
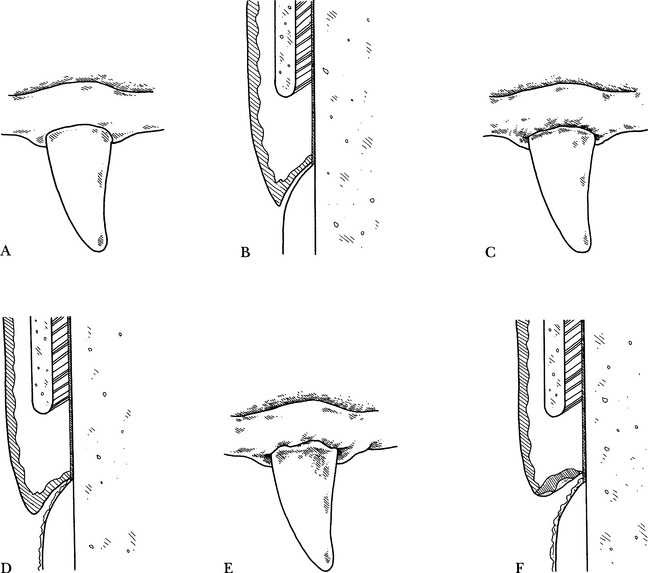
• The healthy gingiva has a knifelike margin (Fig. 4-2, A and B). The line of the gingival margin flows smoothly from tooth to tooth, called smooth topography.
• Radiographically, alveolar crestal bone is seen close to the neck of the tooth. The distance may vary proportionately with the greatly differing size of veterinary patients.
Stage 1: Early Gingivitis
• There is a redness of the gingiva at the crest of the gingival margin and a mild amount of plaque and calculus (Fig. 4-2, C and D).
Stage 2: Established or Chronic Gingivitis
• Stage 2 is similar to stage 1, but there is an increase in inflammation, including edema and subgingival plaque development. Amounts of supragingival plaque and calculus are increased (Fig. 4-2, E and F). The line of gingival margin topography has started to become irregular but is still intact. Root exposure has not yet occurred.
Stage 3: Early Periodontitis
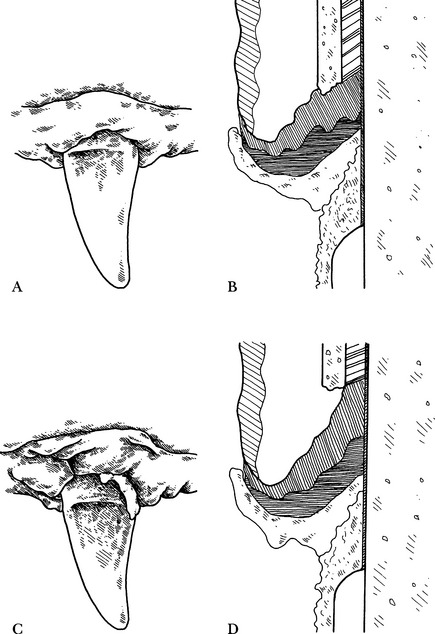
• Stage 3 is an incipient periodontal disease stage, with gingivitis, edema, beginning pocket formation, and increasing amounts of plaque and calculus supragingivally and subgingivally. The gingiva bleeds on gentle probing (Fig. 4-3, A and B). The gingival topography no longer flows smoothly from tooth to tooth, because there may be either mild gingival recession or gingival hypertrophy.
• Radiographically, subgingival calculus may be noted, and a rounding of the alveolar crestal bone at the cervical portion of the tooth can be seen on careful examination at the earliest of stage 3. Up to 30% of the tooth root may be affected by either vertical or horizontal bone loss.
Stage 4: Established Periodontitis
• Some of the signs that may be associated with stage 4 are severe inflammation, deep pocket formation, gingival recession, easily recognized bone loss, pus, and tooth mobility. The gingiva usually bleeds easily on probing (Fig. 4-3, C and D).
• Radiographically, subgingival calculus and vertical or horizontal bone loss of 30% or greater of the root length are noted.
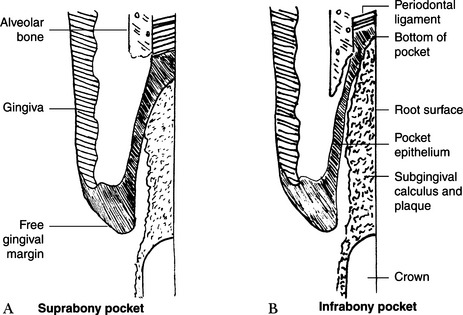
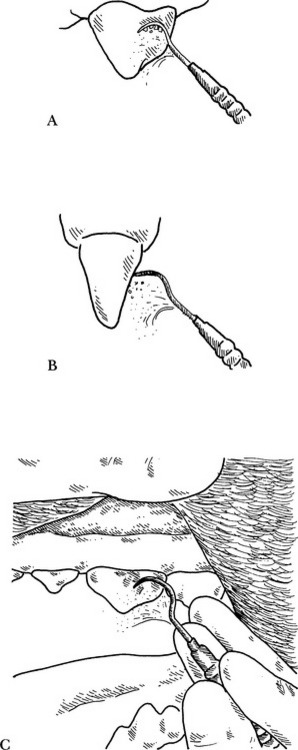
• There are two types of pocket formation, suprabony (Fig. 4-4, A) and infrabony pockets (Fig. 4-4, B). These are differentiated by the location of the bottom of the pocket with respect to the adjacent alveolar bone. Infrabony pockets have the depth of the pocket apical to the level of the alveolar bone and are associated with radiographically identifiable vertical bone loss. Suprabony pockets have the fundus of the pocket superficial to the height of the alveolar bone and are associated with horizontal bone loss radiographically. The different pocket types often require different treatment approaches, to be covered in Chapter 5.
Chronic Ulceroproliferative Paradental Stomatitis
• This variation can be seen in immunocompromised dogs and cats. They may have ulcers of the mucosa above areas of dental deposits out of proportion to the amount of deposit present. The gingiva is very friable, and there is often loss of attached gingiva. The condition can be very painful and the animals may suffer from decreased appetite, drooling, lack of grooming, and general discomfort. Feline leukemia virus (FeLV) and feline immunodeficiency virus (FIV) can be associated with these cases in cats. Hypothyroidism should be ruled out in dogs. Maltese dogs have an increased incidence of this form of periodontitis.9 Large breed dogs such as the German shepherd can also be affected. Spirochetes and other pathologic oral bacteria are often involved. Many cases require frequent dental cleanings, as well as long-term medical treatment, for control, along with home oral hygiene. Refractory cases often require extraction of affected teeth to control the inflammation.
Chronic Ulceroproliferative Faucitis, Gingivitis, and Stomatitis in Cats
• This variation is seen in cats. Typically the entire caudal aspect of the mouth, fauces, and oropharyngeal area will be inflamed, proliferative, and ulcerated. Histopathologic studies usually show a predominance of lymphocytes and plasmacytes along with varying degrees of polymorphonuclear cells. These cats experience significant pain and often will become anorexic. Their blood study results often are negative for FeLV and FIV. Some may be from households with more than one cat, and feline calicivirus (FCV) usually can be isolated from the tissues; however, in another study, inoculation of cats with FCV from infected cats did not produce chronic oral disease.10 Cats should be tested for Bartonella and, if positive, treated appropriately. Disease in these cats is often refractory to usual dental cleaning and medical treatment successful in other periodontal disease cases, and caudal or even full mouth extractions may be required to resolve the disease (see Chapter 6).
Dental Resorptive Lesions
• These odontoclastic resorptive lesions are most frequently seen in cats; however, they can be diagnosed in dogs as well. They often cause a localized gingivitis. Tactile evaluation of the tooth with an explorer will demonstrate varying degrees of coronal and root destruction. External resorption without replacement resorption of the root structure can be seen with periodontal bone loss and gingival pocket formation along with the tooth defect. These are classified differently than other resorptive lesions that are associated with minimal gingivitis. No periodontal bone loss and replacement resorption or ankylosis of the roots is seen radiographically.11
Autoimmune Disease
• Pemphigus vulgaris and bullous pemphigoid cases often have oral lesions that may appear similar to those of periodontitis. Often a distinguishing factor is that lesions are found in the oral mucosa, mucocutaneous junctions in the mouth, and elsewhere. Biopsy and histopathology are necessary to confirm and distinguish the two diseases. Autoimmune diseases will not be responsive to thorough dental cleaning and respond decreasingly well to intermittent courses of antibiotic therapy. Corticosteroid administration, in addition to dental cleaning, is the usual treatment.
Periodontal Treatment Planning
• Different areas of the mouth can be affected with different stages of periodontal disease at the same time. Each area should be treated accordingly.
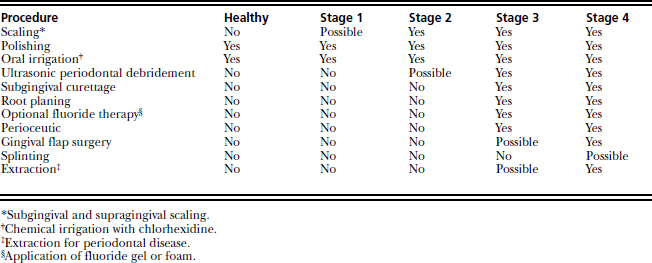
• Patients with early gingivitis (stage 1) should receive hand or mechanical scaling and polishing supragingivally and subgingivally (above and below the gum line).
• Advanced gingivitis (stage 2) should be treated with supragingival and subgingival mechanical and hand scaling, tooth polishing, oral irrigation, optional fluoride treatment, and home care instruction.
• Early periodontal disease (stage 3) should be treated with thorough calculus removal supragingivally and subgingivally, polishing, systemic antimicrobial treatment, ultrasonic periodontal debridement or root planing, and gingival curettage, oral irrigation, optional placement of a perioceutic formulation, and home care on a regular basis. Poor-risk patients with greater bone loss or those with an owner who does not perform regular home care may require extractions in order to maintain a healthy mouth.
• Established periodontal disease (stage 4) should be treated with thorough scaling, ultrasonic periodontal debridement, subgingival curettage, root planing, polishing, oral irrigation, systemic antimicrobial treatment, perioceutic treatment of deep pockets, gingival flap surgery, and other periodontal therapeutic modalities, as indicated (see Chapter 5). Teeth with significant mobility or with severe bone loss around one or more roots should be extracted. An intensive home care program is necessary if compromised teeth are to be salvaged. If the owner lacks this commitment or the patient’s health status is poor, many teeth with stage 4 disease may require extraction to maintain a healthy mouth.
• Once periodontal disease reaches stage 3 or 4, a simple dentistry, dental (sic), or “prophy” (sic) treatment, as commonly perceived by many veterinary practices, will not be sufficient to stabilize the infectious disease (Table 4-1).
DENTAL PROPHYLAXIS
General Comments
• A thorough dental prophylaxis program consists of supragingival and subgingival gross calculus and plaque removal, fine hand scaling, polishing, diagnostic studies, oral irrigation, charting, and home care instruction. The goal of dental prophylaxis is to remove or disrupt the composition of the bacterial plaque and its associated endotoxins, along with elimination of plaque retentive deposits and surfaces over the tooth and root surfaces to promote a healing response.12
• The procedure should be performed with the patient under general anesthesia and intubated with the cuff inflated. Adequate anesthetic monitoring, to maintain body temperature, and packing of the pharyngeal area are important for safety when performing dental procedures.
• Steps for a thorough prophylactic procedure are presented below in order of application. Some clinicians choose to do step 5 (diagnostic procedures, charting, and radiology) first, before cleaning the teeth, to record various periodontal indices on the dental chart and take dental films when indicated. Calculus and prophy paste may be seen on dental radiographs and may interfere with interpretation.
Step 1: Gross Calculus Removal
General Comments
• Gross calculus is removed by using calculus-removing forceps, ultrasonic or sonic scalers, hand scalers, and curettes.
• Large accumulations of supragingival calculus are removed from the buccal, lingual, palatal, and interproximal surfaces of the teeth.
• Removal of gross calculus alone is not a complete prophylactic dental procedure and is of minimal therapeutic value. Gross calculus removal is, however, an important step in providing visualization and access to the smaller deposits and stains, as well as evaluating tooth mobility in patients with periodontal disease.
Calculus-Removing Forceps
Technique
• The long jaw of the forceps is placed over the cusp of the crown, and the shorter cutting-edged jaw apical to the calculus to be removed.
• The jaws are closed by squeezing the handles together, and the calculus is loosened from the tooth.
Power Instrumentation: Ultrasonic Scalers
General Comments
• There are three basic styles of ultrasonic scalers: piezoelectric, magnetostrictive with a stack, and magnetostrictive with a ferrite rod.
• The magnetostrictive units with a stack-type insert tend to create more heat at the working tip than the other styles. They are all designed to be used with a fine-mist water spray around the tip.
• The pot (stack) should be inspected carefully at regular intervals for small fatigue fractures in one or more of the nickel alloy leaves (see Chapter 2).
• If performed properly, ultrasonic scaling is a safe method for removing large amounts of calculus rapidly.
• For gross calculus removal, the broad blade insert or tip or universal tip can be used supragingivally. Only the universal or microtips are to be used subgingivally.
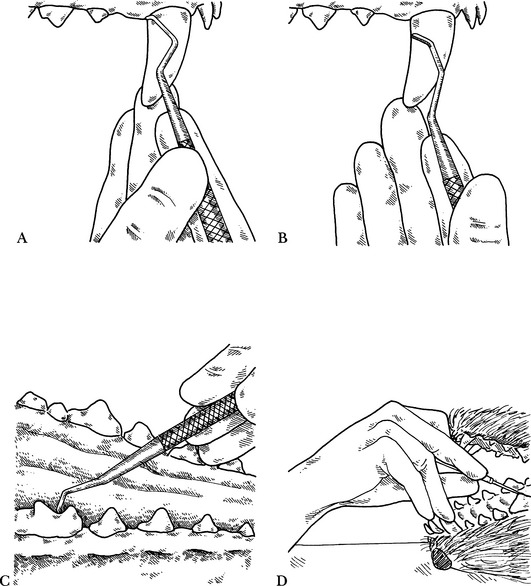
• The correct angulation of the working end of the scaler is necessary for efficient and safe use. Numerous tip styles have unique modes of action at the working tip. Different styles have variable lengths of the tip that are active and different dimensions of the tip excursion. Generally, the side of the tip is most effective and least likely to cause damage if the handle is held parallel to the tooth surface (Fig. 4-6, A) rather than perpendicular to it13 (Fig. 4-6, B). The handpiece is held so that the working end is between the thumb and index finger, with the handle coming up over the web between the thumb and index finger. A feather-light grip is maintained, to avoid fatigue.
• To avoid damaging the tooth surface, the pressure applied should be less than approximately 50 grams (the weight of two aspirin tablets).
Technique
Substep 2—The terminal active portion on the side of the tip of the instrument is used (Fig. 4-6, C).
Substep 3—Rapid, broad overlapping strokes are made over the tooth surface. The strokes should start at the edge of the calculus to free it more readily. The tip should be moving continually to avoid thermal injury to the underlying pulp. With the stack-type scaler, only 10 to 15 seconds should be spent on one tooth at a time. The power setting, unless the unit has auto-tuning, should be set as low as efficiently possible so as to reduce metal fatigue of the working tip. The water spray should, at the same time, be adjusted to adequately cool the tip and effectively wash away calculus debris for better visualization.
Substep 4—The teeth are scaled systematically so that all tooth surfaces are cleaned. With the patient in lateral recumbency, the buccal surfaces of the teeth in the quadrants closest to the technician and inner surfaces of the teeth in the quadrants closest to the table are scaled to take advantage of optimum visibility and efficiency. Tips or inserts are changed alternately to continue scaling subgingivally safely and effectively. Hand positioning and rests can be used as demonstrated with the sonic scaler shown on pp. 192 to 195. The first side can be completed with fine scaling by hand instrument, subgingival scaling, charting, and polishing, with subsequent oral irrigation, and then the patient is positioned on its opposite side and all the steps of the cleaning process are repeated. If a patient is placed in dorsal recumbency, each step can be completed around the entire mouth with the patient in the same position.
Complications
• Inadequate water spray or lingering at one spot on the tooth may cause thermal injury to the pulp.
• Etching of the enamel because of excessive pressure or using the instrument tip rather than the side of the working end.
• Premature metal fatigue necessitating frequent replacement of pot stacks or working tips due to higher than necessary power settings.
Ultrasonic Instrumentation: Magnetostrictive with Ferrite Rod
General Comments
• The instrument is used in a manner similar to that of other ultrasonic handpieces (42:12, IM3, Vancouver, Wash.; Odontoson M, Odonto-Wave, Fort Collins, Colo.).
• The properties that are similar to those of a piezo transducer allow the ferrite rod unit to generate an exceptionally high frequency of 42,000 cycles per second (cps).
• The ferrite ceramic rod should be inspected periodically for tightness at its attachment to the working end. If the performance of the handpiece appears reduced, the transducer may have become loosened.
Technique
• The unit can be attached to the water supply system of a dental unit or other pressurized water system.
• Because of the design of the scaler tip, the water is delivered directly down the tip of the working end.
• The water bottle can be filled with an antimicrobial solution, and the scaler tip may be used to administer deep root therapy.
• The external tubing and scaler tips may be sterilized to reduce the risk of cross contamination or persistent biofilm.
• The on/off switch is in the handpiece, which is more ergonomically beneficial than using a foot pedal switch (see Chapter 13).
• Either the broad-tipped or universal insert is used first, set at a higher power to remove the heavier calculus deposits. It is moved with broad, sweeping strokes over the tooth’s crown, with the tip positioned facing the gingiva. Because about 13 mm of the probelike tip is active, more of the tip can be placed on the tooth. Next, either the universal or the periodontal insert is used with short overlapping strokes to remove residual coronal calculus, and the periodontal insert can be used to perform delicate subgingival debridement at a reduced power setting. General technique is the same as per magnetostrictive scaler description above.
Ultrasonic Instrumentation: Piezoelectric
General Comments
• The unit operates with an electromagnetic transducer that allows it to operate at 40,000 cps, thus reducing operator time. The scaler tip moves in a linear manner (back and forth), rather than in a figure-of-eight motion as do magnetostrictive stack units. One model has a variety of tips available: three universal tips, six periodontal tips, and a variety of crown removing, as well as amalgam condensing, tips and an endodontic ultrasonic file handpiece (Amdent, Dentalaire, Fountain Valley, Calif.).
• The unit utilizes a water spray, either from an independent source or from the hospital main water supply, for irrigation and as a coolant.
Technique
• The handpiece is held and used in a manner similar to that of the stack model of magnetostrictive ultrasonic scalers.
• A broad tip is used first for heavy calculus removal, with broad sweeping strokes performed over the crown surface. Only the last 3 mm of the tip vibrates. Smaller or subgingival tips are then used for fine and subgingival scaling and ultrasonic debridement, with short overlapping strokes at a lower power setting.
Power Instrumentation: Sonic
General Comments
• Sonic scalers can be used subgingivally because of minimal heat production. The tip, however, operates with a wider excursion than ultrasonic scaler tips and thus has the potential to create more soft tissue irritation when used subgingivally.
Technique
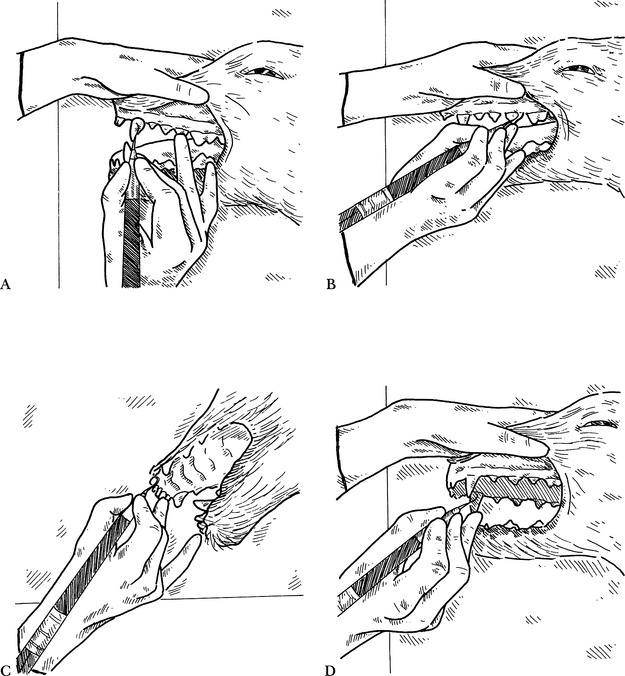
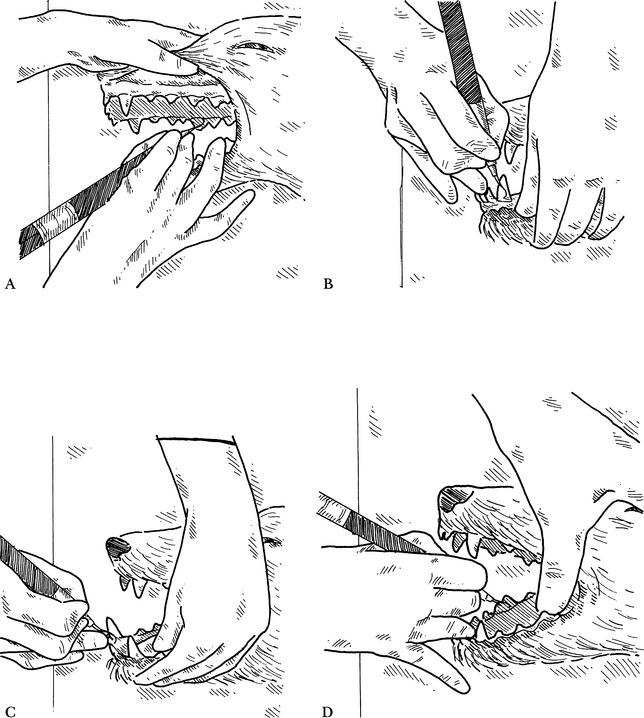
Step 1—The labial surface of the maxillary canine tooth is scaled with a sonic scaler, using extended-reach finger rests (Fig. 4-7, A).
Step 2—The buccal surfaces of the maxillary premolars and molars are scaled using standard finger rests (Fig. 4-7, B).
Step 3—The palatal surfaces of the maxillary incisors are scaled using extended-reach finger rests (Fig. 4-7, C).
Step 4—The palatal surface of the maxillary canine is scaled using standard finger rests (Fig. 4-7, D).
Step 5—The palatal surfaces of the maxillary premolars and molars are scaled using an extended grasp (Fig. 4-8, A).
Step 6—The labial surface of the mandibular canine is scaled using standard rests on the incisor (Fig. 4-8, B).
Step 7—The lingual surfaces of the mandibular incisors are scaled using standard rests (Fig. 4-8, C).
Step 8—The lingual surfaces of the mandibular premolars and molars are scaled using extended rests (Fig. 4-8, D).
Scalers and Curettes
Techniques
Hand instrument holding techniques
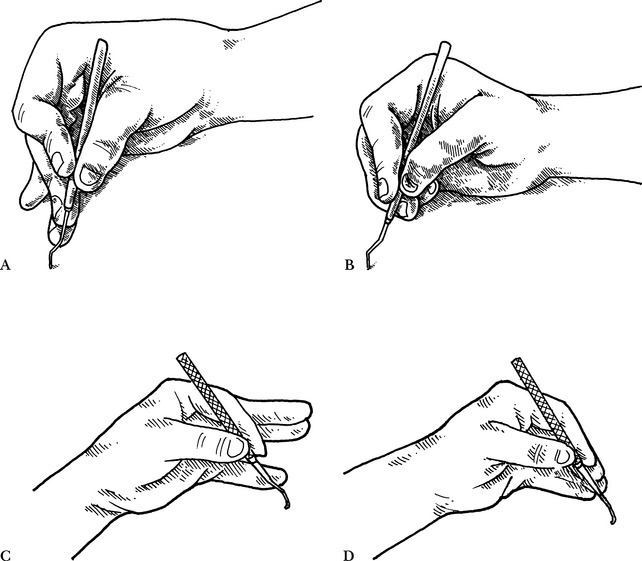
• Scalers and curettes are designed to be used with a modified pen grasp for greater control and effectiveness of the working end (Fig. 4-9, A).
• The modified pen grasp is achieved by first holding the instrument between the thumb and index finger, with the remaining fingers held straight (Fig. 4-9, C).
• The remaining fingers are then moved over so that they are to the side of and slightly on top of the index finger. The instrument remains held by the tips of the fingers (Fig. 4-9, D).
Standard position
• The middle or the fourth (ring) finger is placed against the tooth being scaled or the proximal (adjacent) tooth. This finger becomes the fulcrum to effect power for the working stroke.
• The wrist is rotated while keeping the fingers straight, as the blade of the instrument is made to move, following the contour of the tooth (Fig. 4-10, B).

