Common Laboratory Procedures for Diagnosing Parasitism
Learning Objectives
After studying this chapter, the reader should be able to do the following:
• Recognize the various types of diagnostic procedures that are used in a parasitology laboratory.
• Detail the types of parasites the various diagnostic procedures can be used to identify.
• Understand the importance of maintaining a well-managed, well-equipped diagnostic facility.
• Understand the importance of good parasitology practices in a diagnostic laboratory.
Key Terms
Correct fecal sample submission
Accession number
“Pooled fecal samples” from herds
Central record book
Gross examination of feces
Calcareous bodies/calcareous corpuscles
Field
Pattern of movement
Calibration of the compound microscope
Stage micrometer
Ocular micrometer
Direct fecal smear
Concentration methods
Fecal flotation
Specific gravity
Flotation media
Sheather’s solution
Sodium nitrate solution
Zinc sulfate solution
Magnesium sulfate solution
Saturated sodium chloride solution
Simple flotation
Centrifugal flotation
Fecal sedimentation
Qualitative fecal procedures
Quantitative fecal procedures
Modified Wisconsin technique
McMaster technique
Modified D’Antoni’s iodine
Fecal culture
Sporulation
Cellophane tape preparation
Baermann technique
Occult blood
Direct smear
Feathered edge thin blood smear
Buffy coat preparation
Modified Knott’s technique
Tracheal washes
Urine sedimentation
Skin scrapings
Ear smear procedure
Preputial washes
The term parasite represents many different types of organisms that live within or on animals, feeding on tissues or body fluids or competing directly for the animal’s food. These parasites demonstrate an amazing variety in size and appearance. Although none of the bacteria or viruses is visible to the naked eye, parasites include organisms that range in size from those that must be observed with the most powerful microscopes up to organisms that measure more than a meter in length. Parasites also show great variety in the locations in which they live in animals and the ways in which they are transmitted from one animal to another. Because of the wide variations in sizes and life cycles, there is no one particular diagnostic procedure to identify all parasites.
This chapter describes many of the procedures that a veterinary diagnostician may perform to diagnose both internal and external parasites. Generally, these procedures are used to detect the presence of parasites or their offspring, their eggs or larval stages, on the skin or in the animal’s excretions or blood. Additionally, serologic tests are being used more frequently in veterinary clinical practice. Many of the diagnostic procedures described in this chapter, however, are not in common use in most veterinary practices but are mentioned because they may be useful to technicians employed in diagnostic or research laboratories.
 TECHNICIAN’S NOTE
There are many procedures used to diagnose internal and external parasites. Some of these tests will not be seen in the clinic but will be of value to a technician working in a research lab or reference lab.
It is important to note that these tests are not by themselves totally reliable. Sometimes an animal may be infected with parasites, but because the infection is slight, no detectable stages can be observed. If the wrong test is used, no parasite will be detected. For this reason, veterinary practitioners use not only these tests but also the animal’s history, clinical signs, and other laboratory tests, such as blood values, to arrive at a specific diagnosis of internal parasites.
 TECHNICIAN’S NOTE
The tests described may not identify parasites if the parasite burden is low, the female is not actively producing eggs, or there are no detectable stages that can be observed. Therefore, these tests should not be the only tests relied upon to make a diagnosis of parasites if the tests are negative.
Diagnosis of Parasites of the Digestive Tract
The following procedures can be used as aids in diagnosis of parasitism of the esophagus, stomach, liver, bile ducts, and large and small intestines. They can also be used for diagnosis of parasitic infections in other parts of the body, when the eggs or the larval stages are passed by way of the digestive tract (e.g., “coughed up and swallowed” eggs of lung parasites).
Collection of the Fecal Sample
Veterinary diagnosticians usually do not have the opportunity to collect fecal samples and must rely on samples brought in by clients or samples collected during farm calls. Regardless of how the samples are obtained, it is important to have fresh feces for testing; this fact must be emphasized to clients. Feces collected from the yard, pen, or litter box may be old, and as a result, parasite eggs may have embryonated or larvated, oocysts may have sporulated, or pseudoparasites may be present. Some protozoans are recognized by their distinctive movements, and in old feces, these parasites may have died. The need for fresh feces stems from the rapid development and changes that occur in some common parasites’ eggs or larvae once they are passed from the animal. If fresh feces cannot be promptly submitted, clients should be advised to refrigerate the sample for no more than 24 hours.
 TECHNICIAN’S NOTE
Fecal samples should be fresh when used for parasite diagnosis. The feces should not be older than 24 hours and should be collected as fresh as possible and, if necessary, refrigerated to prevent eggs from larvating, oocysts from sporulating, or larva from changing.
Feces should be submitted in a sealed glass or plastic container, clearly marked with the time and date of collection, species of animal, animal’s name, owner’s name, and any other information relevant to the case. The condition of the stool should be noted for color, consistency, and presence of parasites. Adult nematodes or tapeworm segments observed by the client may be overlooked by the veterinary practitioner.
Clients are often confused about the amount of feces needed to perform a fecal examination. An excellent rule of thumb is that the amount of feces submitted should be approximately the size of an adult man’s thumb.
Small Animal Samples
For small animal samples, it is best that the client actually witness the animal defecating to be sure of the source of the sample and to note any straining, blood in the feces, or other problems. Again, all samples should be properly identified. In laboratories that process a large number of fecal samples, it is sometimes convenient to assign each sample an “accession number” to ensure that samples are processed in the order in which they are received and to aid in thorough recordkeeping.
 TECHNICIAN’S NOTE
The owner should be instructed to collect a fecal sample from an animal that he or she actually sees defecate to be sure of the source of the sample.
Large Animal Samples
Large animal fecal samples should be collected directly from the animal’s rectum, if possible. While wearing a disposable plastic glove, the veterinarian performing the rectal examination of cattle or horses can grasp a handful of feces and retrieve it from the rectum. These feces can then be placed in a sealed container and the container appropriately marked with the owner’s name, animal’s name or number, and date and time of collection.
The practice of turning the disposable palpation glove inside out while removing it and tying the open end with a knot, thus containing the feces, should be discouraged. These makeshift containers are difficult to label, and the process of removing collected feces from such a flexible container can be difficult and distasteful.
Samples from pigs, feedlot cattle, or other grouped animals are often “pooled” samples; that is, several fecal samples are collected from a pen without the specific animal of origin being known. Again, these samples should be as fresh as possible, and each sample should represent only one group of animals in direct contact with one another. Disposable, zipper-locking plastic bags make good containers for pooled, large animal fecal samples. These samples should be labeled with the owner’s name, specific location of the pen, number of animals, and date and time of collection. The basic rule of thumb is to always have clean containers that can be tightly sealed to prevent spillage or loss of samples. Any fecal sample that cannot be examined within an hour after collection should be refrigerated to slow down or stop the parasite’s development and reduce unpleasant odors.
 TECHNICIAN’S NOTE
Large animal samples should be taken fresh when the veterinarian is doing a rectal exam. In the case of group-housed animals, one “pooled” sample per group is used. All samples should be properly labeled to avoid confusing samples later.
Examination of the Fecal Sample
Several procedures commonly used to examine feces for internal parasites are described in this section. Before attempting to apply these procedures, the following rules should be remembered:
 TECHNICIAN’S NOTE
The technician should always wear latex or plastic gloves and proper outerwear when handling feces as some parasites are zoonotic and can even enter through the skin.
• Always clean up immediately after the tests have been performed. Leaving spilled fecal material or dirty glassware or equipment lying about creates a source of contamination and could lead to serious infections in both animals and humans. The surface top of the area should be thoroughly cleaned with Roccal-D, Nolvasan solution1 or other parasiticide cleaning solution.
The record book serves as a backup for veterinary medical records and provides a catalogue of parasites that are prevalent in the pet and livestock population of that geographic area. An accurate diagnosis of parasitism is based primarily on the diagnostician’s awareness of parasites prevalent within the geographic region. Because twenty-first century humans are extremely mobile, however, the movement of pets and livestock to and from other geographic regions should also be considered when parasitism is suspected.
 TECHNICIAN’S NOTE
Laboratory results should be recorded in a central laboratory result book and also recorded in the patient’s medical record. The central result book is used as a backup to make sure tests are run. If results are not recorded in the central book or in the record, they did not happen.
Gross Examination of Feces
The following characteristics of feces should be recorded and relayed to the attending veterinarians:
 TECHNICIAN’S NOTE
The physical appearance of the feces should be recorded in the central laboratory record book as well as on the animal’s medical record (i.e., color, consistency, presence of blood, gross parasites seen, and presence of mucus).
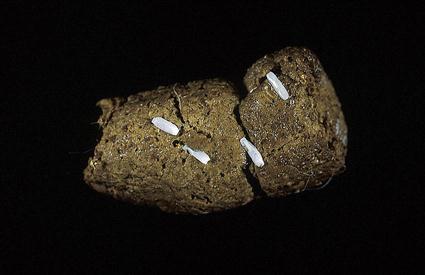
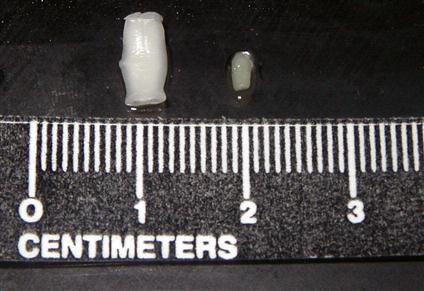
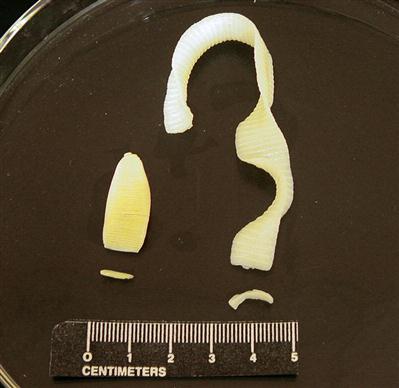
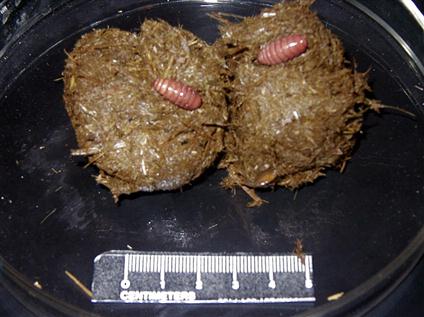
Figure 17-1 shows tapeworm segments (proglottids) in fresh feces. These should be gently removed from the feces with thumb forceps and examined with a hand-held lens or dissecting microscope. Figure 17-2 shows segments of two common tapeworms (Dipylidium caninum and Taenia pisiformis) found in the feces of dogs and cats; their morphology, shape, size, and movement may aid in identification. Short segments of ruminant and equine tapeworms may also be recovered from feces (Figure 17-3). Of interest, swine in the United States do not demonstrate adult tapeworm segments in their feces.
Occasionally, clients will bring in dried tapeworm segments that they have found in their pet’s bedding or hair coat. For identification, these segments must be rehydrated by soaking for 1 to 4 hours in a Petri dish or small container of water or physiologic saline. These segments will resume their natural state and can then be identified by their morphologic features. Alternatively, they may be “teased” open in a small amount of water on a glass microscope slide. If they are gravid (egg-containing) proglottids, they may release their eggs and be easily identified.
The diagnostician should always attempt to identify the parasite in terms of genus and species so that the veterinarian can use this information in the control and treatment of the tapeworm infection. The morphology of the segment can assist in the identification of the tapeworms. For example, with D. caninum, the tapeworm of dogs and cats that is transmitted by fleas, the diagnostician can observe with a hand-held magnifying lens the “double-pored effect,” the presence of a genital pore on both sides of every segment. Segments of tapeworms of the genus Taenia, which uses rodents and mammals as intermediate hosts, have a single pore on each segment. These pores are irregularly alternating. Again, tapeworm segments can also be definitively identified by teasing them open and demonstrating the characteristic eggs they contain.
 TECHNICIAN’S NOTE
Parasites should be identified by genus and species when possible (as some medications will work for some types of parasites and not others, some types of parasites (tapeworms) have different intermediate hosts, etc.) so the veterinarian can use proper control and treatment measures.
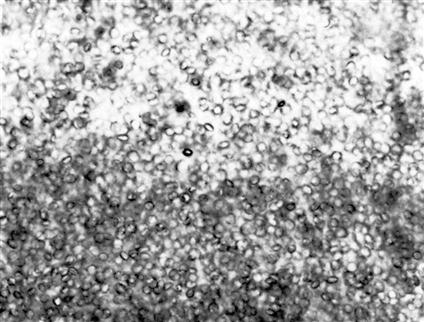
Segments of some uncommon tapeworm species may be “spent” proglottids; that is, the proglottids have dispelled their eggs and the uteri are empty. If the diagnostician is confused as to whether these are tapeworms, the suspect material can be macerated between two microscope slides and examined microscopically to determine if the tissue has small mineral deposits (called calcareous bodies, or calcareous corpuscles) that are unique to tapeworms (Figure 17-4).
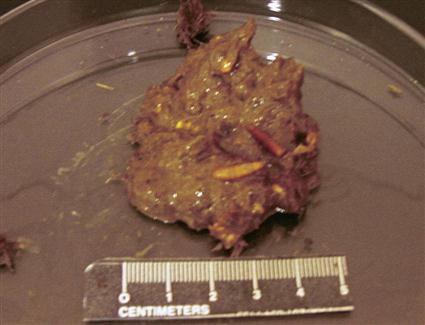
Other types of parasites are large enough to be observed in animal feces. These include adult worms expelled from their host by drug treatments or overcrowding by fellow parasites (Figure 17-5). Horse feces may contain bots, which are the larvae of a certain type of fly, Gasterophilus species. The larval flies are parasitic in the stomach of horses and are passed in the feces to complete their life cycle outside the body of the equine host (Figure 17-6).
 TECHNICIAN’S NOTE
Aged feces may contain pseudoparasites picked up from the environment or nonparasitic larvae from flies that have grown after defecation occurred.

Aged feces may also contain nonparasitic fly larvae called maggots (Figure 17-7). The maggots do not live within the animal’s intestines but instead develop from eggs laid by free-living adult flies after the feces have been passed. Flesh flies of the genus Sarcophaga deposit larvae (rather than eggs) on the feces of many domestic animals. Usually, fly maggots seen in feces voided more than 12 hours previously should not be mistaken for internal parasites; they should be considered pseudoparasites. There is one exception to this rule: Gasterophilus species, or horse bot fly larvae, may be found in fresh horse feces.
In general, when the veterinary diagnostician cannot identify parasite-like material (whether parasite or pseudoparasite) found within feces, the unidentified specimen should be sent to a diagnostic facility (a university or state diagnostic laboratory) for proper identification. These specimens should be preserved in 70% alcohol or 10% formalin and shipped as described later in this chapter. An up-to-date history should accompany each specimen.
Microscopic Examination of Feces
Compound microscopes used in a veterinary diagnostic setting vary widely in features and in the magnifications they provide. For parasitologic diagnostic examinations, objective lenses with magnification powers of 4×, 10×, and 40× are most often used. Oil-immersion objectives (e.g., 100× magnification) are occasionally used in veterinary practice, particularly in blood smear preparations. A mechanical stage is preferable and convenient for parasitologic work because it allows for smooth, uniform movement in a thorough search of the microscope slide. Regardless of how the slide is moved, the area under the coverslip must be thoroughly and uniformly searched (Figure 17-8).
 TECHNICIAN’S NOTE
Compound microscopes with 4×, 10×, and 40× objectives are usually sufficient for proper identification of parasite larvae, eggs, and oocysts.
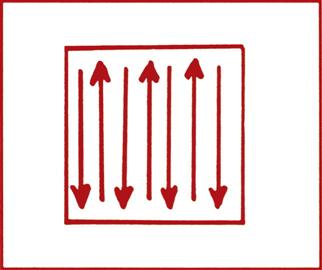
To search the slide thoroughly, the diagnostician must begin using an objective lens that magnifies at least 10× and, with experience, should be able to scan the slides more rapidly at 4×. The edge of the coverslip can be used for adjusting the coarse focus and any debris under the coverslip used for fine focus adjustment. Each circular area of the slide seen through the coverslip is called a field. The slide should be moved so that the field follows either of the patterns of arrows shown in Figure 17-8. Each time the edge of the coverslip is reached, a piece of debris or other object at the edge of the field (in the direction of the search) should be identified. The slide is then moved until the piece of debris or other object is at the edge of the field. In this manner, every field scanned slightly overlaps the previous field, and every area beneath the coverslip is examined. When the slide is being scanned in this manner, it is important to move the fine focus knob continually back and forth slightly to aid in visualization of parasite eggs or cysts not in a single plane of focus. When a parasite egg or cyst is observed at low magnification, higher-power objectives (10× or 40×) may be used to more closely examine it.
Calibrating the Microscope
The size of various stages of many parasites is often important for correct identification. Some examples are eggs of Trichuris vulpis versus eggs of Capillaria species and microfilariae of Acanthocheilonema reconditum versus microfilariae of Dirofilaria immitis. Accurate measurements are easily obtained by using a calibrated eyepiece on the microscope. Calibration must be performed on every microscope to be used in the laboratory. Each objective lens (4×, 10×, 40×) of the microscope must be individually calibrated.
Instruments
The stage micrometer is a microscope slide etched with a 2-mm line marked in 0.01-mm (10-µm) divisions (Figure 17-9). Note that 1 micron (micrometer, µm) equals 0.001 mm. Also note that the stage micrometer is used only once to calibrate the objectives of the microscope. Once the ocular micrometer within the compound microscope has been calibrated at 4×, 10×, and 40×, it is calibrated for the service life of the microscope; the stage micrometer will never be used again. Therefore it is a good idea not to purchase a stage micrometer, but instead borrow one from a university or some other diagnostic laboratory and return it following calibration.2
 TECHNICIAN’S NOTE
Microscopes with calibrated eyepieces should be calibrated for each objective for accurately measuring parasite larvae, ova, or oocysts.
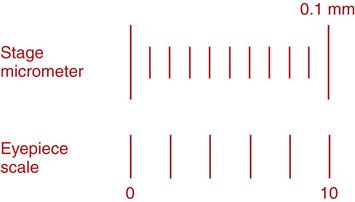
The eyepiece scale (or ocular micrometer) is a glass disc that fits into and remains in one of the microscope eyepieces. The disc is etched with 30 hatch marks spaced at equal intervals (see Figure 17-9). The number of hatch marks on the disc may vary, but the calibration procedure does not change.3
The stage micrometer is used to determine the distance in microns between the hatch marks on the ocular micrometer for each objective lens of the microscope being calibrated. This information is recorded and firmly affixed to the base of the microscope for future reference.
 TECHNICIAN’S NOTE
The calibration is used to measure the hatch marks on the ocular micrometer in the eyepiece. This is done at each objective power, recorded and affixed to the microscope for future reference.
Procedure
Start at low power (10×) and focus on the 2-mm line of the stage micrometer. Note that 2 mm equals 2000 µm. Rotate the ocular micrometer within the eyepiece so that its hatch-mark scale is horizontal and parallel to the stage micrometer (see Figure 17-9). Align the 0 points on both scales.
Determine the point on the stage micrometer aligned with the 10 hatch mark on the ocular micrometer. In Figure 17-9, this point is at 0.1 mm on the stage micrometer.
Multiply this number by 100. In this example, 0.1 × 100 = 10 µm. This means that at this power (10×), the distance between each hatch mark on the ocular micrometer is 10 µm. Any object may be measured with the ocular micrometer scale, and that distance is measured by multiplying the number of ocular units by a factor of 10. For example, if an object is 10 ocular units long, its true length is 100 µm (10 ocular units × 10 µm = 100 µm).
This procedure should be repeated at each magnification (4× and 40×). For each magnification, this information is recorded and labeled on the base of the microscope for future reference.
Objective Distance between Hatch Marks (Microns)
Direct Smear
 TECHNICIAN’S NOTE
The simplest method of microscopic fecal examination for parasites is the direct smear.
The simplest method of microscopic fecal examination for parasites is the direct smear, which consists of a small amount of feces placed directly on the microscope slide (Box 17-1). The advantages of the direct smear are the short procedure time and minimal equipment needed. Some veterinary practitioners make direct smears with only the amount of feces that clings to a rectal thermometer after the animal’s temperature has been recorded. The direct smear allows the diagnostician to observe eggs and larvae undistorted by the procedures discussed later.
 TECHNICIAN’S NOTE
The direct smear is a good diagnostic test for viewing the motile forms of protozoans that might be destroyed by other methods.
A disadvantage to the direct smear technique is that the small amount of fecal material required for this procedure is not a good representative sample size; this procedure can be inaccurate. Such a small quantity of feces may not contain the larvae or eggs of the adult parasite the animal is harboring. The animal may be incorrectly assumed to be free of parasites. This procedure also leaves much fecal debris on the slide that may be confusing to the veterinary diagnostician.
Concentration Methods for Fecal Examination
The greatest disadvantage to the direct smear procedure is the small amount of feces used, which greatly reduces the chance of finding parasite eggs or larvae or protozoan cysts. To overcome this problem, methods have been developed to concentrate parasitic material from a larger fecal sample into a smaller volume, which may be examined microscopically. Two primary types of concentration methods are used in veterinary practice: fecal flotation and fecal sedimentation.
 TECHNICIAN’S NOTE
Fecal concentration methods are preferred for indentifying parasite ova, larvae, and oocysts in the feces because larger volumes of feces are used making it more likely the developmental stages will be seen if present in the feces.
Fecal Flotation
Fecal flotation procedures are based on differences in specific gravity of parasite eggs, cysts, and larvae and that of fecal debris. Specific gravity refers to the weight of an object (e.g., the parasite egg) compared with the weight of an equal volume of pure water. Most parasite eggs have a specific gravity between 1.1 and 1.2 (g/mL), whereas tap water is only slightly higher than 1 g/mL. Therefore, parasite eggs are too heavy to float in tap water. To make the eggs float, a liquid with a higher specific gravity than that of the eggs must be used. Such liquids are called flotation solutions and consist of concentrated sugar or various salts added to water to increase its specific gravity. Flotation solutions usually have specific gravities between 1.2 and 1.25. In this range, fecal material, much of which has a specific gravity of 1.3 or greater, does not float (Figure 17-10). The result of using flotation solutions is that parasite eggs float to the surface of the liquid and large particles of fecal material sink to the bottom, making eggs easier to observe (Box 17-2).
 TECHNICIAN’S NOTE
Fecal flotation solutions with a specific gravity of 1.2 to 1.25 are used to “float” parasite ova, cysts, and larvae while the fecal material sinks to the bottom of the container.

If the specific gravity is below the desired range (1.2 to1.25), add more reagent until the hydrometer indicates this range. If the specific gravity is above 1.25, add water until the proper reading is obtained.
Sugar (Sheather’s solution), saturated sodium chloride (table salt), magnesium sulfate (Epsom salt), zinc sulfate, and sodium nitrate solutions are the flotation solutions most often used in veterinary practices. Veterinarians may select from among these solutions based on personal preference, availability of reagents, and target parasites.
Sheather’s solution is less efficient than sodium nitrate solution because it floats fewer eggs and is messy to work with (it is quite sticky). Sugar, however, is readily available and inexpensive, does not distort roundworm eggs, and floats an adequate percentage of the eggs. Sodium nitrate solution is the most efficient flotation solution, but it forms crystals and distorts the eggs after a time. Sodium nitrate may be difficult to acquire, but it can be purchased through chemical supply houses. Sodium nitrate solution is used in commercial fecal diagnostic kits and may be purchased already prepared in the form of refill bottles for these kits. Sodium nitrate solution is more expensive than sugar solution.
Saturated sodium chloride solution is the least desirable flotation solution. Its main disadvantages are that it corrodes expensive laboratory equipment, such as compound microscopes and centrifuges; forms crystals on the microscope slide; and severely distorts the eggs. Because it reaches a specific gravity of 1.2, some heavier eggs may not float in this solution. However, sodium chloride is inexpensive, easily prepared, and readily available.
 TECHNICIAN’S NOTE
The fecal solutions of choice are Sheather’s sugar solution, sodium nitrate solution, and zinc sulfate solution, however, it will depend on the specific gravity of the solution as to how many different types of eggs, larvae, and cysts are able to be floated.
Zinc sulfate solution is similar in efficiency to sugar solution and can be purchased through chemical supply houses or from veterinary suppliers in ready-to-mix gallon containers. Cystic stages of intestinal protozoans such as Giardia are best concentrated with zinc sulfate solution. Magnesium sulfate solution (Epsom salt) also forms crystals on the microscope slide. It is an inexpensive solution and is easily prepared and readily available.
Simple Flotation
The simple flotation method is probably the second most common parasitologic test performed in veterinary practices, after the direct smear (Box 17-3). A specimen of 2 to 5 g of feces is placed in a suitable container, such as a paper cup. Flotation solution is added directly to the feces, mixed thoroughly with a tongue depressor, and strained through a metal tea strainer (or cheesecloth) into a second paper cup. The contents of the second paper cup are poured into a test tube, and the flotation medium is added until a meniscus is formed (Figure 17-11). A glass coverslip is placed over the meniscus and allowed to remain for 10 to 15 minutes (depending on the flotation medium used), after which the coverslip is removed and placed on a glass microscope slide. The parasite eggs are lighter than the solution and float to the top of the tube (or vial) of flotation solution. The coverslip is removed from the liquid and examined with a microscope. This method is less efficient than the centrifugal flotations described next, but it does not require a centrifuge.
BOX 17-3
3. Fill the shell vial to the top and slightly overfill it so that a meniscus forms above the lip of the vial (see Figure 17-11). If there is not enough fluid in the cup to fill the shell vial, a small amount of fresh flotation medium may be added. Place a glass coverslip gently on top of the fluid, and allow it to settle on the meniscus.
Stay updated, free articles. Join our Telegram channel

Full access? Get Clinical Tree


