Stacking gel (4 mL)
Separating gel (10 mL)
Acrylamide concentration
5%
10%
12%
15%
30% Acrylamide mix
0.67 mL
1.7 mL
3.3 mL
4 mL
5 mL
1.5 M Tris, pH 8.8
2.5 mL
2.5 mL
2.5 mL
2.5 mL
1 M Tris, pH 6.8
0.5 mL
H2O
2.4 mL
5.7 mL
4.1 mL
3.4 mL
2.4 mL
10% SDS
40 μL
100 μL
100 μL
100 μL
100 μL
10% Ammonium persulfate
30 μL
50 μL
50 μL
50 μL
50 μL
TEMED
3 μL
5 μL
5 μL
5 μL
5 μL
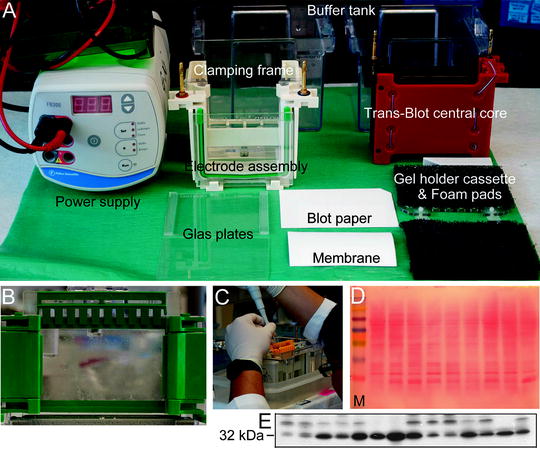
Fig. 1.
Instruments and devices used for electrophoresis and Western blotting (a). Preparing gel for SDS-PAGE (b) and loading of the samples into wells in the gel (c). The effectiveness of transfer of proteins from the gel to the membrane could be checked by staining the membrane with Ponceau S dye (d). The molecular marker (M) is in the left line. The transferred proteins were probed using antibody against hemoxygenase 1 (MW of HO-1 is ∼32 kDa, e).
2.
Prepare the brain samples for loading onto the gel (50 μg protein in 20 μL total volume). Boil for 5 min at 95°C, cool, and load into the sample wells on the gel along with a prestained MW marker (Fig. 1c).
3.
Carry out electrophoresis at 30 mA constant current until the sample has traversed the stacking gel. During this time, the samples “stack,” becoming concentrated into a very tight band, affording maximal resolution and separation of the polypeptides in the separating gel. Then continue electrophoresis until the bromphenol blue dye front is approximately 1 cm from the end of the gel.
4.
Remove the gel assembly from the vertical gel apparatus, separate the glass plates, and cut off the stacking gel with a sharp scalpel blade.
1.3 Assembly of the Gel/Membrane “Sandwich”
1.
For each gel, cut a piece of nitrocellulose and two pieces of Whatman 3 M filter paper to 5.5 × 8.5 cm.
2.
Open the plastic holder for the gel/membrane “sandwich” in a basin containing sufficient transfer buffer to cover it. Place a nylon pad flat into the holder, followed by a piece of filter paper, gel, and then the nitrocellulose. Roll over the nitrocellulose with a glass rod to remove any air bubbles between the gel and the membrane.
3.
Lay another piece of filter paper and nylon pad on top, and carefully close the blotting clamp. Place the clamp in the blotting apparatus.
4.
Fill the tank with the transfer buffer, sufficient to cover the gel/membrane “sandwich.” Carry out the transfer at a constant current of 30 mA overnight at 4°C.
1.4 Development of the Western Blot
1.
Carefully remove the nylon pad and top filter paper.
2.
Cut away any excess nitrocellulose from around the gel with a pair of scissors.
3.
Place the nitrocellulose membrane in a suitable plastic container and stain with Ponceau Red solution for 5 min with gentle agitation (Fig. 1d).
4.
Block the membrane with PBS, pH 7.4, with 0.1% Tween (PBST) containing 5% nonfat dried milk for 1–2 h. The Ponceau Red stain will be washed off the membrane during the blocking step. All subsequent reactions/washings are carried out on a shaker at room temperature.
5.
Wash with PBST (3× 5 min) before incubating with the first antibody (polyclonal rabbit anti-rat HO-1, 1:2,500 dilution, StressGen, Victoria, Canada) for 1–2 h at room temperature.
6.
After washing with PBST (3× 5 min), place the membrane in the HRP-conjugated secondary antibody solution (goat anti-rabbit IgG, 1:2,500 dilution, BioRad) for 1 h at room temperature.
7.
After washing with PBST (3× 5 min), add the ECL mix (1:1 mix of Amersham reagents 1 and 2) for 1 min.
8.
Dry out the excess liquid, wrap the membrane, and immediately expose to Kodak X-OMAT film for 30–60 s.
1.5 Stripping Blots
1.
Most antibodies should be removed by SDS. Wash blot well with PBST. Incubate and agitate the membrane in stripping buffer (100 mM β-mercapto-ethanol, 2% SDS, 62.5 mM Tris, pH 6.8) for 30 min at 50°C in a closed container.
2.
Wash several times with PBST. The membranes are ready to reuse and can be reprobed with antibodies following the blocking step.
1.6 Notes
1.
The concentration of acrylamide depends on the molecular mass of the polypeptide to be identified. As an approximate guide, for polypeptides of >100 kDa, a separating gel of 5–7% acrylamide should be employed. For polypeptides between 50 and 100 kDa, 7–9% and for <50 kDa, the acrylamide concentration in the separating gel should be 12–15% (Table 1). Acrylamide and bis-acrylamide are cumulative neurotoxins. Care should be exercised in their handling.
2.
It is advisable to run protein molecular weight standards in one of the electrophoresis lanes (Fig. 1d).
3.
The dilution of the primary antibody is dependent on the nature of the antibody (i.e., monoclonal or polyclonal) and should be determined empirically.
4.
The smaller the volume loaded onto the gel, the better the resolution will be.
5.
The proteins should be run slowly through the resolving gel to prevent “smiling” of the separated polypeptides, where the bands toward the edges of the gel tend to turn upward.
6.
Good contact between the gel and the nitrocellulose is essential for efficient electrotransfer, and care should be taken to ensure that all air bubbles are removed, as these will prevent uniform current flow, and thus interfere with the blotting process.
7.
The process of “blocking” the membrane after transfer is essential to block the unoccupied protein-binding sites on the membrane. Failure to carry out this step effectively will result in the primary and secondary antibodies binding to these sites, leading to a reduction in the sensitivity of the blotting process and unacceptably high background “Noise.” The presence of 0.1% (v/v) of polyethylene sorbitan monolaurate (Tween-20) in all buffers during the processing of the membrane assists in the prevention of nonspecific binding.
2 Enzyme-Linked Immunosorbent Assay
Enzyme-linked immunosorbent assays (ELISAs) combine the specificity of antibodies with the sensitivity of simple enzyme assays, and are used to detect the presence and concentration of an antigen or an antibody in a sample. There are many different types of ELISAs. One of the most common types of ELISA is the “sandwich ELISA.”
2.1 Sandwich ELISA
The direct sandwich ELISA involves the passive attachment of antibody to the solid phase. The antibody (capture antibody) then bind antigen that is added. The antigen is diluted in a blocking buffer to avoid nonspecific attachment to the solid phase. After incubation and washing, an antibody–antigen complex is attached to the solid phase. The captured antigen is then detected by the addition and incubation of enzyme-labeled specific antibody in blocking buffer. Thus, this is a direct conjugate binding with the antigenic targets on the captured antigen. After incubation and washing, the bound enzyme is developed by the addition of substrate/chromogen, then stopped, and finally read using a spectrophotometer.
2.2 TNF-α Measurement
Here, we provide an ELISA for quantitative determination of TNF-α in brain tissue (5).
2.2.1 Sample Preparation
Following ICH induction, basal ganglia samples are prepared. The tissues are diluted (40% weight/volume) with 0.01 mol/L PBS, containing a protease inhibitor cocktail (Roche, Indianapolis, IN), and homogenized. The homogenates are then centrifuged at 7,500 × g for 20 min at 4°C. TNF-α in the supernatant is determined using an ELISA kit (Endogen, Woburn, MA, USA) according to the manufacturer’s recommendations and results are expressed as picogram per gram (pg/g) of brain tissue.
< div class='tao-gold-member'>
Only gold members can continue reading. Log In or Register to continue
Stay updated, free articles. Join our Telegram channel

Full access? Get Clinical Tree


