Fig. 6.1
Holding of the instruments (Source: http://www.szote.u-szeged.hu/expsur/hefop/angol/microsurgery/microsurgery_advanced_invivo.htm#TOP)
There exist some techniques for knotting , but in all types of knotting in microsurgery is performed with using instruments (microsurgical needle holder and tweezers). The first knot is mostly a double and another is simple. Tightening of the suture must be reasonable, because over tightening can lead to disruption of the vessel wall and damage of the intimal layer, which may result in the initiation of coagulation and thrombosis. On the other hand, too loose tightened of sutures may expose thrombogenic subintimal layers of the vessel wall and patency of the anastomosis is also seriously threatened. A schema of knotting techniques are described in Fig. 6.2.
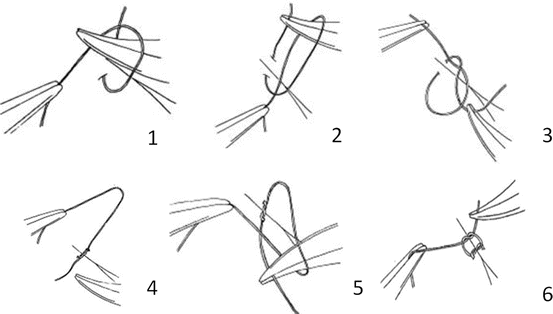
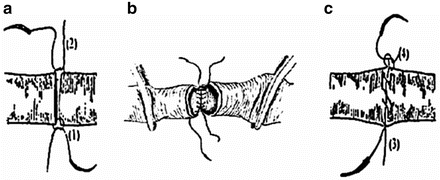
Fig. 6.2
The knotting technique (Source: http://web.med.u-szeged.hu/expsur/hefop/angol/microsurgery/microsurgery_exercises.htm#endtoend)
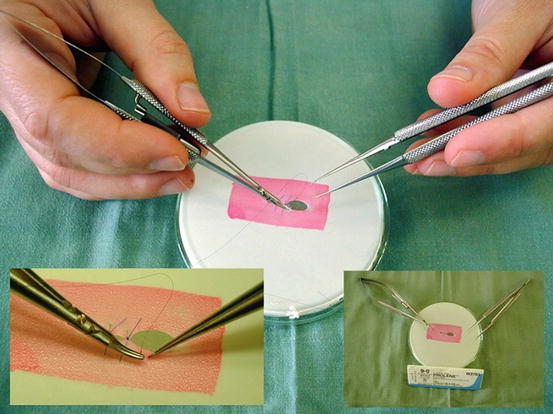
For the training of previously described practice, it is the ideal to use an inexpensive model which can be easily prepared from a surgical glove stretched over a Petri dish where the target area is painted with a square (Fig. 6.3). Initially, put the instruments into the field of microscope view in a predetermined place. This exercise teaches the surgeon tool orientation and gentle movements of the instruments in vertical and horizontal lines. After perfectly mastering the safe orientation in the field of the microscope, then proceed to practice stitching. As the most effective training, it is best to make the sutures on the perforated glove in previously described model. This model allows surgeons to practice incision, excision and their suture technique under the magnification.
6.1.2 Vascular Anastomoses
Organ transplantation depends on restoration of blood flow to the new organ and, for this reason, the precise vascular connection between graft and recipient vascular system is the “cornerstone” success of the procedure. In contrast with human organ transplantation, experimental rat transplantation is performed with microsurgical technique similarly as in human reconstructive microsurgery . Therefore, the main rules with vessels handling are similar to the human microsurgical technique. Microsurgical anastomoses are performed using meticulous technique and with the following principles. The recipient vessels and the match between the size of the recipient and pedicle vessels must be carefully assessed. Preparation of vessels must be to a healthy untraumatized part; blood clots from the edge of the vessels must be removed and irrigated with heparinized saline. Vessel side branches are examined and ligated to prevent hematoma. Either end-to-end or end-to-side anastomoses may be performed, depending on the recipient vessel and the match between the size of the vessels. Avoidance of vessel tension, kinking, and twisting is important. Vascular anastomoses are finally examined with patency test and the control of bleeding must be precise. Small bleeding should be stopped with pressure applied using a cotton pad or adding sutures. Keep in mind that small bleeding can be fatal in experimental rat transplantation.
6.1.2.1 Preparation of the Vessel
For the better visualization and to avoid contamination of the anastomotic area, it is recommend to put a strip of silicon glove behind the dissected vessel. A vascular clamp is gently placed as first on proximal part of artery (distally on the vein) and after distally (proximally on the vein). The space between the clamps and the place of the future anastomosis must be enough large so that there is about a 1 mm distance between the vessel ends. The cutting of the vessels must be completely through with one cut using scissors perpendicularly to the vessel axis. Both lumen are irrigated in with a solution containing heparin (1 ml of solution contains 5000 UI of heparin) and the adventitia should be removed in a few millimeter distance from the edges (Fig. 6.4). If the distal end of the vessel is not used for the anastomosis, it must be carefully ligated.
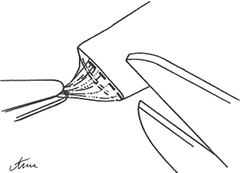
Fig. 6.4
Adventitial stripping using scissors (Source: http://www.szote.u-szeged.hu/expsur/hefop/angol/microsurgery/microsurgery_advanced_invivo.htm#TOP)
It is recommend to perform a gently dilatation the lumen of the dissected vessel with tweezers to avoiding a spasm and enlargement the diameter to a maximum of 1.5 times the natural diameter (Fig. 6.5). During surgery, it is important to rinse the wounds with isotonic solution and wash the vessel lumen with heparin solution for better visualization and vasospasmus prevention. Flushing solutions should be at room temperature as a cold solution for possible induction of vasospasm is not suitable.
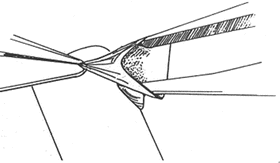
Fig. 6.5
Dilatation of the vessel (Source: http://www.szote.u-szeged.hu/expsur/hefop/angol/microsurgery/microsurgery_advanced_invivo.htm#TOP)
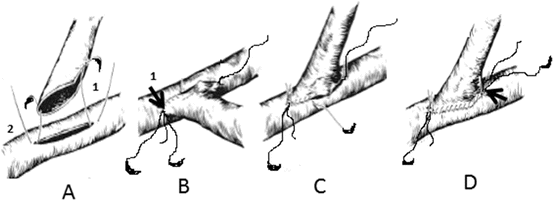
6.1.3 End to End Anastomosis
6.1.3.1 Continuous Suture
While the interrupted suture technique has been generally preferred for microsurgical end-to-end and end-to-side anastomosis, studies which preferred continuous suture technique have been also reported [3–5]. Additionally, this technique is faster than an interrupted suture: there are no knots to tie, no thread ends to cut, and therefore there is no need to change the instruments in the hands. It is important to use a two short thread (3–5 cm) in order to reduce vessel trauma which occurs when the suture passage through the vessel wall. In additional, in texts, the upper pole is defined as “12 o’clock” and the lower pole as “6 o’clock”.
1.
3.
the one end of each suture is temporarily fixed in gently tension to maintain the vessel lumen in a flattened and expanded condition
4.
the anastomosis begins from 12 o’clock from the posterior wall of the vessel towards 6 o’clock (to avoid the accidental stitching of the dorsal wall the plastic cannula with appropriate diameter can be placed into the lumen during the suture) (Fig. 6.6, B)
6.
finally, the continuous suture is finished with sutures of the anterior wall from 6 o’clock toward to the 12 o’clock, where the thread is knotted with one of the threads at 12 o’clock (Fig. 6.6, C4)
Apart from the previously described technique, the suture of the posterior wall with rotation of the vessel can be facilitated so that the stitch placed on the 6 o’clock is turn up to the 12 o’clock position and the stitch placed at 12 o’clock is turned down at the 6 o’clock position. With this maneuver, twist the vessel and place the posterior wall to the anterior position which will facilitate the suture. After finishing the suture of the posterior wall, the vessel is turned back to the initial position and the anterior wall is performed.
Usually after the first two initial stitches at both ends, a further 4–5 stitches are necessary and must to include the muscle and also the intima layer of the vessel wall into the each stitch. The technique of the continuous suture is similar for the vein and artery, however, the artery anastomosis is easier than the vein because the fine venous wall and the lumen collapse when the suture is performed.
6.1.3.2 Interrupted Suture
The classical end-to-end interrupted suture is performed after vessels clamping with the placing of three main sutures which divide the circumference of the vessels into three equal 120° segments. Additional sutures are then placed between the main sutures on the anterior vessel wall. The clamps are then rotated 180° to allow suturing of the posterior wall [6]. In the next paragraph, we described a simplified technique developed by Yu et al. [7] which allow the safe end-to-end anastomosis without vessels rotating which can cause a endothelial damage, sometimes resulting from even slighter manipulations [8].
Course of the technique described by Yu et al. [7]:
1.
2.
the vessel is rotated 90° by traction of the two stay sutures, allowing for half of the vessel to be presented anteriorly (Fig. 6.7, B)
4.
after traction on the two stay sutures, the vessel is first rotated back 90° to its original position (Fig. 6.7, D)
5.
in a further 90° rotation, the opposite unsutured half of the vessel is presented anteriorly (Fig. 6.7, E)
6.1.4 End to Side Anastomosis
Although end-to-side anastomosis is technically more challenging than the end-to-end anastomosis, its importance is a good patency rate and safety. This type of anastomosis represents a solution for the using with discrepancies in the vessel diameters and, additionally, it does not interrupt the distal blood flow. The main difference is in the performance of arteriotomy, which can be demanding with the small caliber of the vessels. For this purpose, facilitate the arteriotomy with placing a stitch into the area of the future excised vessel part, lift it up and cut out an ellipse-shaped piece with a single move with a curved scissor (Fig. 6.8). This excised area can further be enlarged when necessary. In very small caliber vessels, a simple longitudinal incision can be also performed. After flushing the lumen, free adventitia is removed. The length of the arteriotomy is recommended at one and a half times more than the diameter of the vessel that will provide the terminal end of the anastomosis.
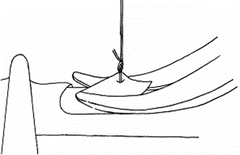
Fig. 6.8
Performing of the arteriotomy in small caliber artery (Source: http://www.szote.u-szeged.hu/expsur/hefop/angol/microsurgery/microsurgery_advanced_invivo.htm#TOP)
Similarly, end-to-end anastomosis can be performed with in a continuous or interrupted fashion. From the literature, there exist a few experimental works comparing the efficiency of both techniques. Little and Salerno [9] suggested that a continuous suture method is faster, more hemostatic with equivalent patency rate compared to an interrupted suture method. On the other hand, Hamilton and O’Brien found that the continuous suture was less favorable because of entrapment and breakage of the suture [10]. In comparative study designed by Peerless et al., it was found that the continuous suture has an equivalent growth and patency figures and is much faster than the interrupted suture method [4]. Based in our long term experimental experience with rat organ transplantation , we recommended for the majority of transplantations an end-to-side anastomosis with continuous suture technique. The next paragraphs will describe both techniques step by step.
6.1.4.1 Continuous Suture
Place the first corner knot at the heel of the anastomosis and tie the knot leaving the short end longer so that later it will be used for tying with another knot (Fig. 6.9 A/1)