Day
Test(s)
Assessment of…
1
Eye blink, righting ability, beam balance, footfall, inclined plane, wire hang, adhesive tape removal, cylinder test (for unilateral models only)
General neurological functioning and sensorimotor coordination, forelimb/hind limb strength
2
Activity
General activity levels, anxiety, and tendency to habituate
3
Accelerating rotarod
Sensorimotor coordination and motor learning
4
Zero maze
Anxiety-like behaviors
5
Forced swim (rats)/tail suspension (mice)
Learned helplessness/depression-like behaviors
6
Cued water maze
Associative learning, visual and/or other sensorimotor deficits, motivation to escape aversive stimuli, swimming ability
7
Spatial water maze—location 1 acquisition
Spatial learning, reversal learning, short-term (working) and long-term (24 h) spatial memory, learning strategy, swim speed, and left/right turn bias
8
Spatial water maze—location 1 probe, location 2 acquisition
“ ”
9
Spatial water maze—location 2 probe, location 3 acquisition
“ ”
10
Spatial water maze—location 3 probe
“ ”
2 Materials
All of the tests require some method of taking notes and collecting data in real time. Whether the experimenter chooses pen and paper or a computer-based entry system depends on budget and convenience. Most of the tests also require a stopwatch. The activity and water maze tests require an overhead-mounted video camera (an inexpensive black and white security camera is sufficient). For most of the other tests, recording with a video camera (mounted either overhead or horizontally) can be helpful for scoring purposes, but is not absolutely necessary. Additionally, a computerized video tracking system (e.g., Noldus Ethovision) is extremely helpful (albeit expensive) for several of the tests (activity, water maze, zero maze, forced swim, tail suspension) but not absolutely necessary. Note that several pieces of equipment can be built rather than purchased (anything made from wood should be sealed and waterproof for easy cleaning), and that following the exact dimensions specified in this chapter is not necessary as long as consistency is maintained within and across experiments. Finally, a spray bottle of ethanol is ideal for cleaning feces and urine from equipment after each trial.
2.1 Day 1 (See Fig. 1): Eye Blink, Righting Ability, Beam Balance, Footfall, Inclined Plane, Wire Hang, Adhesive Tape Removal, Cylinder Test (See Note 1)
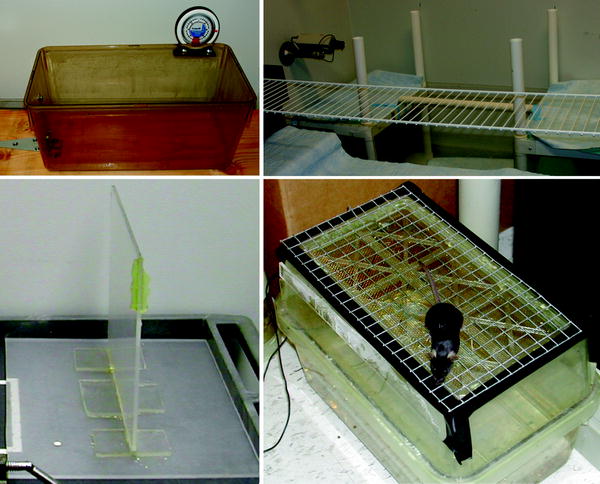
Fig. 1.
An assortment of handmade equipment used to assess sensorimotor and neurological functions.
1.
Eye blink: Cotton swab.
2.
Righting ability: Flat surface.
3.
Beam balance: A piece of thick plastic sheeting is mounted vertically in a base placed on a padded surface to form a balance beam (∼80 cm long × 80 cm high, and ¼″ wide for mice and young rats, ½″ wide for adult rats). The edge near the top is marked in increments of 1 cm and labeled with a number line in which 0 is the exact middle of the beam (for recording the distance traveled as the animal walks along the beam).
4.
Footfall: For mice and young rats, a grid of 19-gauge (∼1 mm) galvanized wire mesh with a 1/2″ grid spacing is mounted to a 100-cm long × 70-cm wide frame and elevated horizontally 100 cm from the floor. For adult rats, a 100-cm long × 35-cm wide section of wire shelving with a 1″ spacing is elevated horizontally 100 cm from the floor.
5.
Inclined plane: The inside bottom surface of a standard-sized rat cage is covered with fine sandpaper (grip tape available from skateboarding shops is ideal). One end of the cage is mounted with a hinge to a flat surface so that the other end can be lifted, and a mounted protractor is used to determine the angle of the cage’s surface.
6.
Wire hang: A 20-cm length of 19-gauge (∼1 mm) wire is suspended horizontally 20 cm (for mice and young rats) or 40 cm (for adult rats) over a padded surface.
7.
Adhesive tape removal: Two pieces of adhesive tape for each animal (0.3 cm × 0.4 cm for mice and young rats, 0.6 cm × 0.8 cm for adult rats), colored blue (left paw) and red (right paw) with permanent marker, and an empty housing cage.
8.
Cylinder test: Glass cylinders ∼10 cm (for mice and young rats) to 20 cm (for adult rats) in diameter and tall enough so that the animal cannot climb out.
2.2 Day 2 (See Fig. 2): Activity Levels

Fig. 2.
Activity-testing boxes and lighting setup for computerized video tracking (top panel ), and an overhead view showing a reconstructed path as detected by the Ethovision computerized video tracking system (bottom panel ).
1.
Video camera mounted overhead.
2.
One plastic storage container (e.g., Sterlite 35 gallon, painted black for white animals and white for dark animals) approximately 50 cm long, 36 cm wide, and 45 cm tall is used for each animal that will be simultaneously recorded. Currently, our setup has four such containers arranged so that all four fit into the field of view of the overhead video camera.
2.3 Day 3 (See Fig. 3): Accelerating Rotarod
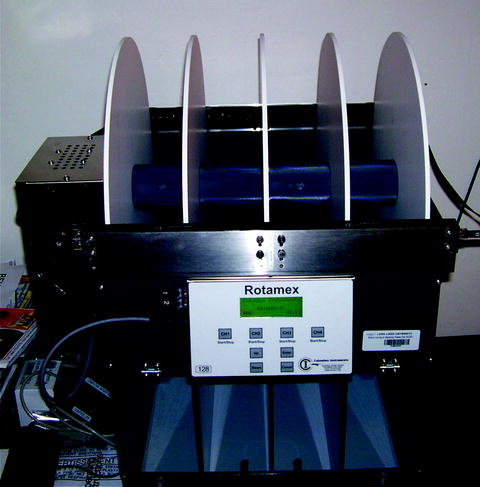
Fig. 3.
Accelerating rotarod.
The accelerating rotarod is a test of motor coordination and balance consisting of a rotating spindle upon which the animal must continuously walk forward to avoid falling off onto a padded surface ∼45 cm below. We currently use a Rotamex-5 accelerating rotarod made by Columbus Instruments with four lanes (9.5 cm wide each) and separate spindles for mice/young rats (3 cm diameter) and adult rats (7 cm diameter).
2.4 Day 4 (See Fig. 4): Zero Maze

Fig. 4.
Elevated zero maze and lighting setup.
The zero maze is a 10-cm wide and 100-cm outer-diameter plastic track in the shape of a circle (or “zero”) and elevated 100 cm above the floor. Walls (30 cm tall) enclose half of the track, and the other half is open. The open halves of the maze are brightly lit. We built our own, but a number of (albeit expensive) zero mazes are readily available for purchase.
2.5 Day 5 (See Fig. 5): Forced Swim (Rats) or Tail Suspension (Mice)
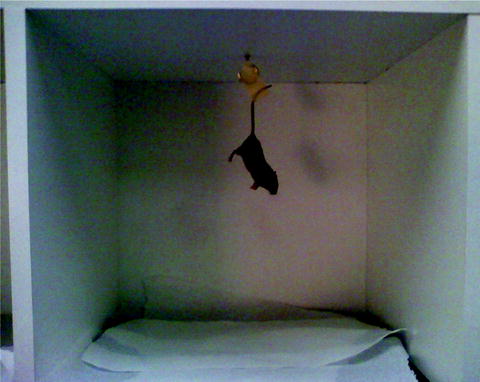
Fig. 5.
A box designed to hold a mouse suspended by its tail.
1.
Forced swim: Glass cylinders ∼10 cm (for mice and young rats) to 20 cm (for adult rats) in diameter filled with room-temperature water to a depth at which the animal’s hind limbs cannot touch the bottom.
2.
Tail suspension: An apparatus used to suspend the mice by their tail (with tape) so that their nose is ∼20 cm above a padded surface. We use a small open-sided box 40 cm in height with an eye screw in the ceiling.
2.6 Days 6–10 (See Fig. 6): Water Maze
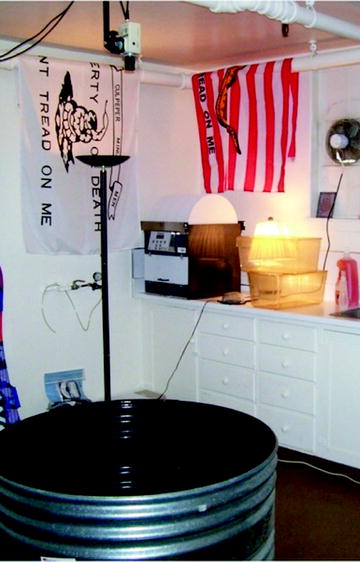
Fig. 6.
Water maze (set up for white animals) and spatial cues in the testing room.
1.
Metal pool (∼110 cm in diameter for mice and young rats, up to 200 cm in diameter for adult rats) filled with room-temperature water.
2.
Video camera mounted overhead so that the entire surface of the pool is visible within the camera’s field of view.
3.
Hose for filling and pump for emptying the pool (as needed, depending on pool configuration).
4.
An “escape” platform that the animal can step on to get out of the water made by capping the ends of a piece of 11-cm diameter plastic pipe (caps and pipe are available at most hardware stores). One end (the bottom) is weighted (e.g., with sand) and attached to a plastic base (∼20 cm × 20 cm) for stabilization. When standing, the height of the pipe should come to within ∼15 cm of the upper edge of the pool. The other end (the capped surface that forms the escape platform) is roughened with sandpaper to provide grip for the animals’ feet. The depth of the water is adjusted so that the surface of the platform is either ∼2 cm above the surface of the water (visible; for the cued water maze) or ∼2 cm below the surface of the water (submerged; for the spatial water maze).
5.
Non-toxic tempera (poster) paint for making the water opaque (white for dark animals, black for white animals).
6.
Posters and other large, visually salient cues to hang on the walls of the testing room.
7.
Kitchen sieve with long handle for removing feces from water.
8.
Extra housing cage under a heating lamp for warming and drying the animals.
3 Methods
Generally, the entire process of completing a comprehensive test battery takes three weeks. After the animals have been transferred to the housing facility nearest to the behavioral testing rooms, further transportation should be limited. For the first week (generally Monday through Friday), each animal is handled (i.e., allowed to freely crawl around the hands of the experimenter) for 1 min. Tests days 1–5 are administered Monday through Friday of the second week, and the water maze is administered Monday through Friday of the third week.
Tests generally start in the morning, shortly after the housing facility’s lights cycle on. Although some have argued for testing during the dark cycle (due to the nocturnal nature of rodents), the animals are generally used to the daytime noise and caretaker interactions, and we have found that daytime testing offers the greatest degree of convenience and generalizability across experiments and laboratories. We move the animals to the testing room and allow them to rest undisturbed for about 30 min before testing begins.
Approximately 40 animals can be tested per day by one experienced experimenter with the procedures outlined. However, most tests will go a little smoother with two experimenters—one to handle and transport the animals and the other to record data and observations. Due to the relatively complicated nature of animal behavior, extensive qualitative notes should be kept on each animal. These notes often provide invaluable answers to questions that arise while analyzing data after the experiment is completed. Ideally, the same experimenters will test the same animals every day until the experiment is complete. Experimenters should be blind to treatment condition and trained in animal handling/restraining. They should also remain a consistent and low-key presence to the animals, wearing a lab coat and similar pants every day, avoiding the use of perfumes or colognes, remaining quiet (speaking softly if necessary), silencing phone ringers, staying relatively still, and moving slowly and calmly when necessary. Experimenters should consider placing a “Do Not Disturb” sign on the outside of the testing room’s door. Additionally, we run a HEPA filter during testing to create white noise (which has the additional benefit of removing some of the animals’ fur and dander from the air).
Note that the tests described are most appropriate for post-weanling animals (21 days and older). Testing short-term behavioral deficits following brain injury in pre-weanling rodents is more difficult due to their relatively limited behavioral repertoire, but can be done with certain modifications (2–4). Additionally, these tests are most appropriate for animals that have had at least a week to recover from any acute, but transient, effects of injury. However, some of the tests, especially those administered on day 1, are also appropriate for testing such acute effects (e.g., for studies of therapeutic treatments for these effects).
Because most of the tests take multiple measurements of the same variable over time, data analysis for these tests generally consists of repeated-measures analysis of variance (ANOVA) or multiple regression. Issues regarding proper adjustments to alpha levels/p-values for multiple tests (e.g., the Bonferroni method, etc.), advanced techniques such as factor analyses (determining how variables “cluster” together), and power analysis (determining how many animals are required to produce quality data—a good starting point is ten per group) are beyond the scope of this chapter and are best discussed with an experienced biostatistician. However, the benefit of running such a comprehensive test battery is that the (potentially spurious) results of any single test or measure need not be “overinterpreted,” as the wide variety of domains tested and measures recorded will provide a relatively rich profile of each group’s behavioral characteristics.
Finally, please regard the experimental parameters described here as simply useful guidelines. Depending on several factors, including species, age, injury model, and previous test experience, certain aspects of the tests may need tweaking. Thus, pilot studies should be conducted to ensure that animals can the perform tests well enough to gather good data. Generally, the parameters should be adjusted so that controls display a “medium” level of performance, giving the experimenter the opportunity to observe group performance changes in both directions (e.g., improvement or deficit).
3.1 Day 1 (See Note 1): Eye Blink, Righting Ability, Beam Balance, Footfall, Inclined Plane, Wire Hang, Adhesive Tape Removal, Cylinder Test
We usually administer the eye blink test first, and only once. The remaining tests are cycled through three times (i.e., all animals are tested for righting ability, then all are tested on beam balance, etc., and this series is repeated three times).
Get Clinical Tree app for offline access
1.
Eye blink
Procedure. While restraining the animal’s head, approach the eye with the cotton swap.
Variables measured. Note the presence or absence of an eye blink.
Data interpretation. The absence of an eye blink could indicate visual deficits. The results of further tests that require vision (e.g., the water maze) should be interpreted with caution for these animals.
2.
Righting ability
Procedure. If using a video camera to assist with offline scoring, start the recording. Place the animal on its back and release while starting the stopwatch.
Variables measured. Record the time required to return to its feet (10 s maximum).
Data interpretation. Most animals will return to their feet very quickly. Animals that cannot return to a prone position by ∼10 s are most likely severely impaired and should probably not be subjected to further behavioral testing.
3.
Beam balance


Procedure. If using a video camera to assist with offline scoring, start the recording. Place the animal on the middle of the beam (counterbalance left facing and right facing) and start the stopwatch.
Variables measured. Record the total distance moved (using the ears as the “marker” for the number line labels), number of foot placement errors, and the latency to fall off the beam (60 s maximum).< div class='tao-gold-member'>Only gold members can continue reading. Log In or Register to continue
Stay updated, free articles. Join our Telegram channel
Full access? Get Clinical Tree
