Fig. 1.1.
The modified Eppendorf tubes are prepared for use for IBO storage by taking one Eppendorf tube, cutting the lower half off and stuffing it into another Eppendorf.
2.3 Surgical Equipment
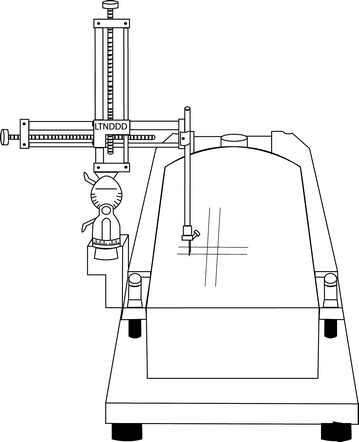
The surgical setup has three main components: the stereotaxic instrument, the syringe/tubing/injection needle (cannula lines), and the infusion pump. It is recommended that the stereotax be of a standard size (e.g., Kopf) for adult rats. Use of a smaller unit as for mice, even though rat pups are comparable in size, is not advised, as one needs plenty of room to move hands freely around the pup’s body during surgery. The stereotax should also be one armed as the lesion is performed bilaterally with the same cannula while the animal is immobilized. The ear bars of the adult stereotax are entirely removed to clear the mounting space. In this space, a platform should be installed upon which the rat will be mounted prone at a level that approximates where an adult rat’s head would be with the use of ear bars (Fig. 1.2). This platform should be custom designed according to the following guidelines: (1) the rat should rest entirely on the platform without any arms, legs, or tail hanging over the edge (i.e., it should be broad enough to accommodate the rat and tape used to immobilize it); (2) the platform should be unaffected by water damage; (3) it should sit firmly in the stereotax; (4) it should be able to have tape bind tightly to it; and (5) it should be able to be marked upon (so that guide marks perpendicular and parallel to the direction of stereotactic movement may be visualized during initial rat placement). We have found that custom-cut hard Styrofoam can fit these requirements fairly well, but for longevity, we have used custom plastic inserts.


Fig. 1.2.
Stereotaxic stage set for neonatal lesions with custom insert, marked for pup placement.
The three components of the cannula lines (e.g., syringe, tubing, and injection needle) used to deliver IBO/aCSF to the brain are described below:
(1)
10-μl Syringe with thin metal plunger: This component sits in the infusion pump. We use a Hamilton 26S fixed non-blunted needle and a 10-μl syringe (Model #701; Hamilton #80300). The inner diameter of the glass cylinder is 0.485 mm and outer 6.604 mm.
(2)
Tubing: Intramedic, non-radiopaque, polyethylene tubing (PE-20). Inner diameter is 0.38 mm and outer diameter 1.09 mm (e.g., manufactured by Clay Adams). This tubing is cut into 30–50 cm segments (e.g., long enough to reach from pump to stereotax, but not too long), one end fitting snugly (without need for glue or grease) onto the tip of the syringe needle (0.5–1 cm down) and the other onto the blunt short end of the injection needle. For this connection, the tubing is advanced as far over the blunt end of the Hamilton needles as possible (a metal ring on the injection needle stops this advancement).
(3)
Injection needle: The proximal end has a small metal ring and the distal tip penetrates the rat brain. We have used a Hamilton replacement needle for a model 701 syringe (Hamilton #80427). It has an internal diameter of 0.115 mm and an outer diameter of 0.457 mm.
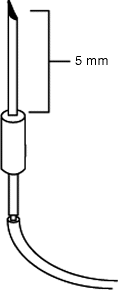
A crucial final modification of the injection needle is the placement of the standardized depth band. This is simply the placement of a small length of the PE tubing (4–6 mm, cut with a scalpel) beyond the sharp tip of the injection needles that serves as a depth guide when the needle is put into the rat’s brain. This eliminates the need for ventral–dorsal (VD) stereotactic measuring and calculation – the needle is simply advanced into the subject’s head until the band contacts the surface of the rat’s skull. For standardized targeting for the NVHL, the piece of tubing should be pushed down from the needle tip to where there is exactly 5 mm between the distal end of the band (tubing) and the middle of the bevel in the sharp end of the needle (Fig. 1.3).


Fig. 1.3.
Placement of PE tubing section on injection needle serving as 5-mm depth gauge for VD coordinate for NVHL surgery.
It is advised that a single surgical setup be complimented with four completed cannula lines: line #1 is for NVHL lesioning; line #2 for SHAM lesioning; line #3 for practice lesioning [e.g., with dye (Section 4.2)]; and line #4 as backup. Each of these lines should be appropriately labeled (e.g., with a small band of colored tape on the syringes) according to whether they will deliver aCSF only, IBO, or dye.
The pump used to deliver the aCSF, the IBO, or the dye should be able to accommodate the previously described Hamilton needles and deliver 0.3 μl over a 2.25-min (135 s) period. We have used Harvard Apparatus microinfusion pumps, with digital/keypad programmable interfaces for this purpose. Regardless of the pump, it should occasionally be checked for proper calibration, as variability in the amount of toxin delivered can have unwanted effects. A simple calibration check is to see how long it takes to deliver 3 μl as visually observed from the 10-μl Hamilton syringe (e.g., it should be about 22.5 min with pump speed at 0.3 μl/2.25 min).
Miscellaneous material needled for the NVHL surgery, including for hypothermic anesthesia, post-operative recovery, and equipment maintenance (Section 3.2), includes:
One or two rubber ice buckets with tops: Used to place rats during induction of hypothermic anesthesia or for short-term storage of IBO in Eppendorf tubes.
Water ice source: For anesthesia.
Surgical Record Book.
Warming pad/heating lamp: For post-op recovery; should accommodate multiple pups.
Freezer tape (about 1 in. wide): For rat immobilization on the stereotaxic stage.
Surgical tools: Scalpel blades or plain single-edged razor blades, fine tweezers, scissors, and an ear punch.
Stopwatch/timer: Need to time duration of needle placement.
Marking pen.
Veterinary wound closure glue.
Small vials (for alcohol tube cleaning and artificial CSF rinsing).
Tuberculin syringes: Several for cleaning line tubing/injector needles each marked according to cannulation setup (e.g., IBO and aCSF).
Dye (for practice lesioning): Prepare by adding 50 mg of Chicago Sky Blue to 20 ml of aCSF.
2.4 Lesion Verification /Histology Materials
The following equipment and materials are required for animal sacrifice/ brain extraction and cutting and histological processing for lesion accuracy (Section 3.3).
Animal sacrifice/brain extraction:
Rat guillotine for decapitation.
Appropriate choice of anesthesia for decapitation (e.g., deep isoflurane/pentobarbital/chloral hydrate).
Surgical kit for brain extraction: Scissors and small bone cutter/rongeurs.
Isopentane in 100–250-ml cylinder: Used to flash freeze extracted whole brains.
Thermometer (reading down to a –50°C).
Dry ice (frozen CO2) source.
Rubber ice bucket: To contain dry ice.
Aluminum foil: To wrap fresh frozen brain.
Marking pen: To label foil by rat number.
Freezer (–80°C) for brain storage.
Brain cutting/ histology:
Cryostat.
Superfrost Plus microscope slides.
DPX or equivalent coverslip adhesive with coverslips.
Citrosolv.
Chloroform.
100% Ethanol.
90% Ethanol.
Calcite water: This is distilled water with a dash (literally a pinch per liter) of calcium carbonated added to pH balance water to between 7 and 8. It is used in all the water containing solutions used for histological processing except the thionin stain. This preparation may be avoided if the lab’s distilled water is already pretreated in this way.
Thionin (Nissl neuronal stain) (0.05%): The following recipe makes a 1 l solution:
(1)
Measure out 940 ml of ddH2O (not calcite H2O).
(2)
Add 37 g of sodium acetate and dissolve.
(3)
Add 500 mg of thionin (baker analyzed) and dissolve.
(4)
Add 30–35 ml of glacial acetic acid to adjust pH to 4.2 (a pH between 4.0 and 4.5 is acceptable).
(5)
Filter (takes about 1 h).
3 Methods
3.1 Animal Selection and Litter Management
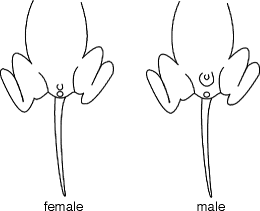
For the standard NVHL, rats should undergo surgeries on the 7th day of life which obviously necessitates daily observation of when rats are born. Some grace to this rule is reasonable such that rats may undergo surgeries at any point during a 24-h period centered on the best guess as to when the seventh day of life is timed. Most importantly, however, at surgery, the rat must weigh from 15 to 20 g, preferably close to 17 g. If it does not, there are risks that (a) the stereotactic coordinates will be inaccurate; (b) the rat may possibly not be at the correct stage of neural development; or (c) the rat (or litter) has failure to thrive due to an unknown stressor, medical problem, or other developmental abnormality (any of which could likely interfere with effects of NVHL or SHAM lesions). It should be expected that large, albeit normal litters (>12 rats) will lead to higher frequencies of PD-7 rats below the 15 g weight minimum. To address this possibility, and to anticipate the number of subjects available for surgery, it is recommended that litters be assessed at PD-3 to 5 and gender-typed and culled as needed (more culling will speed growth per animal). Gender-typing pups before PD-3 can be tricky but is quite accurate thereafter with a brief visual exam of pup’s genitalia (Fig. 1.4). Generally, compared to females, males will have a greater distance between anus and phallic prominence, and, no huge surprise, the males have a larger phallic prominence.


Fig. 1.4.
Sketch of gender differences in genitalia in PD-3–7 pups.
On the day of surgery, it is important to balance randomized NVHL vs. SHAM assignments across and within available litters. Across litters, this is important for minimizing the effects of genetic heterogeneities between moms. Allowing for expected rates of attrition due to incorrectly placed lesions, this means generating NVHL vs. SHAM ratios (e.g., 5:3 NVHL/SHAM), as consistently as possible across litters. Within litters, even when keeping within the 15–20 g weight range, it is important to optimize balance of lesion status by weight (e.g., ensure all the SHAM animals do not tend smaller).
3.2 Performing NVHL and SHAM Control Surgeries
3.2.1 Surgical Setup
On the day of surgery, setting up should include the following:
Hypothermic anesthesia bucket: Prepare the anesthesia bucket as a rubber ice bucket filled with small ice chips/balls. The researcher’s fist is used to punch a central crater in the ice field 5–10 cm deep for pup placement.
Cannula preparation: Tubing and syringes must be clean and patent with easy gliding motion of the syringe plunger. Between surgical sessions, the lines should be flushed with a tuberculin syringe loaded, first with 90% EtOH (4–5 ml squirted vigorously through a 25-gauge needle into the plunger-less Hamilton syringe end of the cannula) and second with aCSF flush (4–5 ml). During these flushes, one wants to see a thin but vigorous stream of fluid emerging from the injector tip. If the flow is slow, repeated flushing may be necessary, possibly with the use of cleaning wires provided with Hamilton syringes for removal of matter from inside the needles.
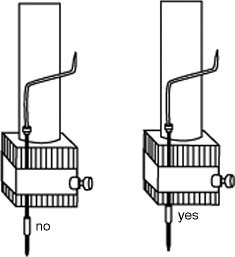
The functioning cannula is then filled completely with aCSF free of air bubbles in the lines (although air bubbles may initially be used to check for good flow in the cannula as described above). As with the cleaning, this insertion of the “hydraulic” aCSF is accomplished by a more gentle injection of aCSF through the plunger-less Hamilton syringe with a tuberculin syringe. Now, for loading the injection bolus (e.g., IBO, aCSF, or dye), one first pulls back on the Hamilton’s plunger to create an air bubble of 0.2–0.3 μl volume as a mobile boundary between the aCSF hydraulic and the injection solution. This bubble not only prevents dilution of the IBO or dye into the hydraulic aCSF but also provides a visual marker to confirm that flow is occurring within surgeries, and for knowing for how much injection solution is left in the cannula over the course of multiple surgeries. Now with the indicator bubble in place, simply suck up IBO (from an Eppendorf tube), aCSF, or dye as needed. For a run of eight or more NVHL surgeries, we recommend filling the line with >7 μl by gentle backward plunging on the Hamilton syringe. If not anticipating a need for IBO for the rest of the session, return it to –80 freezer; if reloading later in the day, it may be stored on ice and under cover for 2–4 h in the surgical room. Now, mounting the cannula needle onto the stereotax, it is key to have the needle secured to the injector arm as close to the tip of the needle as possible for stability (Fig. 1.5), because the needle itself is somewhat unstably flexible. Also, the bevel of the injection needle should be squarely positioned facing the caudal aspect of the rat. After mounting the Hamilton syringe into the infusion pump, go ahead and manually waste some injection fluid out the injector needle tip to again confirm patency and ensure that the infusion pump and the syringe are correctly mechanically interfaced. Finally with no pup on stage, make one or two 0.3 μl infusions to verify proper function and volume delivery, and to generate a consistent balancing of hydraulic tension in the system. Wipe away the small infusate bead on the tip of the needle.


Fig. 1.5.
Proper mounting of the injection needle on the stereotaxic arm.
Pre-op ready chamber: Properly selected pups (about six at a time, at the start of a run) should be on hand in a rat-housing tub. Each rat should be numbered with a marker on their back, with weight references, semi-random lesion assignments, and possibly gender ID noted on paper. Logistically, it is best to perform a series of rats (six or more) as IBO lesions and another series as SHAMS, to prevent from having to change cannula between surgeries. If two setups are used, they may be segregated for NVHL vs. SHAM surgeries.
< div class='tao-gold-member'>
Only gold members can continue reading. Log In or Register to continue
Stay updated, free articles. Join our Telegram channel

Full access? Get Clinical Tree


