Section 5 Laboratory Diagnosis and Test Protocols
Common reference range values,
Submission requirements for rabies suspects,
Histopathology and cytopathology,
Special diagnostic tests and test protocols,
Infectious disease serology and microbiology,
Sample handling
Sample identification
1. Write the animal and client names on each specimen container.
2. Write the animal and client names, species, breed, gender, and date on the test requisition form.
3. Make sure that the originating clinic name and account number are clearly identified on the form.
4. Clearly mark or write down the needed tests on the form. (Note: Commercial laboratories receive hundreds of samples each day with no test marked!)
5. Indicate the source, if other than a blood sample, on the form.
6. Identify the tissue or fluid source and clinic ID on all slides submitted for cytology (use a lead pencil to write on the frosted side).
Sample collection tubes
Most practices use a variety of glass, and occasionally plastic, vacuum tubes (Vacutainer*) to collect and submit blood, serum, or plasma from individual patients. The tubes are actually designed for collecting blood samples from humans. A variety of tube sizes, each of which maintains a predetermined negative pressure (vacuum) inside, are available. The vacuum facilitates collection of an appropriate volume of the patient’s blood to nearly fill the tube. In addition, most of the blood collection tubes contain an additive that will either accelerate or prevent clot formation.
The color of the stopper in the top of the tube indicates the type of additive, if any, and the specific type of tests that can be performed with that sample. For example, do not send serum when plasma is required! Refer to Table 5-1 as a guide for selecting the appropriate tube for the type of test desired. In addition, commercial laboratories generally provide tube selection guidelines. Interpretation of the in-office coagulation screen is outlined in Table 5-2.
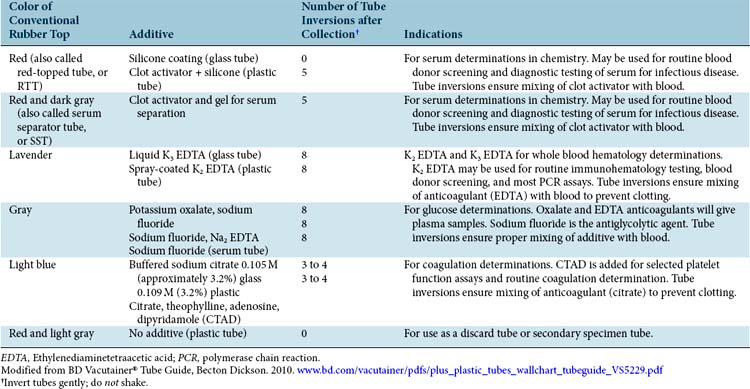
Table 5-2 Interpretation of the In-Office (or Point-of-Care) Coagulation Screen
| Platelet (Estimate) | Low | Thrombocytopenia |
|---|---|---|
| ACT | Rapid, prolonged | Intrinsic or common clotting pathway defect |
| APTT | Rapid, prolonged | Intrinsic or common clotting pathway defect |
| BMBT | Prolonged | Thrombocytopenia, thrombocytopathia |
ACT, Activated clotting time; APTT, activated partial thromboplastin time; BMBT, buccal mucosal bleeding time.
Special Considerations
When recovering serum from whole blood by centrifugation, always allow the sample to completely clot before centrifugation. Centrifuging too early can result in a mixed sample that contains both serum and plasma (Box 5-1).
Samples that clot during collection may result in:
Underfilling the collection tube can result in an excess of anticoagulant (EDTA or citrate), causing:
From IDEXX Reference Laboratories Directory of Tests and Services—2010, Westbrook, Maine, United States, IDEXX Laboratories.
When collecting blood from a patient, it is critical to use the following:
Sample storage and transport
To prepare a sample for storage and transport:
1. Stabilize serum from an SST by centrifuging the specimen before submission. If the specimen is being mailed, it is preferable to transfer the separated serum to a labeled plain RTT.
2. Centrifuge the blood samples in a plain RTT, and transfer the serum to another RTT.
3. Refrigerate and transport all blood specimens, cytology fluids, tissues, viral cultures, and urine specimens for urinalysis or culture with ice packs.
4. Do not refrigerate unstained or unfixed slides submitted for cytologic evaluation (e.g., hematology slides, tissue impression, fine-needle aspiration [FNA]).
5. Keep all routine microbial cultures (except urine) and blood cultures at room temperature.
6. If a specimen must remain frozen for transport, dry ice is required. It is usually the responsibility of the individual practice to package frozen samples correctly. Most laboratories do not provide dry ice for shipping.
Avoiding clots and platelet clumps
1. Select a vein with good blood flow—the larger the better.
2. Minimize the trauma of venipuncture.
3. Collect blood directly into anticoagulated vacuum tubes (e.g., light blue–topped tube [citrated] or lavender-topped tube [EDTA]).
4. Mix the contents of the tube well by inverting several times immediately after filling.
Submission requirements for rabies suspects
Sample submission for rabies testing
1. Laboratories may limit acceptance of tissue from dead animals for rabies testing to those for which there is a documented reason for considering that animal a rabies-suspect mammal. Generally this includes animals for which there has been a reported bite, scratch, or other possible saliva or nervous tissue exposure of a human.
2. Most laboratories will accept any bat as long as there is reasonable likelihood that a human was exposed.
3. Brain tissue from a rabies-suspect mammal reported to have bitten (or otherwise had “intimate” contact with) a domestic animal will likely be acceptable (e.g., brain tissue from a stray dog or cat that bit a pet dog or cat).
4. Highly suspect surveillance specimens (with no reported human contact) may include:
5. Most laboratories will not accept live animals as rabies suspects. The intact head only of authorized specimens will generally be accepted. Exceptions include bats, which should be submitted whole, and livestock, for which a cross-section of the brainstem and representative sections of brain (as defined by the laboratory) may be removed by a veterinarian and submitted. Special livestock instructions may apply.
Information requested on the rabies specimen history form
1. Name and address of veterinarian submitting the specimen.
2. Name and address of owner (if known).
3. Indicate whether or not human exposure occurred and the type of exposure (e.g., bite, scratch). Also note whether exposure to a rabid animal is known or highly suspect.
5. Location: description of the geographic location (exact address) of the animal when the specimen was collected.
Submission guidelines
1. Diagnostic testing of the specimen is generally performed by a designated laboratory within the state. Prior authorization to submit a rabies-suspect specimen is generally required; it is always recommended.
2. If the submission is an emergency, or made over a weekend or holiday, most laboratories will provide specific instructions to accommodate a veterinarian’s request.
3. Do not submit live animals.
4. If the suspect animal is alive, it should be humanely euthanized without damaging the head. The head must then be removed from the body and submitted intact for examination. Brain tissue that is damaged may not be accepted by the laboratory. Dead suspect bats can usually be submitted with the head intact.
5. Specimens must be preserved by refrigeration. Freezing should be avoided. Only if refrigeration is not available can the tissue be submitted frozen.
6. Tissues must not be fixed with chemical preservatives.
7. Tools, cages, and other surfaces potentially contaminated with infectious saliva or blood can be disinfected with a solution of sodium hypochlorite (1 part household bleach to 10 parts water).
8. Properly packaged specimens may be shipped directly to the rabies laboratory (verify correct address) by parcel post or commercial mail carrier. Special arrangements are likely to be required for samples arriving over weekends or holidays.
Packing and shipping directions
An acceptable rabies suspect shipping set may include any of the following:
1. One preassembled shipping container, including outer cardboard box, insulated cooler, and two gallon-sized cans with lid-locking plastic seal. Packing instructions for package are printed on top inner flaps.
2. Two gel packs of refrigerant (store the pack—not the specimen—frozen until needed).
3. Two plastic bags (13 × 20 inches × 4 mil) in which the animal head, brain of livestock or other large animal, or intact bat is to be sealed before placing in can.
4. Two plastic bags (13 × 20 inches × 4 mil) in which to place the cans.
5. One large plastic bag that surrounds the closed insulated cooler.
6. Two absorbent pads to be placed in the cans, surrounding the specimen.
7. Two blank rabies history forms and directions for collection and submission of specimens.
To prepare the specimen for shipping:
1. Remove the head from the body of the animal (except bats) and place the head in a small plastic bag. Cool specimen in a refrigerator or freezer before packaging, to enhance preservation.
2. When shipping samples consisting of only cerebellum and brainstem, first place the brain tissue in a small plastic container, then place the container in the small plastic bag. If sharp objects protrude from the specimen (e.g., bone fragments, porcupine quills) wrap specimen in several layers of newspaper before putting head in the plastic bag. Wrap bagged specimen in provided absorbent material and place inside the metal can.
3. Place the lid on the metal can and secure with a mallet. Place a plastic pressure ring (provided) on the can and secure with a mallet. The plastic ring will be seated more easily if a hard surface is placed on top of the ring before using the mallet. This will allow even pressure to be applied to the ring. Caution: Infectious splashes can occur when hammering the lid in place if the groove is contaminated with blood or body fluids in the specimen.
4. Wash hands well with soap and water. Disinfect or burn all materials contaminated in specimen preparation.
5. Complete the rabies specimen history form provided with the package. Answer all questions as accurately as possible; the history form will be used to report results to the local health authority. Place form on the outside of the plastic bag that surrounds the cooler. When shipping more than one specimen in the container (e.g., bats), be certain that each specimen is individually bagged to prevent cross-contamination, each is clearly identified, and a separate history is included for each specimen.
6. Caution: Do not use glass, wire, or other packaging materials capable of causing wounds or injuring skin.
Histopathology and cytopathology
Histopathology and cytopathology are among the most important diagnostic tools available for use in clinical practice. Generally, diagnostic specimens are submitted to a commercial laboratory or university where specially trained technologists can prepare and stain the cells or tissue to be interpreted by a pathologist. One critical limiting factor in obtaining diagnostic cytology or histopathology is the quality of the specimen submitted. It is the responsibility of the practice not only to obtain but also to prepare specimens properly before submission and interpretation. This part of Section 5 describes standards for preparing and submitting specimens for cytologic or histopathologic interpretation. Sample collection techniques are described in Section 4.
Histopathology
Cytopathology
Although it is the responsibility of the individual clinician to understand personal limitations when interpreting cytopathology on individual patients, there is one special advantage that the clinician does have over the pathologist—familiarity with the patient’s health status and the nature of the lesion or disease under consideration. Described here are guidelines for preparing and submitting samples for cytologic interpretation (see Section 4 for sample collection techniques). Whether samples are sent to a commercial laboratory or a university, or are interpreted within the practice, the recommendations that follow are important when preparing a high-quality specimen.
Note: The accuracy of interpreting cytopathologic specimens is dependent on four key variables:
 Experience and training of the clinician
 Selection of the appropriate case and lesion
 Cellular quality of the specimen selected

Exfoliative Cytology (“Impression Smear”)
Swabs, Scrapings, Washings, or Brushings
Indications
A variety of techniques are available to collect cytologic specimens from the upper and lower respiratory tract, conjunctiva, ear canals, and vaginal mucosa. In most cases, cytologic objectives focus on the recovery and identification of infectious organisms (e.g., mites, bacteria). Section 4 describes the various techniques of sample collection from these locations.
Stay updated, free articles. Join our Telegram channel

Full access? Get Clinical Tree


