Section 4 Diagnostic and Therapeutic Procedures
Routine procedures
Administration techniques for medications and fluids
Oral Administration: Tablets and Capsules—Canine
Technique
The simplest method of administering tablets or capsules to dogs is to hide the medication as bait in food. Offer small portions of unbaited cheese, meat, or some favorite food to the dog initially. Then offer one portion that includes the medication. Pill Pockets Canine Treats* is a commercially available alternative.
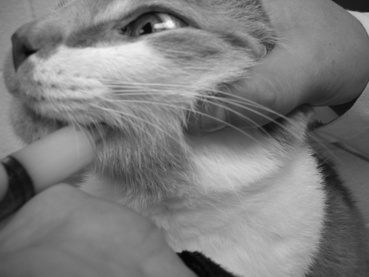
For anorexic dogs or when pills must be given without food, give medications quickly and decisively so that the process of administering the medication is accomplished before the dog realizes what has happened. With cooperative dogs, insert the thumb of one hand through the interdental space, and gently touch the hard palate. This will induce the cooperative dog to open its mouth (Figure 4-1). Using the opposite hand (the one holding the medication), gently press down on the mandible to open the mouth further (Figure 4-2). Quickly place the tablet or capsule onto the caudal aspect of the tongue. Quickly withdraw the hand and close the dog’s mouth. When the dog licks its nose, the medication likely has been swallowed.
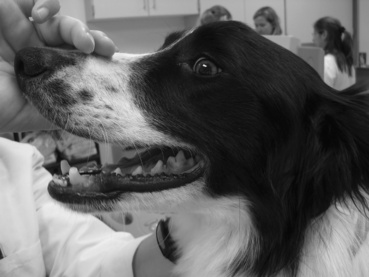
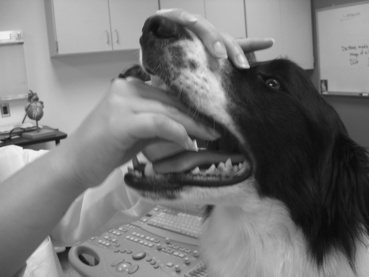
Figure 4-2: Use of the opposite hand to place a tablet or capsule on the caudal aspect of the tongue.
Oral Administration: Tablets and Capsules—Feline
Technique
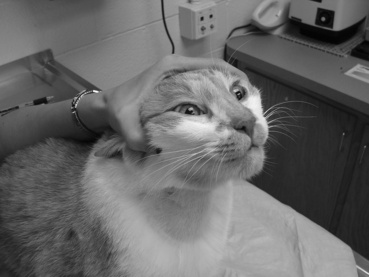
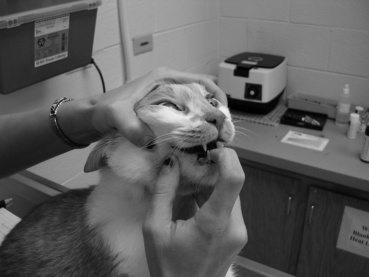
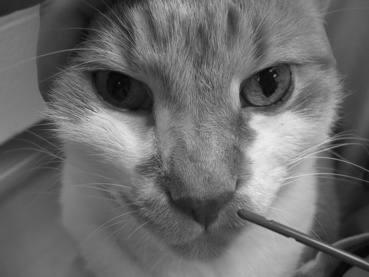
Two methods of pill administration are used in cats. In both methods the cat’s head is elevated slightly with the nose pointed upward. Success in administering pills and tablets to a cat entails a delicate balance between what works well and what works safely. In cooperative cats, it may be possible to use one hand to hold and position the head (Figure 4-3) while using the opposite hand (the one holding the medication) to open the mouth gently by depressing the proximal aspect of the mandible (Figure 4-4). Press the skin adjacent to the maxillary teeth gently between the teeth as the mouth opens, thereby discouraging the cat from closing its mouth. With the mouth open, drop (do not push) the medication (try generously lubricating the tablet or capsule with butter) into the oral cavity. The cat can be tapped under the jaw or on the tip of the nose to facilitate swallowing if you really think this works. If the cat licks, administration was probably successful.
Oral Administration: Liquids
Without a Stomach Tube
Technique
Small amounts of liquid medicine can be given successfully to dogs and cats by pulling the commissure of the lip out to form a pocket (Figure 4-5). Deposit the liquid medication into the “cheek pouch,” where it subsequently flows between the teeth as the head is held slightly upward. Patience and gentleness, along with a reasonably flavored medication, contribute to the success.
With an Administration Tube
Technique
The narrow lumen of tubes passed through the nostril of small dogs and cats limits the viscosity of solutions that can be administered through a tube directly into the gastrointestinal tract. Nasoesophageal intubation can be done with a variety of tube types and sizes (Table 4-1). Newer polyurethane tubes, when coated with a lidocaine lubricating jelly, are nonirritating and may be left in place with the tip at the level of the distal esophagus. When placing the nasogastric tube, instill 4 to 5 drops of 0.5% proparacaine in the nostril of the cat or small dog; 0.5 to 1.0 mL of 2% lidocaine instilled into the nostril of a larger-breed dog may be required to achieve the level of topical anesthesia needed to pass a tube through the nostril. With the head elevated, direct the tube dorsomedially toward the alar fold (Figure 4-6). Pushing dorsally on the nasal philtrum and pushing the nostril from lateral to medially will help facilitate passage of the tube into the ventromedial nasal meatus.
Table 4-1 The French Catheter Scale Equivalents*
| Size | ||
|---|---|---|
| Scale | Millimeters | Inches |
| 3 | 1 | 0.039 |
| 4 | 1.35 | 0.053 |
| 5 | 1.67 | 0.066 |
| 6 | 2 | 0.079 |
| 7 | 2.3 | 0.092 |
| 8 | 2.7 | 0.105 |
| 9 | 3 | 0.118 |
| 10 | 3.3 | 0.131 |
| 11 | 3.7 | 0.144 |
| 12 | 4 | 0.158 |
| 13 | 4.3 | 0.170 |
| 14 | 4.7 | 0.184 |
| 15 | 5 | 0.197 |
| 16 | 5.3 | 0.210 |
| 17 | 5.7 | 0.223 |
| 18 | 6 | 0.236 |
| 19 | 6.3 | 0.249 |
| 20 | 6.7 | 0.263 |
| 22 | 7.3 | 0.288 |
| 24 | 8 | 0.315 |
| 26 | 8.7 | 0.341 |
| 28 | 9.3 | 0.367 |
| 30 | 10 | 0.393 |
| 32 | 10.7 | 0.419 |
| 34 | 11.3 | 0.445 |
* Multiple types of pediatric polyurethane nasogastric feeding tubes are available in sizes ranging from 8F to 12F that easily accommodate administration of liquids medications and fluids to kittens, cats, and small dogs.
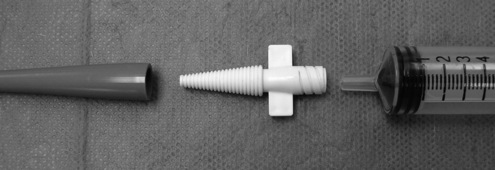
Depending on the feeding tube type, the end of the tube may or may not accommodate a syringe. For example, soft, rubber urinary catheters are excellent tubes for single administration use. However, the flared end may not accommodate a syringe. To affix a syringe to the outside end of a tapered feeding tube or catheter, insert a plastic adapter (Figure 4-7) into the open end of the tube.
Topical Administration
Dermatologic
Patient Preparation
Several objectives should be considered when treating dermatologic disorders with topical medication: (1) eradication of causative agents; (2) alleviation of symptoms, such as reduction of inflammation; (3) cleansing and debridement; (4) protection; (5) restoration of hydration; and (6) reduction of scaling and callus. Many different forms of skin medications are available, but the vehicle in which they are applied is a critical factor (Box 4-1).
Box 4-1 Vehicles Used in the Administration of Topical Skin Medications
Lotions are suspensions of powder in water or alcohol. They are used for acute, eczematous lesions. Because they are less easily absorbed than creams and ointments, lotions need to be applied two to six times a day.
Pastes are mixtures of 20% to 50% powder in ointment. In general, they are thick, heavy, and difficult to use.
Creams are oil droplets dispersed in a continuous phase of water. Creams permit excellent percutaneous absorption of ingredients.
Ointments are water droplets dispersed in a continuous phase of oil. They are very good for dry, scaly eruptions.
Propylene glycol is a stable vehicle and spreads well. It allows good percutaneous absorption of added agents.
Adherent dressings are bases that dry quickly and stick to the lesion.
Shampoos are usually detergents designed to cleanse the skin. If shampoos are left in contact with the skin for a time, added medications may have specific antibacterial, antifungal, or antiparasitic effects.
Subcutaneous Injection
Implanted Subcutaneous Fluid Ports
Technique
Recently, implantable subcutaneous ports* have been introduced for use in patients requiring regular administration of subcutaneous fluids at home. A 9-inch silicon tube is preplaced under the skin and is sutured in place by a veterinarian. Objectively, this offers easy access to the subcutaneous space without the need for needle penetration. Owners simply attach a syringe or extension tube tip to the port and administer the appropriate volume of fluids at an appropriate rate and frequency.
Transdermal (Needle-Free) Administration
Technique
Intradermal administration of vaccine and drugs in veterinary and human medicine largely has been limited to the complexities of accurately delivering the desired dose into, and not under, the skin. In 2004 a transdermal administration system* was introduced for cats (recombinant feline leukemia virus [FeLV] vaccine) that was designed after a similar device used in human (pediatric) medicine. Recently the transdermal administration system used for administration of the recombinant FeLV vaccine has been re-designed. This same administration system is now used for the transdermal administration of the oral melanoma vaccine. The transdermal administration system consistently delivers a precise volume of vaccine into the skin, subcutaneous tissues, and muscle. Use of the transdermal administration system should only be used to administer those vaccines approved for this method of delivery.
Additional Reading
Wingfield WE: Veterinary emergency medicine secrets, Philadelphia, 1997, Hanley & Belfus.
Blood pressure measurement: indirect
Technique
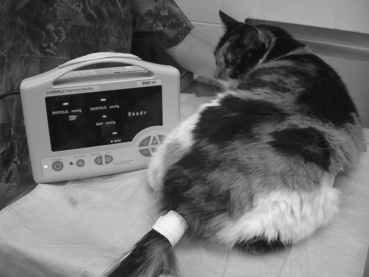
Generally, two techniques are used. Oscillometric blood pressure (BP) measurement entails use of an automated recording system. A cuff is applied to the base of the tail or a distal limb for access to an artery. This technique generally is regarded as being most accurate in dogs. When oscillometric BP measurements are performed in dogs, the patient should be in lateral recumbency. This places the cuff at approximately the same level as the heart. In cats the patient generally remains in sternal recumbency (and minimally restrained). Most patients experience a brief acclimation period to the cuff placement. For this reason, at least three to five separate readings are obtained at 1- to 2-minute intervals. This technique can be used on awake or anesthetized patients (Figure 4-8).
Clinically, the most common use of indirect BP measurement is in assessing cats for the presence (or absence) of systemic hypertension caused by renal insufficiency or hyperthyroidism (thyrotoxicosis). A common finding among untreated hypertensive cats is retinal detachment and blindness. Early detection and therapeutic intervention (e.g., enalapril and or amlodipine) is critical. In dogs, BP measurement is indicated in patients with chronic renal insufficiency and/or protein-losing nephropathy, hyperadrenocorticism, and diabetes mellitus. In veterinary medicine, interpretation of BP centers on the systolic BP reading, not the diastolic reading (Table 4-2).

Additional Reading
Diagnostic sample collection techniques
Bacterial Culture
Direct Microscopic Examination
Before actually collecting and submitting a sample to a laboratory for bacterial culture, it is appropriate (whenever feasible to do so) to prepare, stain, and examine, under direct microscopy, exudates or fluid from the suspect material or tissue. Staining the air-dried sample with a rapid Romanowsky-type stain (e.g., Diff-Quik stain) or a Gram stain may reveal evidence of neutrophilic inflammation (neutrophilia, especially with a left shift) and occasionally degenerative neutrophils with intracellular bacteria visible. These findings greatly facilitate patient management by documenting the immediate need for interventive empiric antimicrobial therapy until definitive culture and antimicrobial susceptibility results are obtained. The absence of cytologic evidence of bacterial infection does not rule out the possibility that the patient is infected or bacteremic (Table 4-3).
Table 4-3 Common Bacterial Culture Results
| Site | Commensals | Pathogens |
|---|---|---|
| External ear canal | ||
| Dog | Malassezia, Clostridium, Staphylococcus (a few), Bacillus (a few); never Streptococcus, Pseudomonas, or Proteus | Many Staphylococcus and Malassezia together; Pseudomonas, Proteus, Streptococcus, Escherichia coli |
| Cat | Not documented | Staphylococcus aureus, β-hemolytic streptococci, Pasteurella, Pseudomonas, Proteus, E. coli, Malassezia |
| Skin | ||
| Dog | Micrococcus, Clostridium, diphtheroids, Staphylococcus epidermidis, Corynebacterium, Malassezia | S. aureus (coagulase positive), Proteus, Pseudomonas, E. coli |
| Cat | Micrococcus, Streptococcus, S. aureus, S. epidermidis | S. aureus, Pasteurella multocida, Bacteroides, Fusobacterium, hemolytic streptococci |
| Conjunctiva | Staphylococcus, Streptococcus, Bacillus, Corynebacterium, diphtheroids, Neisseria, Pseudomonas | S. aureus, Bacillus, Pseudomonas, E . coli, Aspergillus |
| Vagina | Staphylococcus, Streptococcus, Enterococcus, Corynebacterium, E. coli, Haemophilus, Pseudomonas, Peptostreptococcus, Bacteroides | Brucella canis; pure culture of organism (especially E. coli, Staphylococcus, Pseudomonas) when accompanied by tissue reaction at vaginal cytology |
| Urine | <1000* organisms per milliliter; presence of several organisms suggests contamination | More than 100,000* organisms per milliliter and often pure culture; E. coli, enterobacteria, Klebsiella, Proteus, Pseudomonas aeruginosa, P. multocida, Staphylococcus, Streptococcus |
* Absolute numbers of bacteria depend on the collection technique.
Stay updated, free articles. Join our Telegram channel

Full access? Get Clinical Tree


