Section I Emergency Care
Prehospital management of the injured animal
Survey of the scene
1. Call for help! At the accident scene, it usually takes more than one person to assist the animal and prevent injury to the animal and human bystanders.
2. If an accident has occurred in a traffic zone, alert oncoming traffic regarding the injured animal in the road. Make sure you have a piece of clothing or other object to alert oncoming traffic. Do not become injured yourself because oncoming traffic cannot see or identify you!
3. If the animal is conscious, prevent yourself from becoming injured while moving the animal to a safe location. Use a belt, rope, or piece of long cloth to make a muzzle to secure around the animal’s mouth and head. If this is not possible, cover the animal’s head with a towel, blanket, or coat before moving it, to prevent the animal from biting you.
4. If the animal is unconscious or is unconscious and immobile, move it to a safe location with a back support device that can be made from a box, door, flat board, blanket, or sheet.
Initial examination
1. Is there a patent airway? If airway noises are present or the animal is stuporous, gently and carefully extend the head and neck. If possible, extend the tongue. Wipe mucus, blood, or vomitus from the mouth. In unconscious animals, maintain head and neck stability.
2. Look for signs of breathing. If there is no evidence of breathing or the gum color is blue, begin mouth-to-nose breathing. Encircle the muzzle area with your hands to pinch down on the gums, and blow into the nose 15 to 20 times per minute.
3. Is there evidence of cardiac function? Check for a palpable pulse on the hind legs or for an apex beat over the sternum. If no signs of cardiac function are found, begin external cardiac compressions at 80 to 120 times per minute.
4. Is there any hemorrhage? Use a clean cloth, towel, paper towel, or disposable diaper or feminine hygiene product to cover the wound. Apply firm pressure to slow hemorrhage and prevent further blood loss. Do not use a tourniquet, because this can cause further damage. Apply pressure, and as blood seeps through the first layer of bandage material, place a second layer over the top.
5. Cover any external wounds. Use a clean bandage material soaked in warm water, and transport the animal to the nearest veterinary emergency facility. Address penetrating wounds to the abdomen and thorax immediately.
6. Are there any obvious fractures present? Immobilize fractures with homemade splints made of newspaper, broom handles, or sticks. Muzzle the awake animal before attempting to place any splints. If a splint cannot be attached safely, place the animal on a towel or blanket and transport the animal to the nearest veterinary emergency facility.
7. Are there any burns? Place wet, cool towels over the burned area and remove as the compress warms to body temperature.
8. Wrap the patient to conserve heat. If the animal is shivering or in shock, wrap it in a blanket, towel, or coat and transport it to the nearest veterinary emergency facility.
9. Is the animal experiencing heat-induced illness (heat stroke)? Cool the animal with room-temperature wet towels (not cold) and transport it to the nearest veterinary emergency facility.
Preparation for transport
1. Call ahead! Let the facility know that you are coming. Be prepared by having emergency numbers and locations available. The police or sheriff’s department may be able to aid in locating the nearest veterinary emergency facility.
2. Line upholstery with plastic bags or sheeting to prevent soilage, when possible.
3. Move the injured patient carefully. Use the same approach as moving the animal from the pavement.
4. Drive safely. Do not turn one accident into two. Ideally, have a bystander or friend or family member drive while another person stays in the backseat with the animal.
Initial emergency examination, management, and triage
Primary survey and emergency resuscitation measures
ABCs
B = Breathing
Is the animal breathing? If the animal is not breathing, immediately intubate the animal and start artificial ventilations with a supplemental oxygen source (see Cardiac Arrest and Cardiopulmonary Cerebral Resuscitation).
C = Circulation
Establish large-bore vascular or intraosseous access (see Vascular Access Techniques). If hypovolemic or hemorrhagic shock is present, institute immediate fluid resuscitation measures. Start with one fourth of a calculated shock dose of crystalloid fluids (0.25 × [90 mL/kg] for dogs; 0.25 × [44 mL/kg] for cats), and reassess perfusion parameters of heart rate, capillary refill time, and BP. If pulmonary contusions are suspected, use of a colloid such as hydroxyethyl starch at 5 mL/kg in incremental boluses can improve perfusion with a smaller volume of fluid. In cases of head trauma, hypertonic (7%) sodium chloride (saline) can be administered (4 mL/kg intravenous bolus) with hydroxyethyl starch. Acute abdominal hemorrhage caused by trauma can be tamponaded with an abdominal compression bandage.
Ancillary diagnostic evaluation
The rapidly decompensating patient
Animals that do not respond to initial resuscitation usually have severe ongoing or preexisting physiologic disturbances that contribute to severe cardiovascular and metabolic instability. A patient that does not respond to or responds to and then stops responding to initial resuscitation efforts should alert the clinician that decompensation is occurring (Boxes 1-1 and 1-2).
Box 1-1 Clinical Signs of Decompensation
Additional Reading
Mathews KA: Veterinary emergency and critical care manual, Guelph, Ontario, Canada, 1996, Lifelearn.
Emergency diagnostic and therapeutic procedures
Abdominal paracentesis and diagnostic peritoneal lavage**
To perform abdominal paracentesis, follow this procedure:
1. Place the patient in left lateral recumbency and clip a 4- to 6-inch square with the umbilicus in the center.
2. Aseptically scrub the clipped area with antimicrobial scrub solution.
3. Wearing gloves, insert a 22- or 20-gauge needle or over-the-needle catheter in four quadrants: cranial and to the right, cranial and to the left, caudal and to the right, and caudal and to the left of the umbilicus. As you insert the needle or catheter, gently twist the needle to push any abdominal organs away from the tip of the needle. Local anesthesia typically is not required for this procedure, although a light sedative or analgesic may be necessary if severe abdominal pain is present. In some cases, fluid will flow freely from one or more of the needles. If not, gently aspirate with a 3- to 6-mL syringe or aspirate with the patient in a standing position. Avoid changing positions with needles in place because iatrogenic puncture of intraabdominal organs may occur.
4. Save any fluid collected in sterile red- and lavender-topped tubes for cytologic and biochemical analyses and bacterial culture. Monitor hemorrhagic fluid carefully for the presence of clots. Normally, hemorrhagic effusions rapidly become defibrinated and do not clot. Clot formation can occur in the presence of ongoing active hemorrhage or may be caused by the iatrogenic puncture of organs such as the spleen or liver.
To perform DPL, follow this procedure:
1. Clip and aseptically scrub the ventral abdomen as described previously.
2. Wearing sterile gloves, cut multiple side ports in a 16- or 18-gauge over-the needle catheter. Use care to not cut more than 50% of the circumference of the catheter, or else the catheter will become weakened and potentially can break off in the patient’s abdomen.
3. Insert the catheter into the peritoneal cavity caudal and to the right of the umbilicus, directing the catheter dorsally and caudally.
4. Infuse 10 to 20 mL of sterile lactated Ringer’s solution or 0.9% saline solution that has been warmed to the patient’s body temperature. During the instillation of fluid into the peritoneal cavity, watch closely for signs of respiratory distress because an increase in intraabdominal pressure can impair diaphragmatic excursions and respiratory function.
6. In ambulatory patients, walk the patient around while massaging the abdomen to distribute the fluid throughout the abdominal cavity. In nonambulatory patients, gently roll the patient from side to side.
7. Next, aseptically scrub the patient’s ventral abdomen again, and perform abdominal paracentesis as described previously. Save collected fluid for culture and cytologic analyses; however, biochemical analysis findings may be artifactually decreased because of dilution. Remember that you likely will retrieve only a small portion of the fluid that was instilled.
Additional Reading
Bandaging and splinting techniques
In general, bandages can be applied to open or closed wounds. Bandaging is used for six general wound types: open contaminated or infected wounds, open wounds in the repair stage of healing, closed wounds, wounds in need of a pressure bandage, wounds in need of pressure relief, and wounds in need of immobilization. Box 1-3 lists various functions of bandages.
Box 1-3 Functions of Bandages and Splints
Wet-to-dry bandages—treat deep shearing injuries
Absorb exudate and debride wounds
Protect a wound from environmental bacteria
Protect the environment from wound blood, exudate, and bacteria
Immobilize a wound and support underlying osseous structures
Serve as a vehicle for antiseptics and antibiotics
Serve as an indicator of wound secretions
Wounds in Need of a Pressure Bandage
Wounds in Need of Pressure Relief
Modified Doughnut Bandage
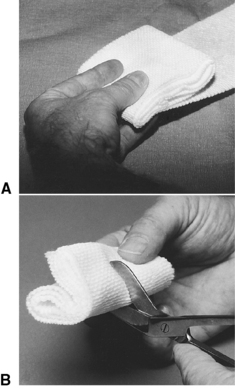
To place a modified doughnut bandage, follow this procedure (Figure 1-1):
1. Make several layers of cast padding, and fold them over together, making a 3- × 3-inch pad.
2. Fold the pad over on itself, and cut a slit in the center. Form this slit into a hole.
3. Place the hole in the cast padding over the bony prominence.
4. Wrap bandaging material over the pad.
5. Place tapes over the wrapping material, with overlap of the tape strips, to secure it in place.
6. Alternatively, place several loose stay sutures percutaneously in the skin surrounding the bony prominence, and secure the doughnut in place with umbilical tape woven through the stay sutures and over the doughnut.
Doughnut-Shaped Bandage
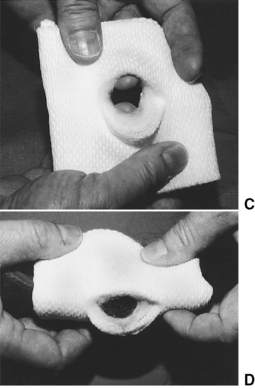
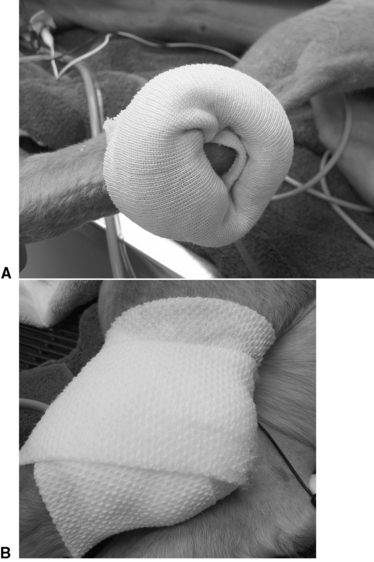
To create a doughnut-shaped bandage, follow this procedure (Figures 1-2 and 1-3):
1. Roll a hand towel tightly and wrap tape around it to create a circle with a hole in the center. Alternatively, take a length of stockinet bandage material and roll it as you would a sock, creating a padded circle with a hole in the center. Make sure that the hole in the center is large enough to fit around the surgical repair site or ulcer.
2. Place the hole in the center over the ulcer or surgical repair site.
3. Secure the roll in place with strips of tape and cotton and then elastic bandage material. Alternatively, place loose loops of suture through the skin adjacent to and around the wound. Secure the doughnut in place with umbilical tape secured through the suture loops and over the bandage. The wound in the center can be observed and treated through the hole in the center, if necessary.

Wounds in Need of Immobilization
External Pin Splints
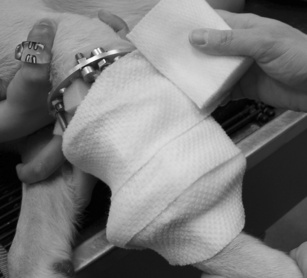
An external pin splint is required when fractures or luxations are associated with open wounds. In some cases it may be difficult to bandage under the bars of the pin splint in such a way that the bandage is in contact with the wound. To create padding around the pins, fit foam rubber sponges to lie securely under and around the pins. Place bandages around the external fixator apparatus in layers to decrease contamination of the wound from the external environment and to absorb fluid that drains from the wound (Figures 1-4 to 1-6).
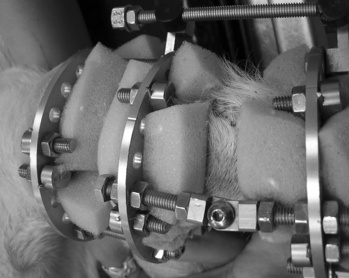
Figure 1-4: Foam rubber pads are placed under and around the pins of the external fixator, adjacent to the wound.
Stay updated, free articles. Join our Telegram channel

Full access? Get Clinical Tree


