Boiling cannot be considered to be a method of sterilization because it does not reach a high enough temperature to destroy bacterial spores. Hot-air ovens produce a dry heat. Microorganisms are more resistant to dry heat so high working temperatures are required for a long period of time (Table 7.1). Long cooling periods are also required and the very high temperatures may damage metal items. A safety device should be fitted to the door to prevent accidental opening before the oven is cool. Care should be taken not to overload the oven, as air will be unable to circulate freely. Table 7.1 Hot-air ovens: working temperature and time ratios The majority of autoclaves designed for modern veterinary practice incorporate a drying cycle. Steam is exhausted and replaced by filtered air which dries the packs (Table 7.2). Table 7.2 Autoclaves: working temperature, time and pressure ratios 1. Action: Place individually packed items into a polythene liner bag. Rationale: Liner bags are supplied with the sterilizer. 2. Action: Place a scored ampoule containing ethylene oxide liquid inside the liner bag and seal the bag with a metal twist tie. Rationale: The bag must be sealed in order to keep the gas circulating around the contents. 3. Action: Put the liner bag into the sterilizer unit. 4. Action: Snap the ampoule from outside the bag to release the gas. Rationale: To minimize exposure to gas. 5. Action: Close and lock the door to the sterilizer unit and turn the ventilator on. Rationale: Accidental opening of the unit can be prevented if the unit is locked. 6. Action: After 12 hours turn on the pump. Rationale: This aerates the unit before it is safe for the operator to open. 7. Action: Two hours after aerating, remove sterilized items. Rationale: This will ensure that any toxic gas has been removed. 8. Action: Store items for a further 24 hours in a well-ventilated room. Rationale: This makes sure that all the ethylene oxide has dissipated. Sterilization by ethylene oxide is suitable for anaesthetic tubing, endotracheal tubes, fibreoptic equipment, optical instruments, plastic items such as catheters and syringes, high-speed drills and battery-operated drills. It is essential that the effectiveness of any sterilization method be constantly monitored to ensure that all microorganisms, including bacterial spores, are destroyed. Different sterilization methods require different working conditions in terms of time and temperature. It is also important to choose the correct method of monitoring the efficacy of sterilization (Table 7.3). Table 7.3 Methods of monitoring the efficacy of sterilization There are a number of different packing materials available for the preparation of items to be sterilized. Selection will depend largely on the method of sterilization but factors such as cost and personal preference may also be taken into account (Table 7.4). Table 7.4 Packing materials for sterilization 1. Action: Select the appropriate packaging material for the method of sterilization to be used. Rationale: A packing material that is non-permeable to steam would not be suitable for an autoclave. 2. Action: Select the correct size for the item to be sterilized. 3. Action: Label the pack with the contents. Rationale: This will save opening incorrect packs, which would then require re-sterilization. 4. Action: Write the date on the pack. Rationale: Sterilized items should be repackaged and sterilized again if not used within 3 months. 5. Action: Write the name of the person preparing the pack on the pack label. Rationale: This allows any problems with the packing to be traced. It is vital to have a strict cleaning regime in the operating theatre and preparation room to maintain a high standard of asepsis. Both daily and weekly cleaning procedures are essential. In addition to this, there are some general rules for maintaining asepsis in the theatre (Table 7.5). Table 7.5 Maintaining an aseptic theatre 1. Action: Damp dust all surfaces and equipment using dilute disinfectant. Rationale: Using a dry cloth would merely move dust around the room. 2. Action: Wipe the table and surfaces in between patients, with dilute disinfectant. Clean the floor if it is soiled. Rationale: This prevents cross-contamination from one patient to the next. 3. Action: Remove used instruments and drapes after each procedure. Rationale: To avoid contaminating the next surgical site. 4. Action: At the end of the day, vacuum to remove debris and hair. Rationale: Fine particles will be collected more efficiently using a vacuum. 5. Action: All waste material and soiled equipment must be removed. Rationale: The warm operating theatre is an ideal breeding ground for microorganisms. 6. Action: All surfaces, including lights and sinks, must be thoroughly cleaned using dilute disinfectant. Rationale: Contaminated dust particles will settle on all surfaces and must be removed. 1. Action: Remove all portable equipment from the operating theatre. Rationale: Dirt and debris quickly build up in less accessible areas such as those behind equipment. 2. Action: Clean the equipment including the castors. Rationale: Castors soon fail to run smoothly if they are not cleaned regularly. 3. Action: Scrub the ceiling, walls, floor and all fixtures thoroughly using a disinfectant with detergent properties. 4. Action: Use cleaning utensils that are specifically designed for the operating theatre. They should be sterilized or washed in a washing machine after use. Rationale: This will minimize cross-contamination from other areas of the veterinary practice. 1. Action: Turn on the water and adjust to a warm temperature. 2. Action: Allow the water to wash over the hands and drain from the wrists to the fingertips. Rationale: This will remove any gross contamination. 3. Action: Clean the fingernails with an orange stick or nail file. 4. Action: Apply plain soap and massage into the hands, from the wrists to the fingertips, in a circular motion, including the backs of the hands. 5. Action: Rinse, allowing the water to drain from the fingertips. Repeat step 4. Rationale: Repeating the washing procedure will ensure the removal of any residual organic matter. 6. Action: Turn off the water. 7. Action: Dry hands thoroughly with paper towels. This should be done as often as possible during the working day as it helps to reduce the spread of pathogens between patients and around the hospital environment. Research shows that regular hand washing significantly reduces the risk of nosocomial infections (WHO 2009). 1. Action: Remove all rings and watches and roll up your sleeves. Rationale: Dirt and microorganisms may accumulate under rings or watch straps. 2. Action: Apply 3–5 ml of alcohol rub to your right or left palm (Fig. 7.1). Rationale: Sterilizing alcohol is widely available in many forms. 3. Action: Rub the palms of your hands together using a minimum of 3 strokes. Rationale: To ensure that the rub is well spread. 4. Action: Rub your right palm over the back of your left hand using a minimum of 3 strokes. Rationale: To clean the back of your left hand. 5. Action: Rub your left palm over the back of your right hand using a minimum of 3 strokes. Rationale: To clean the back of your right hand. 6. Action: Interlace your fingers and rub the palms together using a minimum of 3 strokes. Rationale: To clean the interdigital spaces and the palms. 7. Action: Clasp your fingers to rub the backs of your fingers using a minimum of 3 strokes. Rationale: To clean the backs of your fingers. 8. Action: Rotationally rub the left thumb with the right palm using a minimum of 3 strokes. Rationale: To clean the left thumb. 9. Action: Rotationally rub the right thumb with the left palm using a minimum of 3 strokes. Rationale: To clean the right thumb. 10. Action: With the left finger tips rub the palm of your right hand using a minimum of 3 strokes. Rationale: To clean the tips of the left fingers. 11. Action: With your right finger tips rub the palm of your left hand using a minimum of 3 strokes. Rationale: To clean the tips of the right fingers. 12. Action: Air dry your hands or ensure that your hands are dried before continuing to do anything else.
Theatre practice
INTRODUCTION
STERILIZATION
HOT-AIR OVEN
Item
Temperature (°C)
Time (min)
Glassware and non-cutting instruments
180
60
Powders and oils
160
120
Sharp cutting instruments
150
180
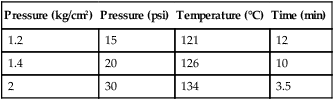
AUTOCLAVE
Pressure (kg/cm2)
Pressure (psi)
Temperature (°C)
Time (min)
1.2
15
121
12
1.4
20
126
10
2
30
134
3.5
ETHYLENE OXIDE
Procedure: Use of the ethylene oxide sterilizer
MONITORING THE EFFICACY OF STERILIZATION
Method
Description
Use
Chemical indicator strips
Paper strips which change colour when the correct temperature and time have been reached. They are placed in the centre of the pack prior to sterilization
Autoclave – select the correct strip for the cycle
Ethylene oxide
Browne’s tubes
Small glass tubes filled with an orange liquid which turns green when the correct temperature is reached and maintained for the correct time
Autoclave
Hot-air oven
Bowie-Dick indicator tape
A beige tape impregnated with chemical stripes that change to black when the correct temperature has been reached (121 °C). It does not indicate that the pack has been exposed for the correct time; therefore it is not a reliable method
Autoclave
Ethylene oxide tape
As above, only the tape is green with lines that change to red on exposure to ethylene oxide
Ethylene oxide
Spore strips
Strips of paper impregnated with spores (usually Bacillus stearothermophilius) are placed in the load. After sterilization, they are cultured for 72 hours. Provided that sterilization has been achieved, no growth will be visible. This is an accurate method, although the delay in obtaining the results is a major disadvantage
Autoclave
Ethylene oxide
Hot-air oven
Thermocouples
Electrical leads with temperature-sensitive tips which are placed in the autoclave with the leads passed out and attached to a recording device. The temperature is checked throughout the cycle and the results are recorded
Autoclave
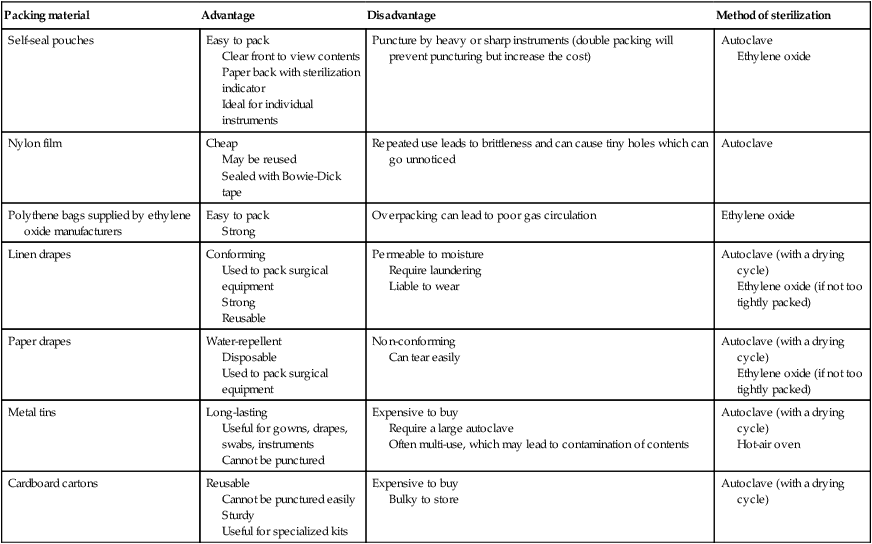
PACKING MATERIALS FOR STERILIZATION
Packing material
Advantage
Disadvantage
Method of sterilization
Self-seal pouches
Easy to pack
Clear front to view contents
Paper back with sterilization indicator
Ideal for individual instruments
Puncture by heavy or sharp instruments (double packing will prevent puncturing but increase the cost)
Autoclave
Ethylene oxide
Nylon film
Cheap
May be reused
Sealed with Bowie-Dick tape
Repeated use leads to brittleness and can cause tiny holes which can go unnoticed
Autoclave
Polythene bags supplied by ethylene oxide manufacturers
Easy to pack
Strong
Overpacking can lead to poor gas circulation
Ethylene oxide
Linen drapes
Conforming
Used to pack surgical equipment
Strong
Reusable
Permeable to moisture
Require laundering
Liable to wear
Autoclave (with a drying cycle)
Ethylene oxide (if not too tightly packed)
Paper drapes
Water-repellent
Disposable
Used to pack surgical equipment
Non-conforming
Can tear easily
Autoclave (with a drying cycle)
Ethylene oxide (if not too tightly packed)
Metal tins
Long-lasting
Useful for gowns, drapes, swabs, instruments
Cannot be punctured
Expensive to buy
Require a large autoclave
Often multi-use, which may lead to contamination of contents
Autoclave (with a drying cycle)
Hot-air oven
Cardboard cartons
Reusable
Cannot be punctured easily
Sturdy
Useful for specialized kits
Expensive to buy
Bulky to store
Autoclave (with a drying cycle)
Procedure: Packing an item for sterilization
MAINTAINING THE THEATRE ENVIRONMENT
Action
Rationale
1. The least number of people should be present and movement kept to a minimum
1. Any movement will increase the risk of wound contamination by airborne particles
2. Personnel must wear the correct theatre attire at all times
2. This will avoid contamination from clothing, skin and hair
3. Clip and disinfect the patient away from the theatre
3. Hair and debris would contaminate the theatre
4. Use a new set of instruments for each surgical procedure
4. Cross-contamination between patients must be avoided
5. Carry out ‘clean’ operations before contaminated procedures
5. Contamination from high-risk procedures should then not occur
6. Discard any instrument that becomes contaminated
6. The remaining surgical instruments must remain aseptic
7. If asepsis is broken by any member of the surgical team it must be rectified
7. Further contamination can then be avoided
Procedure: Daily cleaning routine
Procedure: Weekly cleaning routine
HAND CLEANING
Procedure: General hand-washing routine
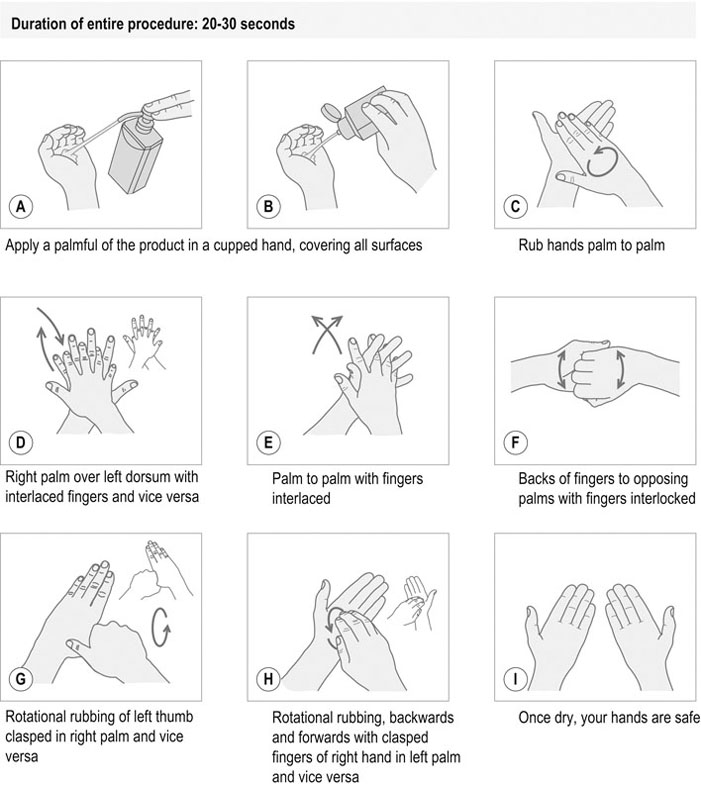
Procedure: Routine hand hygiene using an alcohol-based rub (based on the World Health Organization (WHO) guidelines)
![]()
Stay updated, free articles. Join our Telegram channel

Full access? Get Clinical Tree


