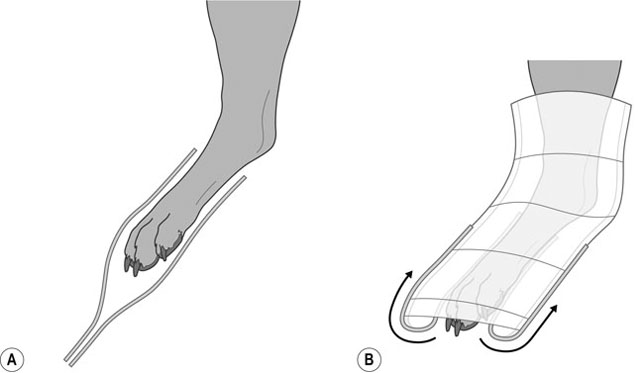
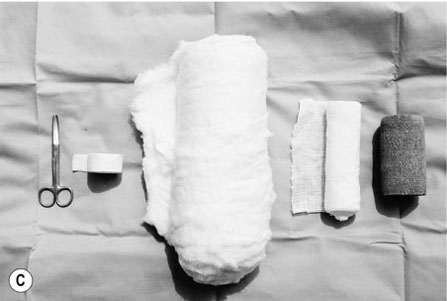
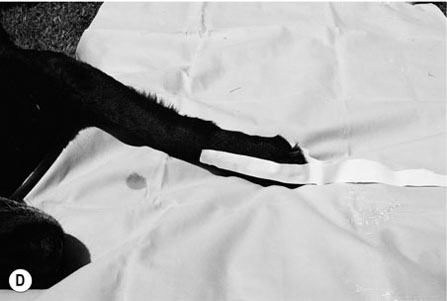
1. Action: Place the animal in a comfortable position on a table. Rationale: If the animal feels uncomfortable it will try to escape. 2. Action: Ask an assistant to restrain the animal so that it is relaxed but secure and the wound is accessible for treatment. 3. Action: Wash your hands with a surgical scrub using the technique recommended by the World Health Organization (as described in Chapter 7 and shown in Fig. 7.1). Rationale: It is important not to introduce infection into the wound. 4. Action: Control any haemorrhage. (See Control of haemorrhage procedure in Chapter 9.) Rationale: Any bleeding should be controlled as a large loss of blood may cause shock. 5. Action: Check for signs of shock and treat. (See Treatment of shock procedure in Chapter 9.) Rationale: If left untreated the animal’s condition will deteriorate. 6. Action: Assess the type of wound and treat accordingly (Table 8.1). Table 8.1 7. Action: For open wounds, fill wound with a sterile lubricant and clip hair away from around the wound. 8. Action: Clean the area surrounding the wound with a surgical scrub and warm water. Clean the wound by lavage with warm, sterile saline in a 20 ml syringe with a 19G needle. Continue until all debris has been flushed away. 9. Action: Assess the blood supply to the wound. If necessary, debride the wound using a scalpel blade to remove necrotic tissue and restore blood supply. 10. Action: Close the wound if necessary (Table 8.1). Suturing techniques are covered later in this chapter. 11. Action: Apply a light dry dressing to first-intention wounds. A primary layer of absorbent padding followed by a secondary conforming and a cohesive tertiary layer may be applied for protection (Tables 8.2 and 8.3). Table 8.2 MRSA, meticillin-resistant Staphylococcus aureus. Table 8.3 12. Action: For second-intention open wounds repeated dressing and debridement are necessary until the wound heals. Initially wet-to-dry dressings may be indicated to debride and then promote a healthy granulation bed. These dressings require changing at least once a day. Once granulation has occurred then change the dressings to non-stick dressings. A primary layer of absorbent padding followed by secondary conforming and cohesive tertiary layers may be applied for protection (see Individual bandaging techniques). 13. Action: Ensure that the dressing is comfortable and that the patient will not interfere with it. 14. Action: Explain the aftercare of the wound and dressing to the owner. 1. Action: Prepare all equipment necessary for the type of bandage. Rationale: This will save time and allow you to complete the bandage without leaving the animal. 2. Action: Place the animal in a comfortable position on a table. Rationale: If the animal feels uncomfortable it will try to escape. 3. Action: Ask an assistant to restrain the animal so that it is relaxed but secure, and the area for bandaging is accessible. 4. Action: Apply a primary dressing to any wounds (Table 8.2). 5. Action: Apply the bandage. Wherever possible, apply the bandage in a ‘reverse wind’ method. Rationale: This will create a more even tension. 6. Action: Ensure that the bandage is comfortable and that the patient cannot interfere with it. 7. Action: Explain the aftercare of the wound and dressing to the owner. 1. Action: Apply two strips of 2.5 cm-wide zinc oxide tape to the cranial and caudal aspect of the lower third of the limb. Allow another 10 cm of tape to overhang the toes, and gently stick together. Rationale: These strips will later be included in the bandage, and form the ‘stirrups’ (Fig. 8.1A).
Surgical nursing procedures
INTRODUCTION
Procedure: Wound management
Type
Comments
Treatment
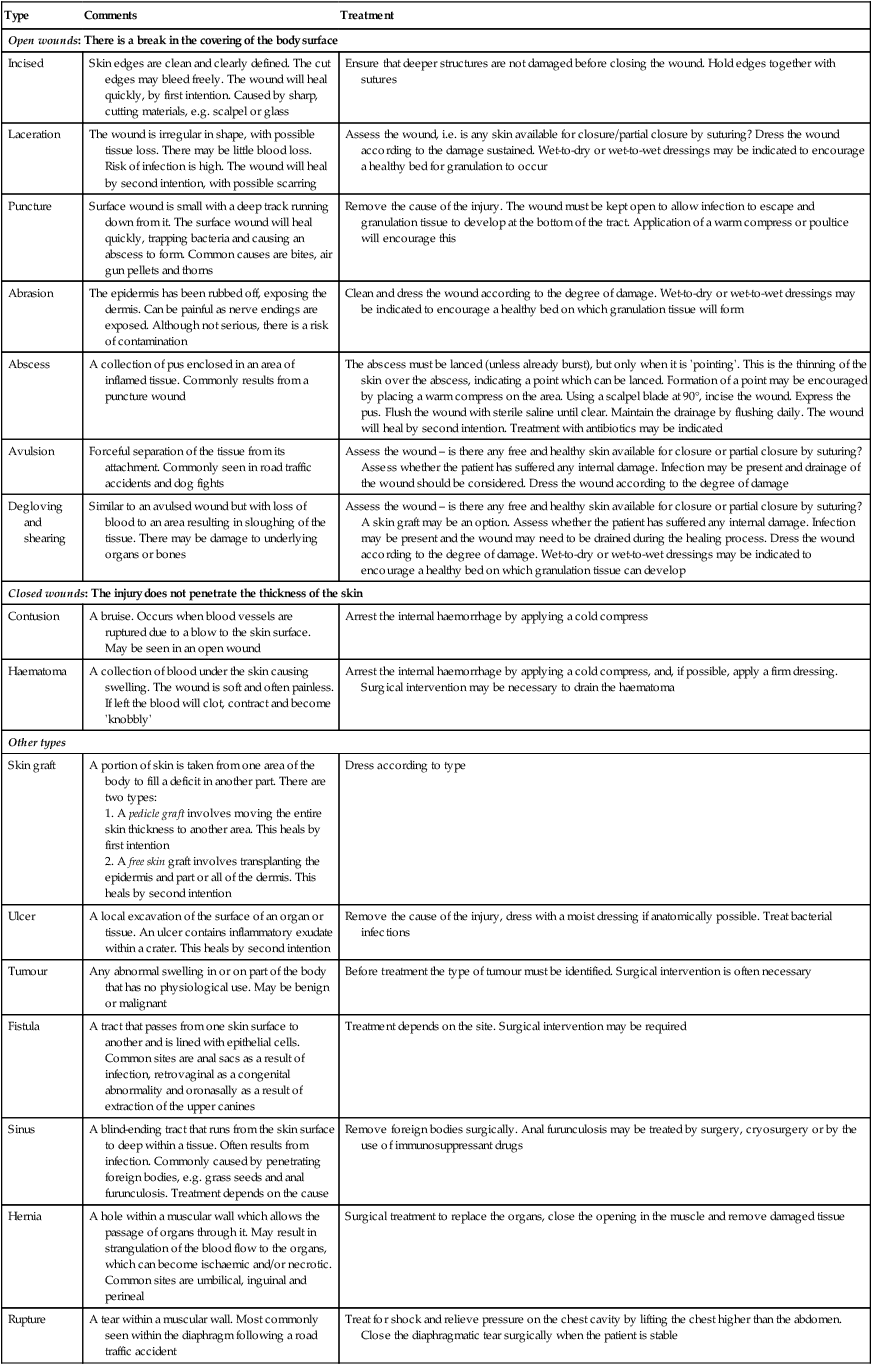
Open wounds: There is a break in the covering of the body surface
Incised
Skin edges are clean and clearly defined. The cut edges may bleed freely. The wound will heal quickly, by first intention. Caused by sharp, cutting materials, e.g. scalpel or glass
Ensure that deeper structures are not damaged before closing the wound. Hold edges together with sutures
Laceration
The wound is irregular in shape, with possible tissue loss. There may be little blood loss. Risk of infection is high. The wound will heal by second intention, with possible scarring
Assess the wound, i.e. is any skin available for closure/partial closure by suturing? Dress the wound according to the damage sustained. Wet-to-dry or wet-to-wet dressings may be indicated to encourage a healthy bed for granulation to occur
Puncture
Surface wound is small with a deep track running down from it. The surface wound will heal quickly, trapping bacteria and causing an abscess to form. Common causes are bites, air gun pellets and thorns
Remove the cause of the injury. The wound must be kept open to allow infection to escape and granulation tissue to develop at the bottom of the tract. Application of a warm compress or poultice will encourage this
Abrasion
The epidermis has been rubbed off, exposing the dermis. Can be painful as nerve endings are exposed. Although not serious, there is a risk of contamination
Clean and dress the wound according to the degree of damage. Wet-to-dry or wet-to-wet dressings may be indicated to encourage a healthy bed on which granulation tissue will form
Abscess
A collection of pus enclosed in an area of inflamed tissue. Commonly results from a puncture wound
The abscess must be lanced (unless already burst), but only when it is ‘pointing’. This is the thinning of the skin over the abscess, indicating a point which can be lanced. Formation of a point may be encouraged by placing a warm compress on the area. Using a scalpel blade at 90°, incise the wound. Express the pus. Flush the wound with sterile saline until clear. Maintain the drainage by flushing daily. The wound will heal by second intention. Treatment with antibiotics may be indicated
Avulsion
Forceful separation of the tissue from its attachment. Commonly seen in road traffic accidents and dog fights
Assess the wound – is there any free and healthy skin available for closure or partial closure by suturing? Assess whether the patient has suffered any internal damage. Infection may be present and drainage of the wound should be considered. Dress the wound according to the degree of damage
Degloving and shearing
Similar to an avulsed wound but with loss of blood to an area resulting in sloughing of the tissue. There may be damage to underlying organs or bones
Assess the wound – is there any free and healthy skin available for closure or partial closure by suturing? A skin graft may be an option. Assess whether the patient has suffered any internal damage. Infection may be present and the wound may need to be drained during the healing process. Dress the wound according to the degree of damage. Wet-to-dry or wet-to-wet dressings may be indicated to encourage a healthy bed on which granulation tissue can develop
Closed wounds: The injury does not penetrate the thickness of the skin
Contusion
A bruise. Occurs when blood vessels are ruptured due to a blow to the skin surface. May be seen in an open wound
Arrest the internal haemorrhage by applying a cold compress
Haematoma
A collection of blood under the skin causing swelling. The wound is soft and often painless. If left the blood will clot, contract and become ‘knobbly’
Arrest the internal haemorrhage by applying a cold compress, and, if possible, apply a firm dressing. Surgical intervention may be necessary to drain the haematoma
Other types
Skin graft
A portion of skin is taken from one area of the body to fill a deficit in another part. There are two types:
1. A pedicle graft involves moving the entire skin thickness to another area. This heals by first intention
2. A free skin graft involves transplanting the epidermis and part or all of the dermis. This heals by second intention
Dress according to type
Ulcer
A local excavation of the surface of an organ or tissue. An ulcer contains inflammatory exudate within a crater. This heals by second intention
Remove the cause of the injury, dress with a moist dressing if anatomically possible. Treat bacterial infections
Tumour
Any abnormal swelling in or on part of the body that has no physiological use. May be benign or malignant
Before treatment the type of tumour must be identified. Surgical intervention is often necessary
Fistula
A tract that passes from one skin surface to another and is lined with epithelial cells. Common sites are anal sacs as a result of infection, retrovaginal as a congenital abnormality and oronasally as a result of extraction of the upper canines
Treatment depends on the site. Surgical intervention may be required
Sinus
A blind-ending tract that runs from the skin surface to deep within a tissue. Often results from infection. Commonly caused by penetrating foreign bodies, e.g. grass seeds and anal furunculosis. Treatment depends on the cause
Remove foreign bodies surgically. Anal furunculosis may be treated by surgery, cryosurgery or by the use of immunosuppressant drugs
Hernia
A hole within a muscular wall which allows the passage of organs through it. May result in strangulation of the blood flow to the organs, which can become ischaemic and/or necrotic. Common sites are umbilical, inguinal and perineal
Surgical treatment to replace the organs, close the opening in the muscle and remove damaged tissue
Rupture
A tear within a muscular wall. Most commonly seen within the diaphragm following a road traffic accident
Treat for shock and relieve pressure on the chest cavity by lifting the chest higher than the abdomen. Close the diaphragmatic tear surgically when the patient is stable
Type
Comments
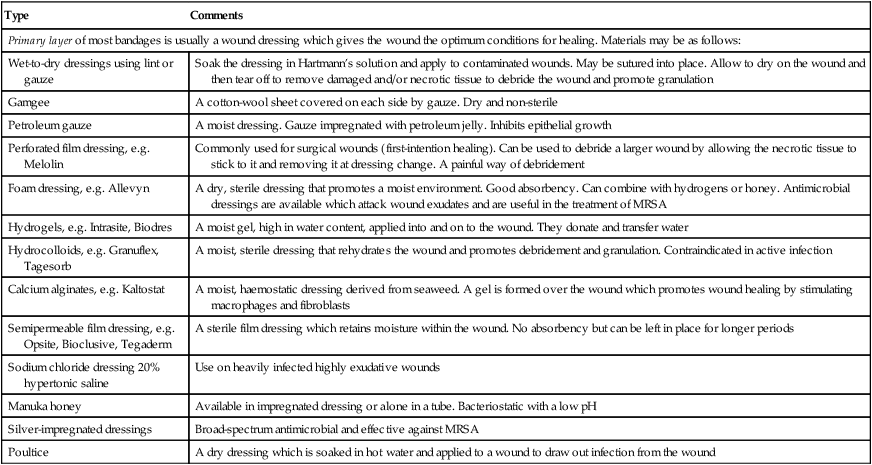
Primary layer of most bandages is usually a wound dressing which gives the wound the optimum conditions for healing. Materials may be as follows:
Wet-to-dry dressings using lint or gauze
Soak the dressing in Hartmann’s solution and apply to contaminated wounds. May be sutured into place. Allow to dry on the wound and then tear off to remove damaged and/or necrotic tissue to debride the wound and promote granulation
Gamgee
A cotton-wool sheet covered on each side by gauze. Dry and non-sterile
Petroleum gauze
A moist dressing. Gauze impregnated with petroleum jelly. Inhibits epithelial growth
Perforated film dressing, e.g. Melolin
Commonly used for surgical wounds (first-intention healing). Can be used to debride a larger wound by allowing the necrotic tissue to stick to it and removing it at dressing change. A painful way of debridement
Foam dressing, e.g. Allevyn
A dry, sterile dressing that promotes a moist environment. Good absorbency. Can combine with hydrogens or honey. Antimicrobial dressings are available which attack wound exudates and are useful in the treatment of MRSA
Hydrogels, e.g. Intrasite, Biodres
A moist gel, high in water content, applied into and on to the wound. They donate and transfer water
Hydrocolloids, e.g. Granuflex, Tagesorb
A moist, sterile dressing that rehydrates the wound and promotes debridement and granulation. Contraindicated in active infection
Calcium alginates, e.g. Kaltostat
A moist, haemostatic dressing derived from seaweed. A gel is formed over the wound which promotes wound healing by stimulating macrophages and fibroblasts
Semipermeable film dressing, e.g. Opsite, Bioclusive, Tegaderm
A sterile film dressing which retains moisture within the wound. No absorbency but can be left in place for longer periods
Sodium chloride dressing 20% hypertonic saline
Use on heavily infected highly exudative wounds
Manuka honey
Available in impregnated dressing or alone in a tube. Bacteriostatic with a low pH
Silver-impregnated dressings
Broad-spectrum antimicrobial and effective against MRSA
Poultice
A dry dressing which is soaked in hot water and applied to a wound to draw out infection from the wound
Type
Indications
Comments
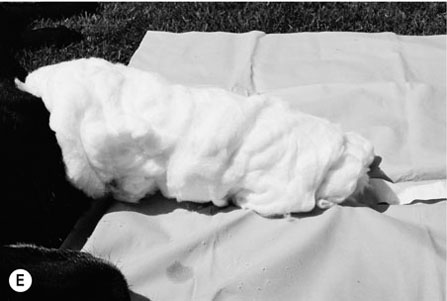
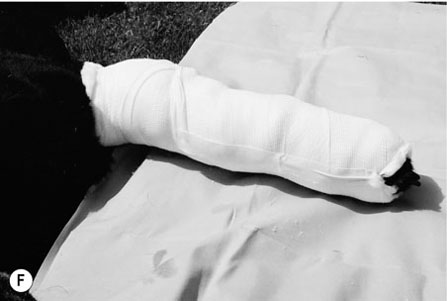
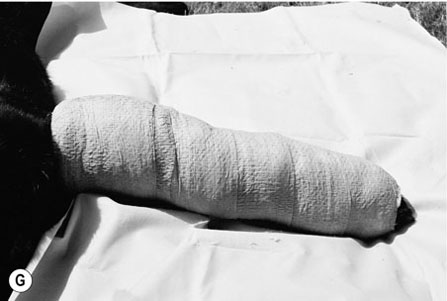
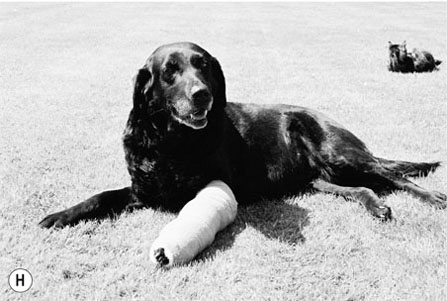
Robert Jones
Support and immobilization of fore- and hindlimbs, commonly used in fractures. Reduction of pain, oedema and haemorrhage (Fig. 8.1)
A light but firm cylindrical bandage
Velpeau sling
Support and immobilization of the shoulder joint following luxation or surgery (Fig. 8.2)
Ehmer sling
Support and immobilization of the hip, following reduction of a luxation (Fig. 8.3)
Ear
Support and protection of the ear following trauma, or post-operatively following resection or haematoma (Fig. 8.4)
One or both ears can be included. Ensure that the ear position is marked with a pen
Chest
Support and protection of wounds and dressings. Useful for holding chest drains in place (Fig. 8.5)
Limb
Support and protection of wounds, reduction of pain, swelling and movement (Fig. 8.6)
Ensure toes and dewclaws are padded. Work from distal to proximal. Include the whole foot and joint above the injury
Tail
Protection of wounds from environmental trauma and/or self-mutilation (Fig. 8.7)
Elastoplast may be applied directly to the hair to prevent this bandage from slipping
Ring
Indicated where there is a foreign body protruding from a wound. A ring bandage protects the wound while preventing further penetration by the object. Usually used in a ‘first aid’ situation
Ready-made rings can be obtained. To make a ring wind conforming bandage around your hand five times (size of ring depends on area of wound to be covered). Remove carefully, maintaining the ring shape and with the same bandage wind it around the ring, creating a bound circle like a doughnut. Continue until you have the desired size and shape (Fig. 8.8)
Splint
Immobilization of an injury below the elbow or stifle
Limited to lower limbs. Immobilization cannot be achieved above the elbow and stifle due to the large mass of muscle that surrounds the bones. Application is often painful for the patient and therefore limited to a first aid procedure.
Common splints used in practice:
Gutter splints – made of hard plastic, lined with foam and snap off to the correct length
Zimmer splints – made of pliable aluminium backed in a foam composite
Cast
Immobilization of a limb
Common cast material:
Plaster of Paris – bandage covered in gypsum (calcium sulphate) that sets hard when water is added.
Polyurethane-based and thermoplastic materials – lightweight, waterproof, short drying time and more radiolucent than plaster of Paris
Procedure: Bandaging techniques – general points
INDIVIDUAL BANDAGING TECHNIQUES (TABLE 8.3)
Procedure: Robert Jones bandage
![]()
Stay updated, free articles. Join our Telegram channel

Full access? Get Clinical Tree


