Radiology Equipment and Positioning Techniques

Chapter 1 Radiology Equipment and Positioning Techniques


RADIOGRAPHIC EQUIPMENT


The x-ray generator should be capable of 5.0 to 7.5 milliampere second (mAs) exposures, have a range of 40 to 100 kilovoltage peak (kVp), and be adjustable in 1- to 2-kVp increments. Rapid exposure times (i.e., 0.017 of a second and faster) should be possible to minimize patient motion artifact.


Most diagnostic x-ray tubes have small and large focal spots. Whenever possible, the small focal spot is selected because it produces radiographic images of superior detail. The disadvantage of the small focal spot is a lower milliampere capacity compared with the large focal spot, therefore requiring longer exposure times for equivalent milliampere second techniques. The small focal spot is also more prone to thermal damage associated with x-ray production. The height of the x-ray tube on the tube stand should be adjustable because it may be necessary to make small changes in the focal spot to film distance (FFD) to manipulate the exposure technique. The FFD used to produce the radiographic images in this text ranged from 38 inches (97 cm) to 40 inches (102 cm), except for the magnification studies. An Innovet Select 20kHz High Frequency Radiographic Machine (Summit Industries, Inc., Chicago, Ill. 60625) was used to produce the radiographic images in this book. Although the animals in this text are relatively small in body size compared to more traditional small animal veterinary patients (e.g., dogs and cats), an x-ray generator, an x-ray tube, and a tube stand with the aforementioned capabilities would offer maximal flexibility and are standard in most small animal veterinary clinics.


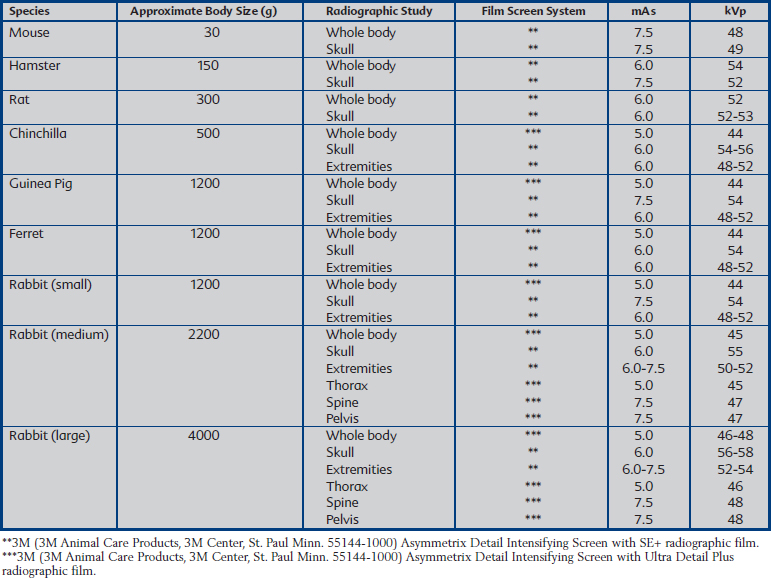
Asymetrix Detail Intensifying Screens (3M Animal Care Products, 3M Center, St. Paul, Minn. 55144-1000) and Ultra Detail Plus or SE+ radiographic film (3M Animal Care Products) were used to produce the radiographic images in this book. This film–screen combination produced a radiographic system speed of 100 to 350. Other film–screen combinations of similar speed and resolution could be used. Table 1-1 summarizes radiographic exposure factors used for creating this text’s radiographic images using the table-top technique. These settings are intended to be guidelines and may require modification depending on the x-ray generator, film–screen combination, radiographic film processing, and patient size.


PATIENT POSITIONING


Imaging the animals included in this text can be challenging because of their resistance to restraint, small body size, relatively short extremities, and body conformation. It is often difficult to palpate anatomic landmarks because of thick subcutaneous adipose layers and luxuriant hair coats. Correct patient positioning is often achieved using visual anatomic landmarks rather than palpation.


Optimal image detail is obtained by performing studieson anesthetized or sedated patients. Anesthesia or sedation facilitates safe and accurate patient positioning and decreases patient motion artifact. All studies in this text were performed on anesthetized or sedated patients.


Important factors in patient positioning are symmetry and stabilization of the subject. Small pieces of radiolucent foam are occasionally used to aid positioning. Radiolucent paper masking tape is ideal for securing the patient’s extremities. Weighted objects (e.g., sandbags) for extending and placing traction on the extremities are not as useful for the smaller patients because of their short limb length and the failure of weighted objects to conform to their extremities. Therefore smaller patients are secured directly on the cassette with tape. The extremities of larger patients may require more traction to prevent their limbs from obscuring the thorax and abdomen; therefore circumferentially wrapping their extremities with tape before the tape is secured to the cassette or table may be necessary. The following are brief descriptions of recommended positioning techniques.


POSITIONING TECHNIQUE FOR LATERAL RADIOGRAPHIC STUDIES OF THE WHOLE BODY, THORAX, AND ABDOMEN


The patient is placed on the cassette in lateral recumbency. The right lateral recumbent position is standard. The dependent limbs are fully extended, minimizing superimposition on the thorax and abdomen, and secured with tape to the cassette or table in a lateral position. The contralateral limbs are superimposed and similarly secured. The head is fixed in a straight lateral position by gently extending the neck and then securing the head and neck with tape onto the cassette or table. To optimize correct patient positioning, it is sometimes necessary to make minor positional adjustments to the head or extremities by placing small pieces of radiolucent foam under the nose or between the limbs. The tail is extended caudally and taped if necessary (Figures 1-1 to 1-3).


May 27, 2016 | Posted by in ANIMAL RADIOLOGY | Comments Off on Radiology Equipment and Positioning Techniques

Full access? Get Clinical Tree

Get Clinical Tree app for offline access