The first portal is made at the dorsal margin of the internal abdominal oblique muscle (mid tuber coxae level) midway between the last rib and the tuber coxae. After a 1.5-cm stab incision is made, a 10-mm-diameter, 20-cm-long trocar-cannula unit with a conical blunt obturator (Optomed Endoscopy, Courtaboeuf Cedex, France) is inserted into the abdomen slightly angled to the opposite stifle until perforation of the peritoneum is achieved. Aspiration of room air in the abdomen can often be heard because of the negative pressure normally present within the abdomen. On trocar removal, a 10-mm, 32-cm rigid 0° or 30° angled laparoscope is inserted through the cannula to check for proper intra-abdominal placement before CO2 insufflation is started. The abdomen is then insufflated with CO2 (6–8 L/min) with an intra-abdominal pressure cutoff level of 12 mmHg. The laparoscopic portal between the 17th and 18th ribs ±5 cm ventral to the ventral border of the tuber coxae is then made under direct visualization. This avoids accidental injury or perforation of the spleen. The laparoscope is then switched from the paralumbar position to the intercostal position, and the second instrument portal is made ±10 cm ventral to the first one. A 20-cm laparoscopic trocar-cannula unit (Optomed Endoscopy) is introduced through the instrument portals.
After observation of the ovarian pedicle, mepivacaine hydrochloride (2%, 15–20 mL) is administered into the mesovarium and mesosalpinx through the dorsal instrument portal using a laparoscopic injection needle (Optomed Endoscopy). The injection needle is removed and the ovary is grasped using a 10-mm claw grasping forceps (Optomed Endoscopy) placed through the lower instrument portal. Some pathologic ovaries are so large and heavy that lifting them and complete exposure of the ovary are not possible. Appropriate traction and some lifting will expose the proper ligament of the ovary and the uterine horn. A 10-mm LigaSure vessel-sealing and cutting electrosurgical instrument (Valley Lab, Boulder, CO) is introduced through the dorsal instrument portal. The LigaSure is placed across the cranial aspect of the mesovarium ±1 cm proximal to the ovary, and the mesovarium, mesosalpinx, and proper ligament are cauterized, incising in a cranial to caudal direction, taking care to avoid the uterus, until dissected completely free. LigaSure and some other electrosurgical instruments will first seal and then cut the tissue. The 10-mm LigaSure can only grasp relatively small tissue bites. This often requires separating the mesovarium in two planes to ensure proper coagulation and cutting. Other electrosurgical instruments will only seal the blood vessels and the cutting is performed using laparoscopic scissors. The latter is more time-consuming and requires continuously interchanging both instruments.
Dissection can also be started in the caudal to cranial direction starting with dividing the proper ligament, salpinx, and mesosalpinx. Gentle traction is applied to the grasping forceps to optimize visualization and access to those structures. This caudal to proximal approach is strongly recommended when not using bipolar or unipolar electrosurgical instruments to seal the blood vessels. It leaves the ovary attached to a smaller pedicle, which makes ligation of the pedicle much easier. A 5- to 8-metric vicryl suture is placed around the pedicle and an extracorporeal 4S modified Roeder knot is tied and advanced using a knot pusher (Shettko et al. 2004). If the pedicle is too wide, a small vertical incision can be made in the middle of the pedicle. This opening is then used to guide one suture around the cranial half and one around the caudal half of the pedicle. Both sutures are tied as described above using a slipknot. The advantages of using a small opening in the mesovarium and using a cranial and caudal ligature are easier placement of the suture with less slipping away, less tissue per ligature, and better hemostasis. The mesovarium is then cut distal to the ligature, making sure the large ovary is firmly grasped with a 10-mm claw forceps. Any residual hemorrhage from the pedicle can be controlled with the LigaSure or other electrosurgical equipment. Ligation with a small loop or laparoscopic vascular clips can be used if one has no access to electrosurgical instruments.
The free ovary is now suspended in the abdomen by the grasping forceps. If an ovary is large and heavy, elevating it clear of the intestines is impossible and only the top of the ovary is exposed.
Depending on ovary size, a number of techniques can be used to facilitate safe removal through the smallest possible skin incision.
For smaller solid ovaries (≤10 cm), the dorsal or ventral instrument portal can be extended ventrally to create a 5-cm skin incision. The external abdominal oblique, internal abdominal oblique, and transverse abdominal muscles are subsequently bluntly divided parallel to their fiber alignment using a grid technique (Figure 18.2). It is important that the opening in the peritoneum is sufficiently large to allow easy passage of the ovary without dropping it in the abdomen. This can be achieved with both index fingers or by using two blunt obturators in very large or fat mares. The ovary is positioned against the opening and grasped externally using large grasping or claw forceps. An assistant stretches the margins of the incision, while the surgeon twists and lifts the ovary using the large grasping or claw forceps and manipulates it through the small incision.
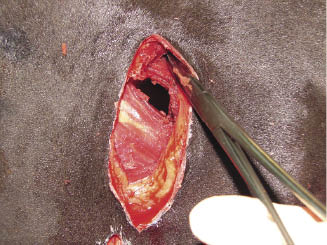
For larger ovaries (15–30 cm), the incision can be extended in a vertical plane connecting both instrument portals, creating a skin incision of ±10 cm.
A number of techniques can be used to reduce the size of larger ovaries before removal.
Aspiration of Fluid
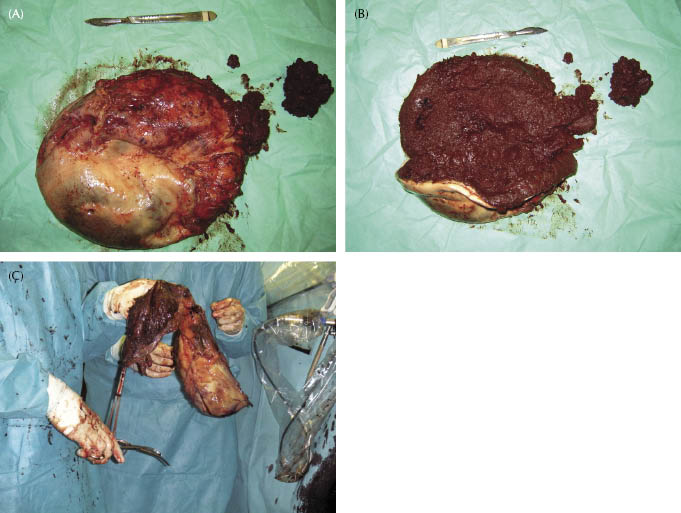
When intraovarian fluid is detected presurgically by ultrasonography, a cannula aspiration technique can be used to reduce the size (Figure 18.3). A 5- to 10-mm-diameter metal suction cannula with blunt trocar (Richard Wolf GmbH, Knittlingen, Germany) can be inserted through one of the instrument portals. In some cases, the blunt trocar can be pushed easily through the ovarian capsule; in other cases, a small incision in the ovarian capsule is made using laparoscopic scissors to facilitate entrance of the suction cannula. The cannula is connected to a sterile suction tube and all fluid pockets are aspirated. This might require several puncture sites. Aspiration of fluid can also be achieved at the start of the procedure before the dissection of the pedicle. In large cystic ovaries, several liters of fluid can be removed, leaving only an empty ovarian capsule intra-abdominally, which can easily be removed through a 3- to 5-cm skin incision (Figure 18.4). Long-standing ovarian hematomas are more difficult to empty completely by suction. The cannula and suction tube are often blocked with the very thick coagulated and digested blood, but suction will often decrease the size to ±50% (Figure 18.5A–C).
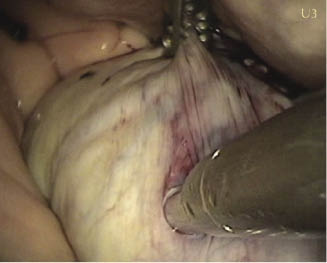
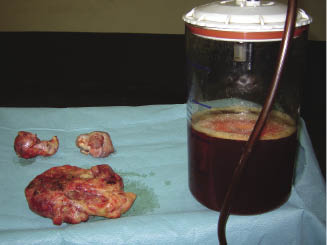
Figure 18.5 (A,B) Ovarian hematoma after removal and partial suction. (C) Ovarian hematoma removal after intra-abdominal suction.
Bagging the Ovary and Intra-Abdominal Dissection
For large solid mass ovaries that cannot be drained or ovaries that remain too big after fluid removal, intra-abdominal dissection within a strong retrieval bag is indicated. Commercial retrieval bags made of nylon can be used, providing the ovary is not larger than 15 cm (Super E-Sac, Espiner Medical Ltd, Bristol, UK). The nylon bag is introduced in the abdomen before dissecting the pedicle. The oviduct, mesosalpinx, and proper ligament can be cut previously to reduce the size of the pedicle. The bag is introduced in the abdomen through a 15-mm-diameter cannula and opened by pulling the colored tabs using 5-mm grasping forceps. The ovary is bagged and the bag is partially closed by pulling the wire drawstring. The pedicle is then cut as described above. The ovary is now ready for dissection.
For ovaries that are larger than 15 cm, a strong sterile plastic bag can be introduced intra-abdominally and the ovary manipulated into it, either by a hand-assisted intra-abdominal technique or by the use of grasping forceps. This requires enlarging one of the instrument portals. It is up to the surgeon’s preference which portal will be enlarged. Sterile disposable X-ray cassette covers can be used, but I use a strong plastic disposable instrument bag (one-section adhesive bag, 43 × 38 cm; Foliodrape® No. 258 322, Hartmann, Heidenheim, Germany).
Hand-assisted bagging of the ovary after dissecting the pedicle requires a surgeon with small hands if the skin incision does not exceed 10 cm in length. After sectioning the pedicle, the ovary is firmly grasped within the 10-mm claw grasping forceps. The skin at the proximal or distal instrument portal is enlarged and the underlying muscles are split in the fiber direction. The bag and one hand are introduced in the abdomen, and the plastic bag is positioned around the ovary. At that moment, visualization is poor, partially due to loss of pneumoperitoneum.
Bagging the enlarged ovary by the use of grasping forceps requires a smaller enlargement of one of the portals. Often, a third instrument portal is needed to open the plastic bag wide enough using grasping forceps to allow entrance of the ovary.
Non-hand-assisted bagging an enlarged ovary through a 5- to 10-cm enlarged instrument portal can be time-consuming, and the most difficult part is keeping the bag open so the ovary can be dropped into it.
For this reason, I developed a “polypropylene band plastic retrieval bag.” A 160-cm-long, 1-cm-wide, and 3-mm-thick polypropylene band is used in a loop fashion, and the adhesive edges of the bag (one-section adhesive bag, 43 × 38 cm; Foliodrape No. 258 322, Hartmann) are folded over the band so that it resembles a brailer bag (Figure 18.6A,B). The distal or proximal instrument portal is enlarged to 5–8 cm, and the polypropylene band retrieval bag is introduced in the abdomen after splitting the muscles as described above. Once in the abdomen, the polypropylene band will open the edges of the bag and the enlarged ovary can be positioned in the bag (Figure 18.7A–E). Once the ovary is bagged, the polypropylene band is pulled outside the abdomen and the edges of the bag are grasped with both hands (Figure 18.8). Bagging the ovary in this way is easier and less time-consuming. Large ovaries of 20–30 cm can be bagged through a relatively small (5–8 cm) flank incision.
Figure 18.6 (A) Open polyprop bag. (B) Closed polyprop bag.

Stay updated, free articles. Join our Telegram channel

Full access? Get Clinical Tree


